Setting up and leveling up your HomeLab - a comprehensive guide
I'm writing this homelab guide to share some of the things I've learned, so if you're starting out or looking for what to do next, perhaps you can grab an idea or two for your setup. I would always advise starting small, getting comfortable, and then deciding if you are ready for more.

I've been running some form of a homelab for a long time now. From the early days of broadband, hosting my own active directory and email servers, to where I'm at today (which is quite a bit better, btw). I find owning and operating my own equipment and services to be both fun and rewarding. If you think you're in the same camp, then you're in the right place. I'm writing this guide to share some of the things I've learned, so if you're starting out or looking for what to do next, perhaps you can grab an idea or two for your setup. I would always advise starting small, getting comfortable, and then deciding if you are ready for more.
Goals
I found it helpful first to identify what I was trying to accomplish. As a long-time software engineer, platform engineer, and engineering leader, I know certain practices and ideas have become second nature in the workplace. Ideas like the principle of least privilege and practices like Infrastructure as Code (IaC), Site Reliability Engineering (SRE), Automated Testing, and others can and probably should be applied to your personal production environment, your Home.
Better privacy
- I want better control over what data is collected about me and my family. This means first finding out what is being sent or tracked and then deciding what is acceptable and what isn't.
- I want an easy-to-configure "whole home" VPN for devices that either can't run a VPN locally or don't, along with an easy way to opt-out.
- I want to ditch my cloud cameras and move to cameras that operate locally, which will give me full control over my live feeds, recordings, and integrations.
Better security
- I want to isolate connected devices (IoT), such as smart speakers, smart appliances, thermostats, TVs, etc., from communicating with the other trusted devices on my network unless expressly allowed. If one of these devices, which I do not control, were to be compromised, I would like to minimize what a potential bad actor could access. This is often a best practice recommended by security professionals and even the FBI.
- I want to limit what guests can do on my network. Anyone who does not live here 24/7, does not need forever and unfettered access to my network. No more sharing the Wi-Fi password with extended family, friends, or house guests.
- I want a network firewall that offers packet inspection, intrusion prevention, and other security and network features not found in typical consumer wifi routers or the junk most ISPs give you.
Better remote access
- Once I set all of these services up, I want an easy way to access them. One of the first devices I purchased was a Synology NAS, which has been rock solid for me. There are a few ways to connect to it remotely, the main one being QuickConnect. I won't get into how it works, but it has and does work fine; however, I want one way to access everything, including my NAS.
- I want remote access to be simple and work on every device I own or have access to.
- I want to avoid traditional VPN servers with broad network access when accessing the individual app or service will suffice without compromising security.
Such simple goals—no problem! Now, let's take a look at some of the choices I made to accomplish these goals.
Network
It all starts here here and it is easier than you think
I've gone through many iterations over the years. My first "prosumer" router/firewall was a Sonicwall appliance. It was relatively easy to use, but was expensive, slow, and had subscription and add-on fees for more advanced features. Then I tried pfsense, and OPNsense, for a while, running on dedicated hardware, which is good but has a fairly high learning curve and had some strange limitations that ultimately caused me to move on to something else. Finally, I found the ubiquiti edgerouter, which was the perfect balance of cost and functionality...which eventually became unsupported in favor of the new, far superior, Unifi Dream Machine SE, which is where I'm at today. Here's some gear to consider then we'll get into some configuration.
- Dream Machine. This is the centerpiece and will manage the rest of your gear. If you have fiber, then go with the PRO series, as you'll want the IPS routing speed to be at or greater than your connection speed. I currently have a 2.5GPS fiber connection and Starlink as a backup, which my PRO SE more than handles. How many devices you buy and adopt are also a factor here, so consider your future growth plans and size accordingly. The Dream Router and Unifi Express are great options for smaller setups especially if you are space-constrained.
- Rack switching. There are so many things to consider here. I have a mix of 2.5GB, 1GB, 1GB PoE++, and 10GB network devices, spread across many floors, inside and outside. I started with a single PoE Pro series switch, which is still in use, and am currently expanding to the Pro Max switches with etherlighting. Given the investment, I would size up a bit if you can spend the money.
- Utility switching. I hard-wire everything I can. It's more reliable, not subject to (most) interference, and I like to make and run cables. I use a mix of the Flex (PoE++ powered & passthrough), Flex mini (PoE powered), Lite PoE (PoE+), and the new Ultra line. Overall, I prefer PoE powered and passthrough switches so that all of the power comes from the central rack, which is easier to manage in power outages and understand my overall power consumption.
- Wi-FI. The Unifi access points are powerful, so if your in a new-ish home, no need to overdo it, one or two access points will do. If, like me, you are in an old home with plaster and lathe, then you may need a lot more. I'm currently using a mix of the U6 gear and will likely leap to U7 gear at some point. Just know that U7, not only is it very new with little device support, but you'll also want 2.5G PoE uplinks and at least a 2.5G internet connection to really take advantage. If that is not you, then a U6 Pro or a U6 Long range are great starting points. If that doesn't cover it, then consider adding more coverage through smaller U6+ APs. If you can't hardwire and need to Mesh, then I love the U6 Mesh. I use two inside, where ceiling mounting is not an option (still use PoE, but not necessary), and one outside for backyard coverage. Always hardwire the backhaul if you can.
- Cameras. You've come this far, so why not go all in? The Protect cameras are amazing, as is the software. Most can be powered via PoE and are managed with your Dream Machine or if you're like me and want more storage retention and protection from drive failure, a dedicated NVR. My goal was to move away from cloud cameras, so this was an easy choice.
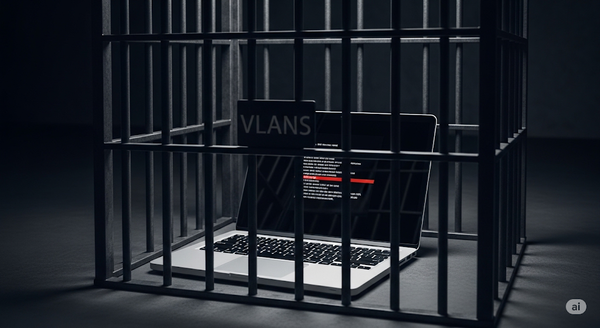
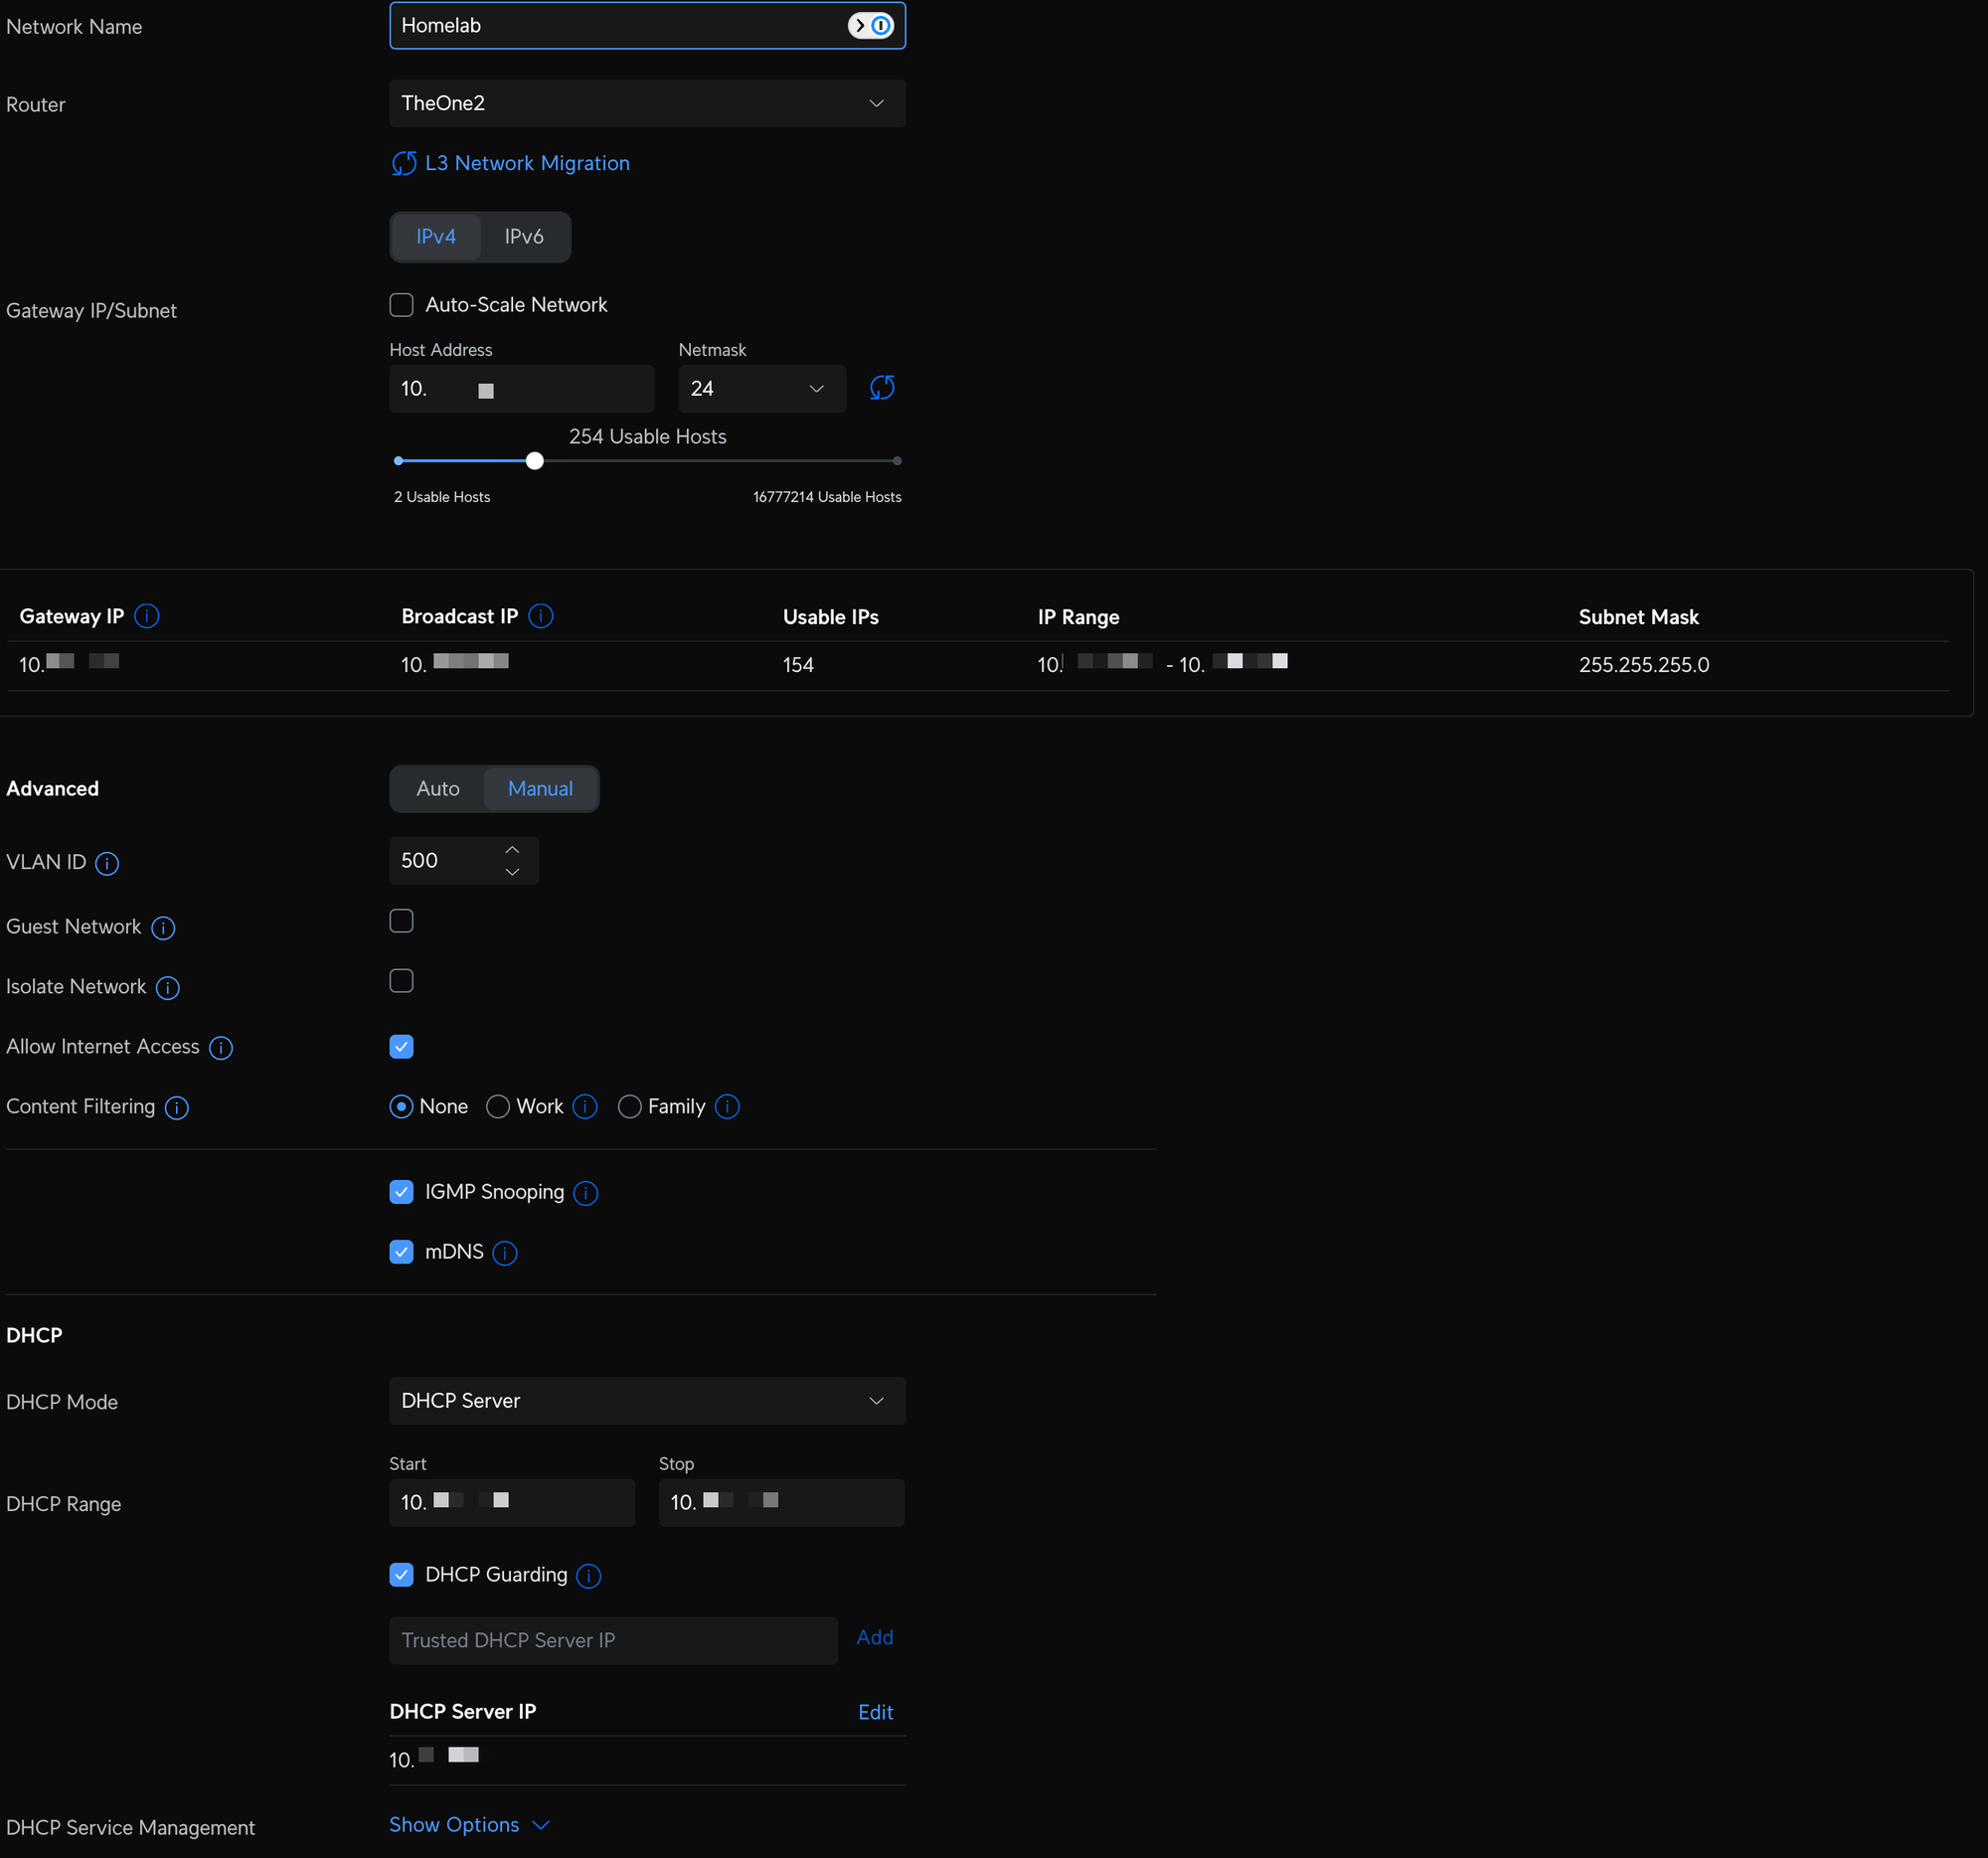
VLANS!
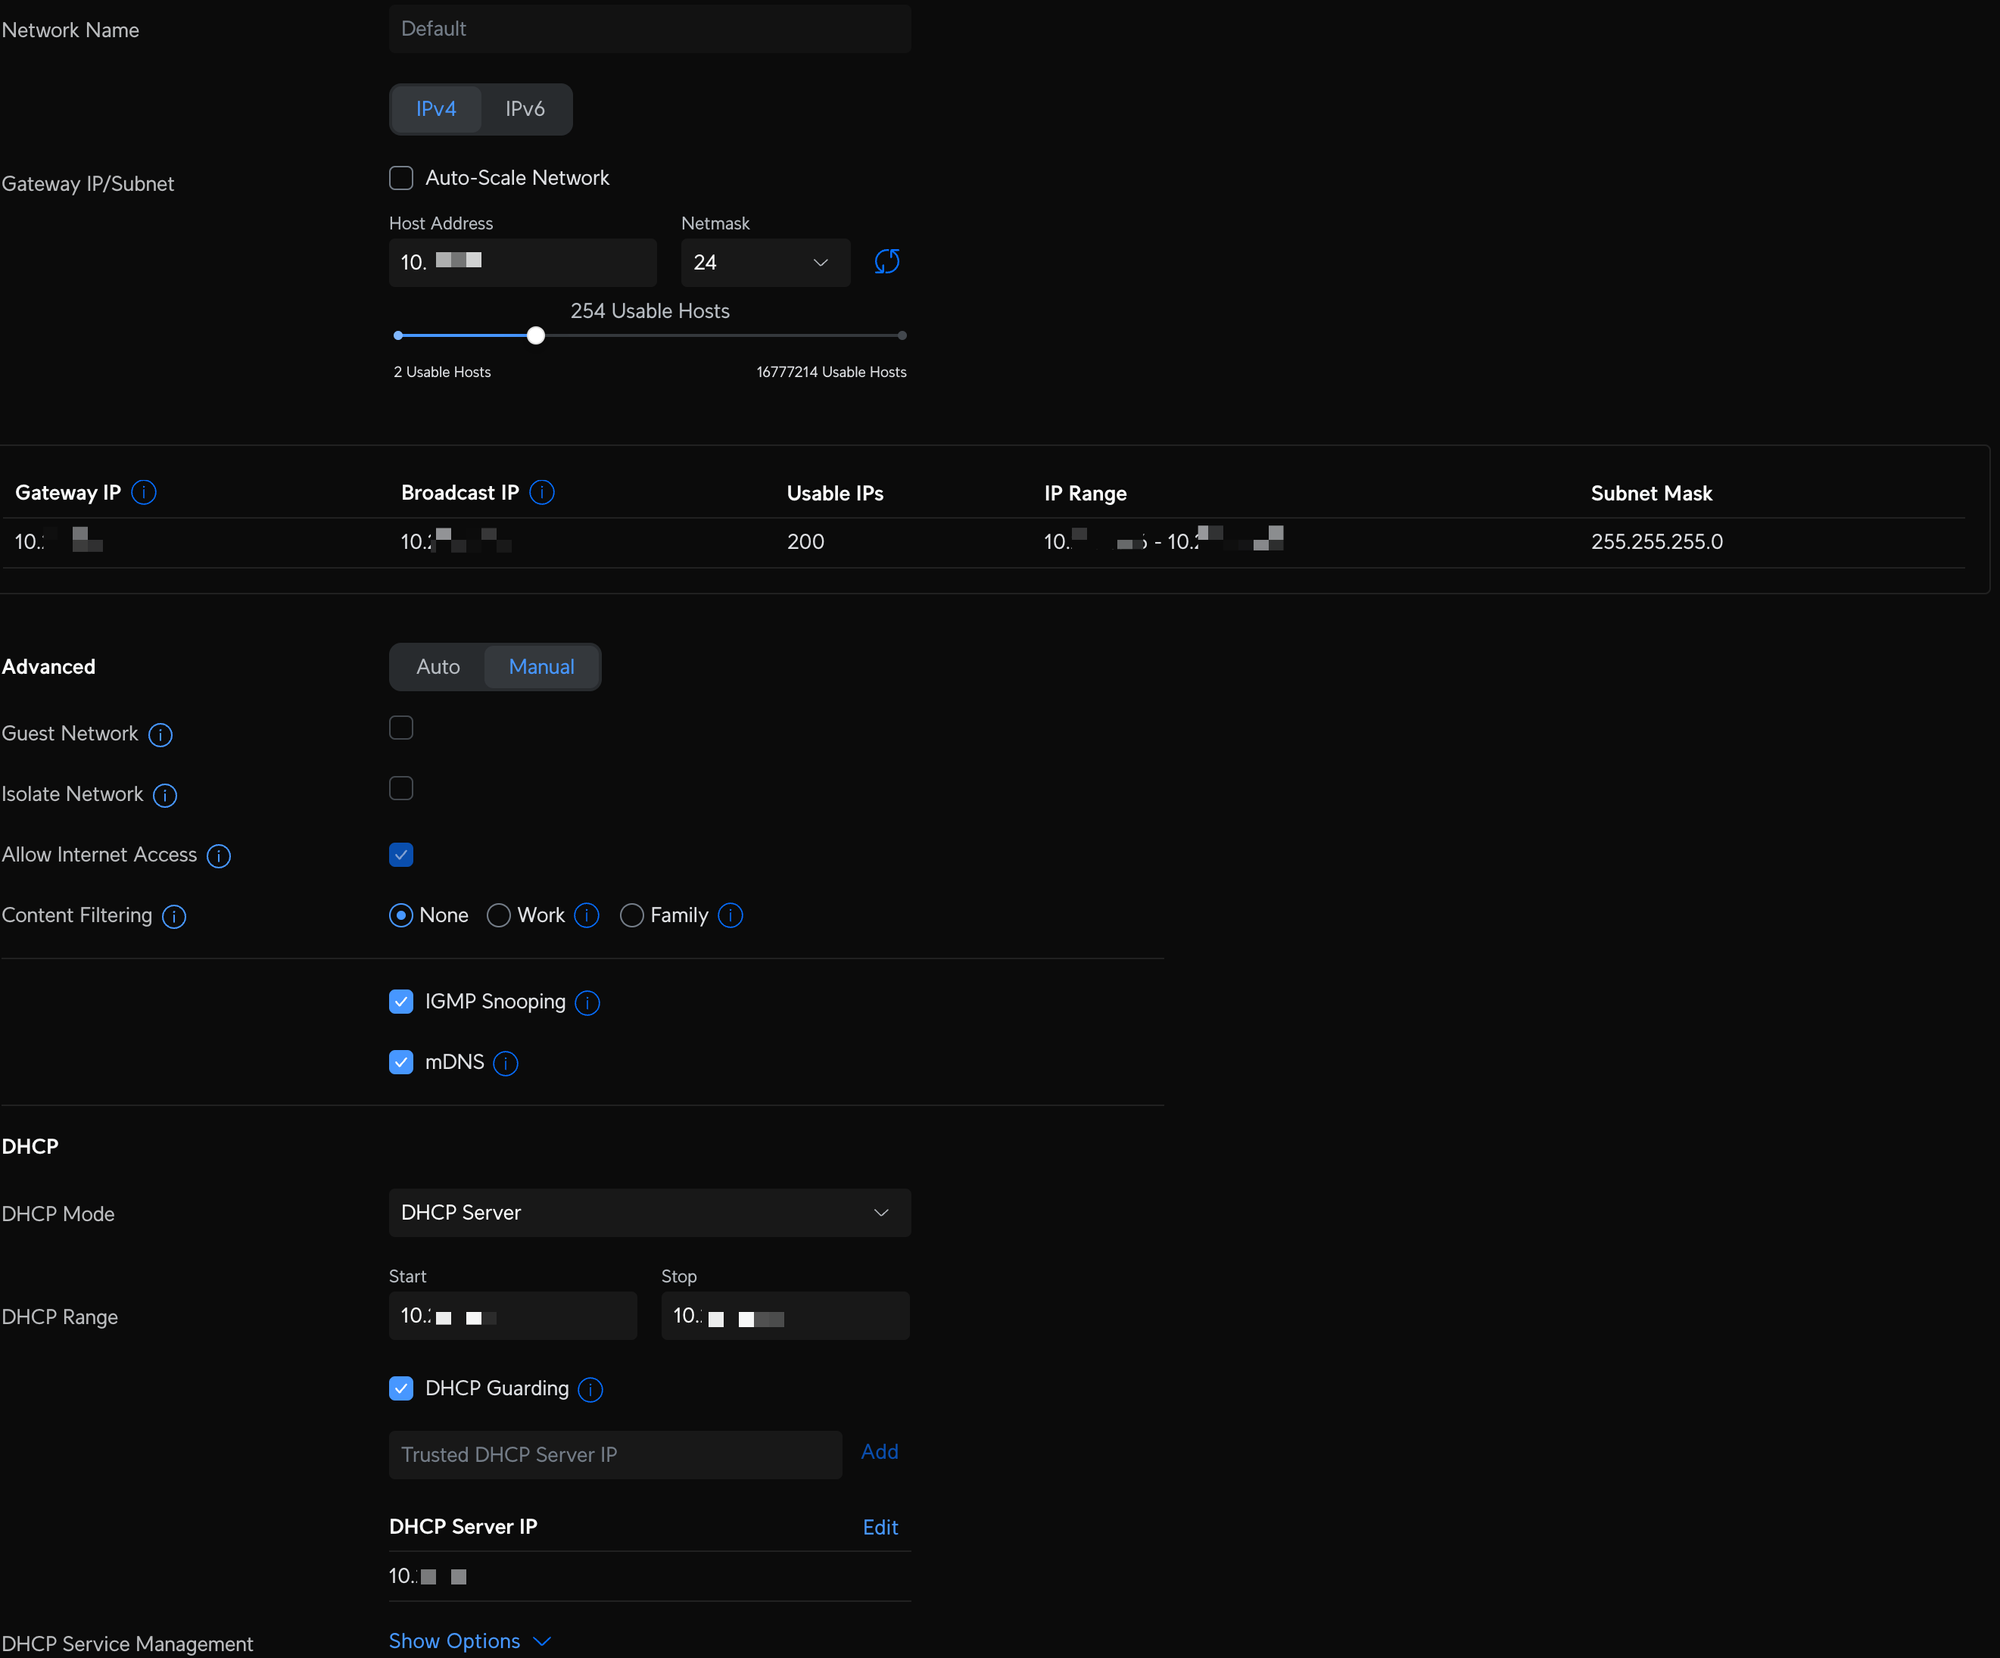
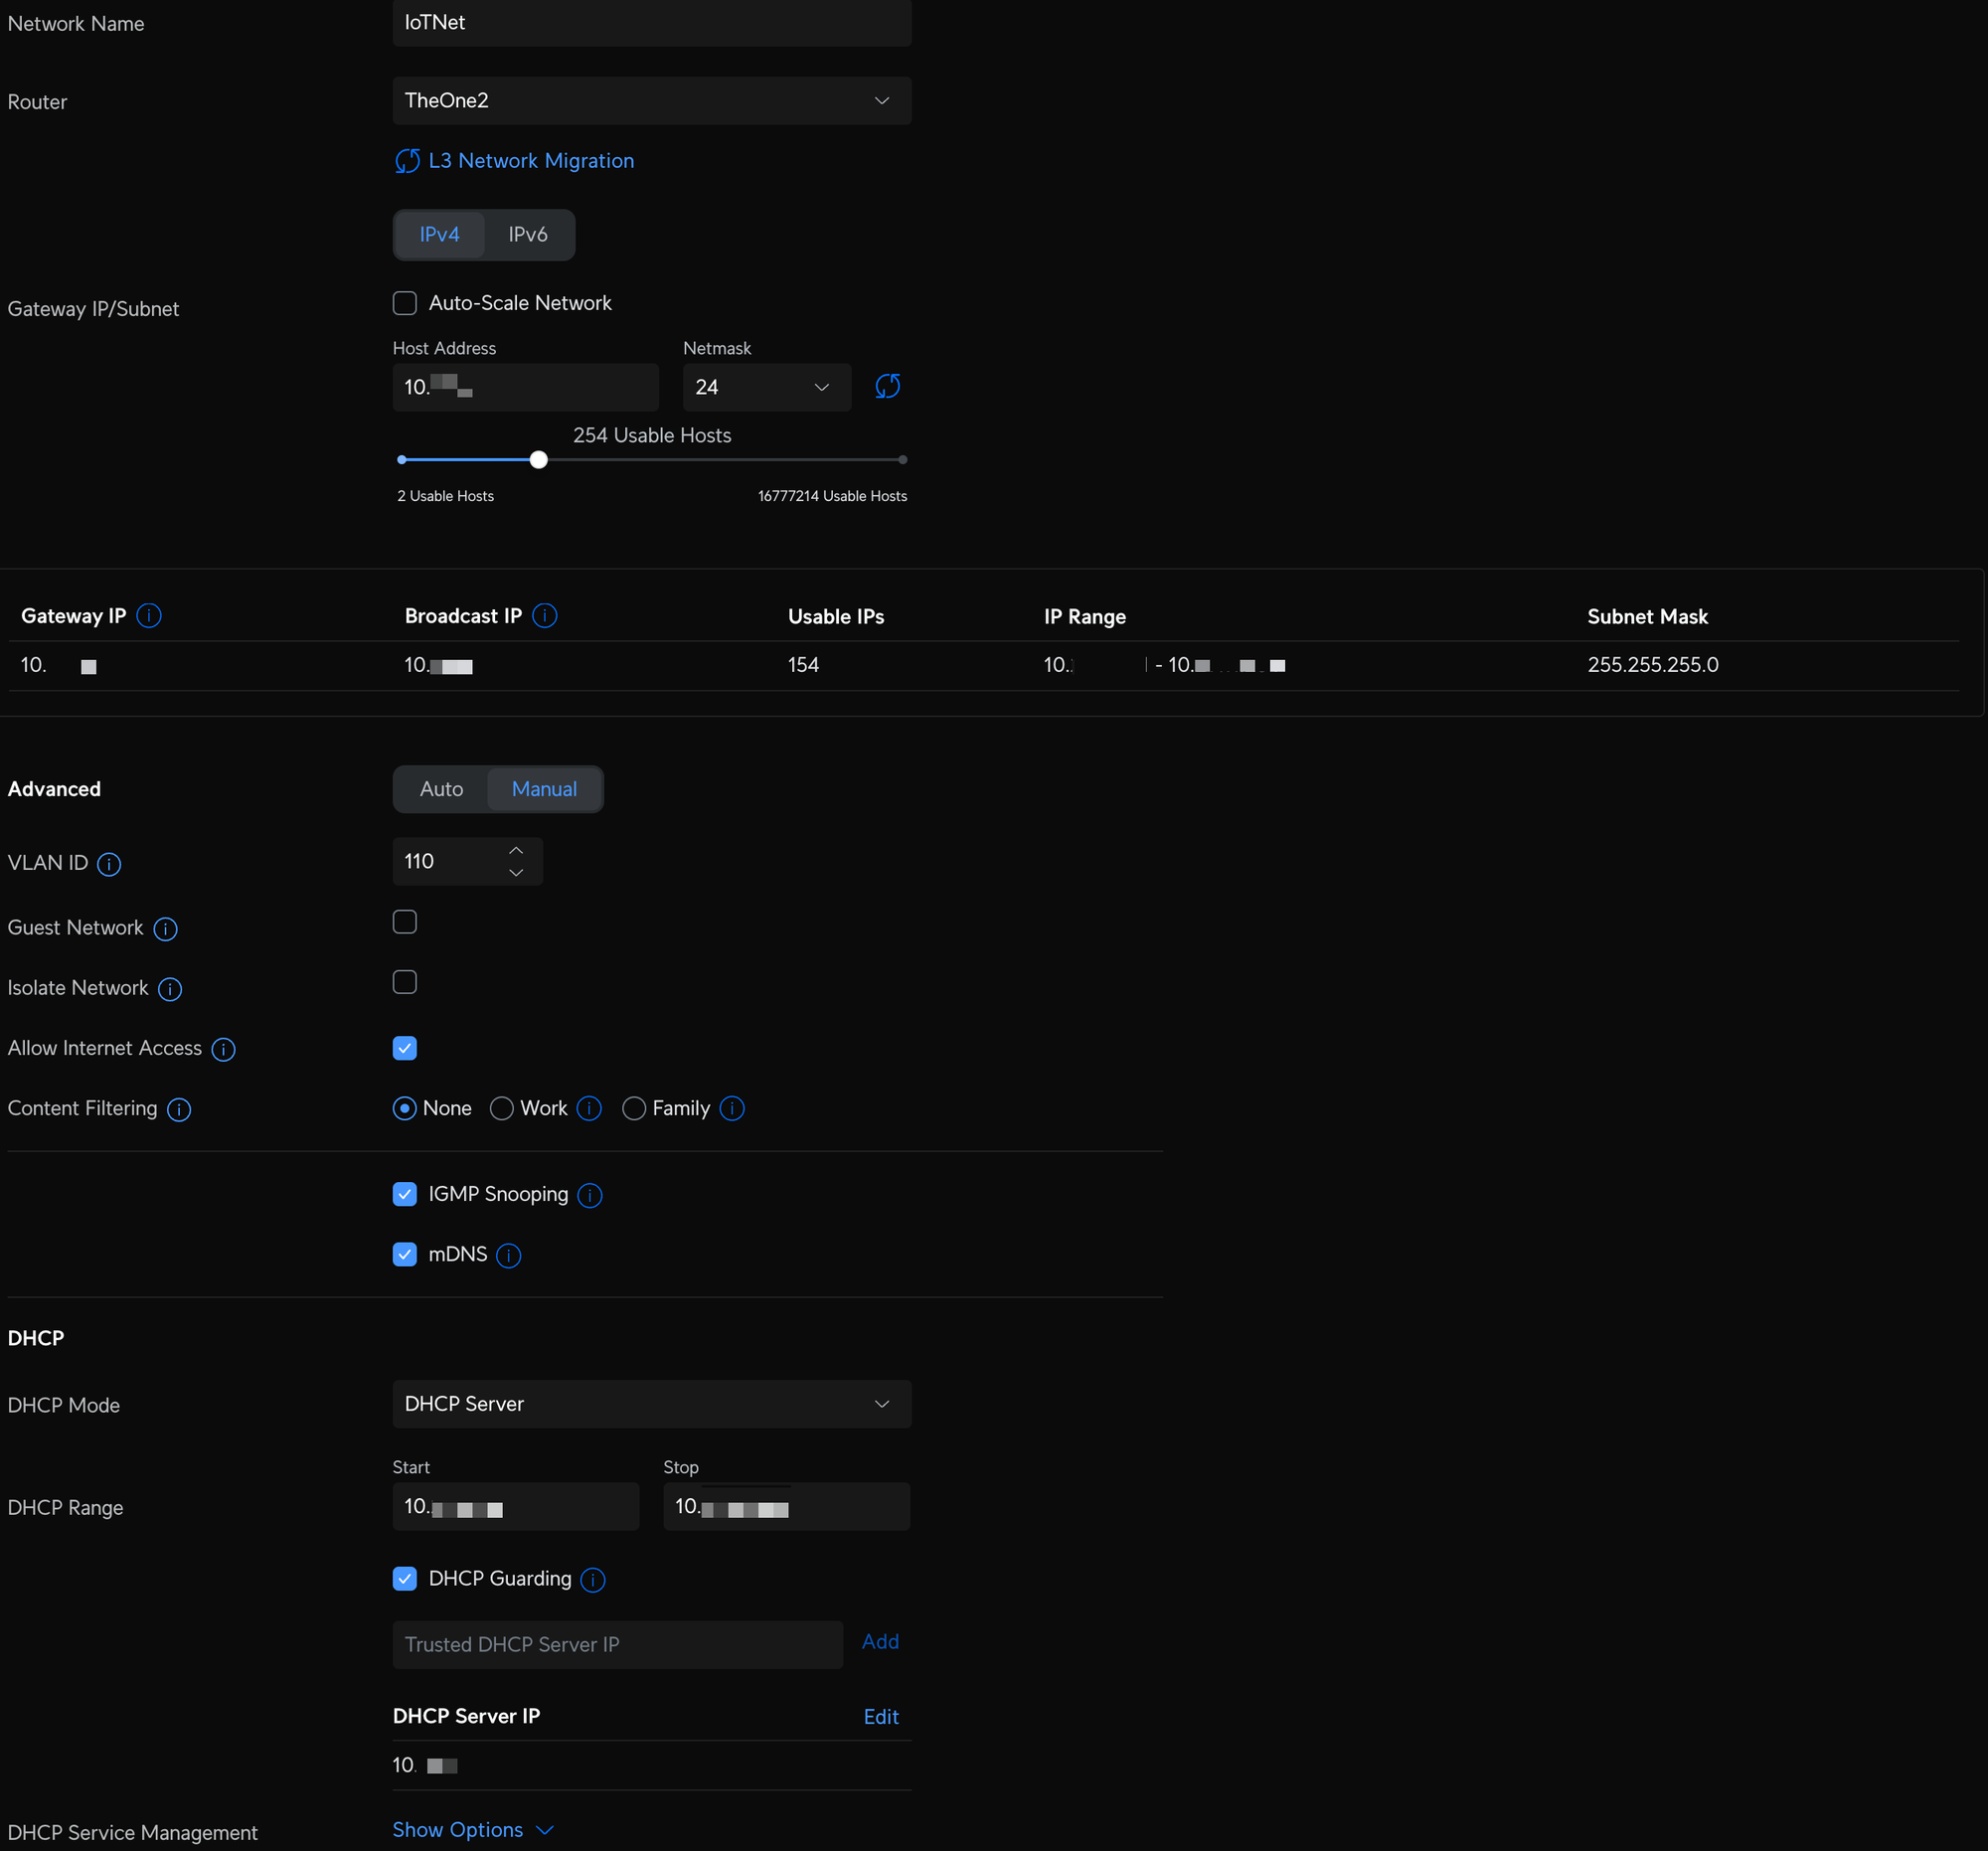
An advanced and sometimes confusing, essential part of your homelab. Most consumer routers typically have one LAN, like 192.168.1.0/24. One LAN means all devices connected to your WiFi will all be on the same network talking to each other. To accomplish my privacy and security goals, I needed multiple LANs and multiple WiFI networks, so it was time to make the leap into virtual local area networks. I say leap because once you start putting devices on different networks that do need to talk to each other, like your Hue hub and your phone for example, it no longer works without some new firewall rules and profiles you will have to create. It's going to require a little bit of work and trial and error, but it's worth it. I'm not the best person to walk you through this, so instead, I will point you to the resources I used in setting up my VLANs. Check out VLANs made easy and Secure IoT Network configuration, as you'll need this knowledge to keep everything working together correctly. Once done, you may want a similar setup to mine:
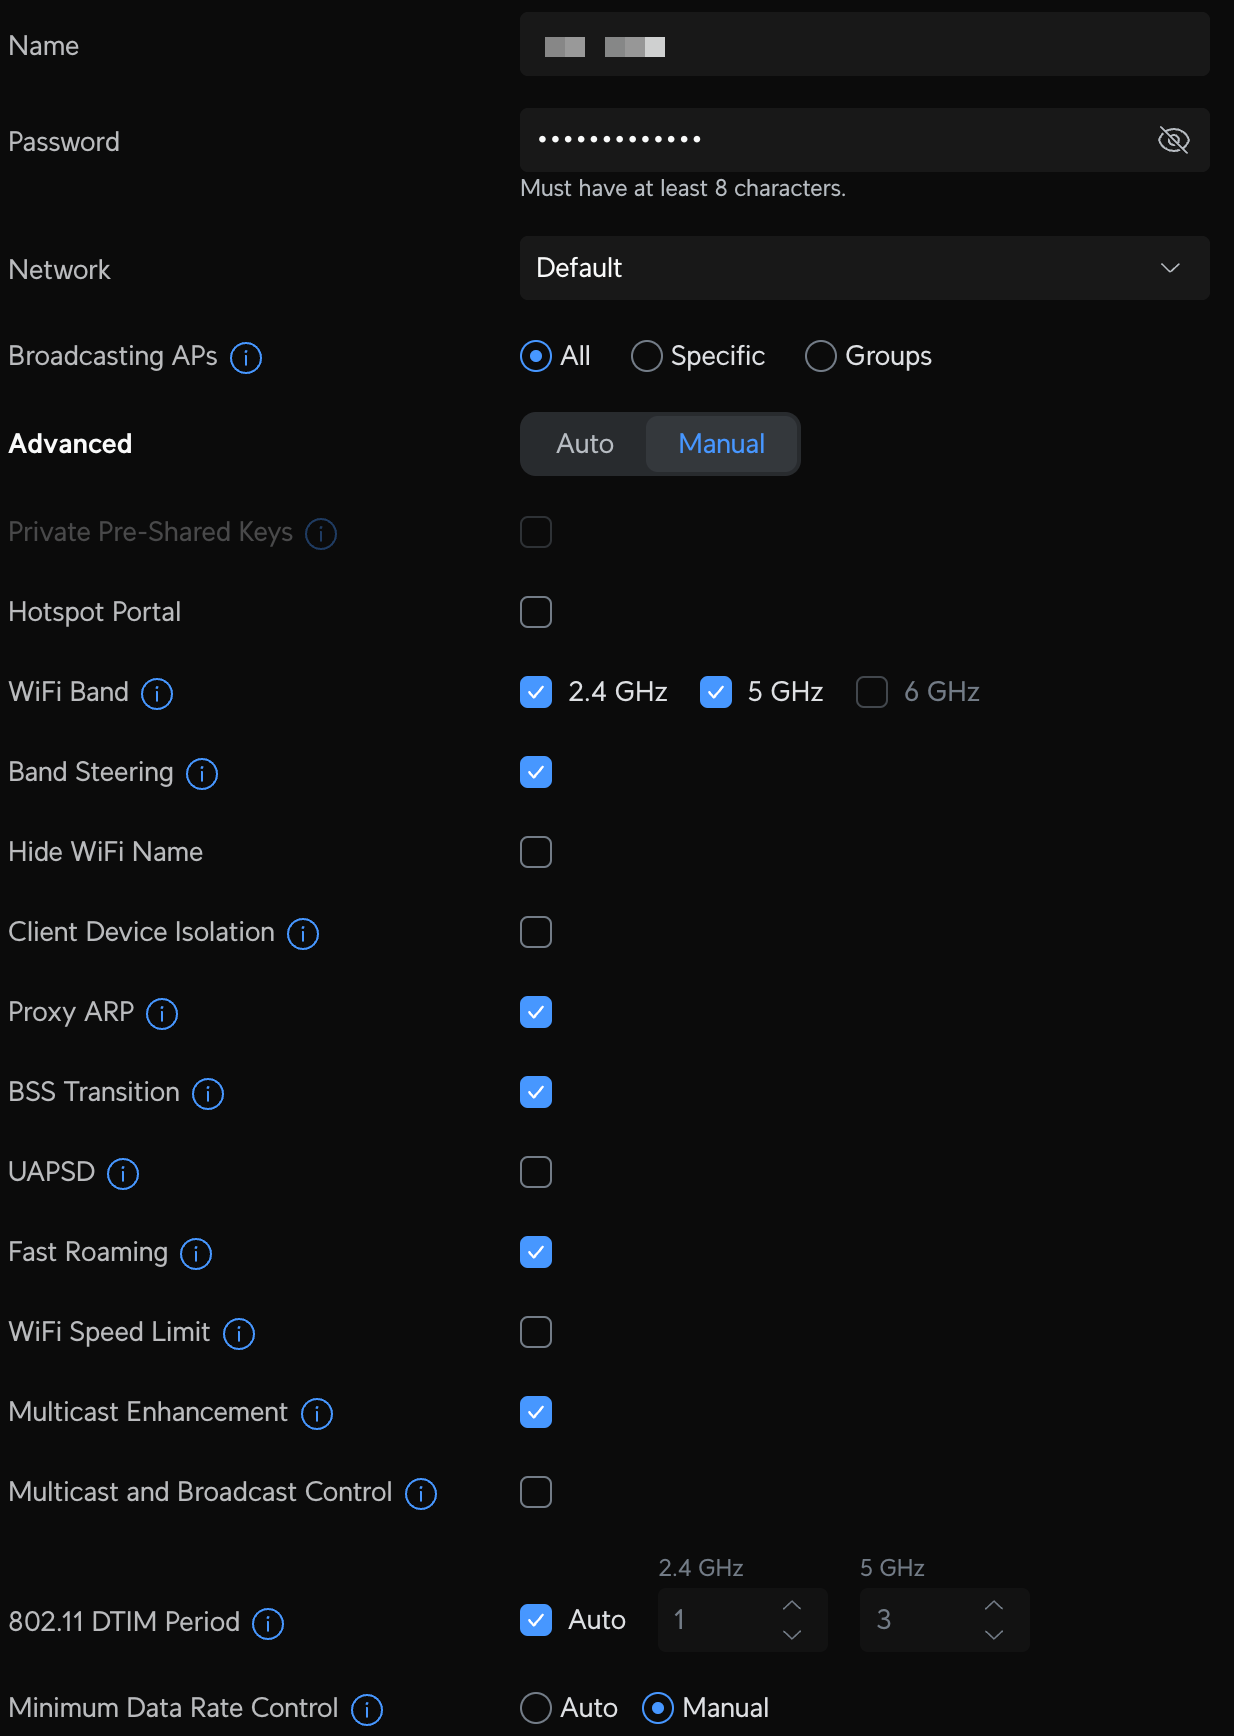
- Default - the LAN you first set up with your router, is now my trusted device network where all of my family's personal devices are connected and has a dedicated WiFI SSID.
- IoT - my first VLAN created for all "smart" devices on my network that require internet access and are not personal devices. Devices on this network are not permitted to communicate with any device on the Default network, but are allowed to communicate with other devices on the IoT network. This also has a dedicated SSID, so anything joining that WiFI SSID will be on the IoT network.
- Guest - a network dedicated for people who need temporary access, like house guests, friends, etc. Devices on this network can access the internet, cannot access any other networks, and can not access or see any other device on the guest network (device isolation). A dedicated and unencrypted WiFI SSID controls access to this network with a hotspot landing page, where you enter a password and accept terms, similar to a coffee shop or a hotel. After 24 hours access is automatically removed.
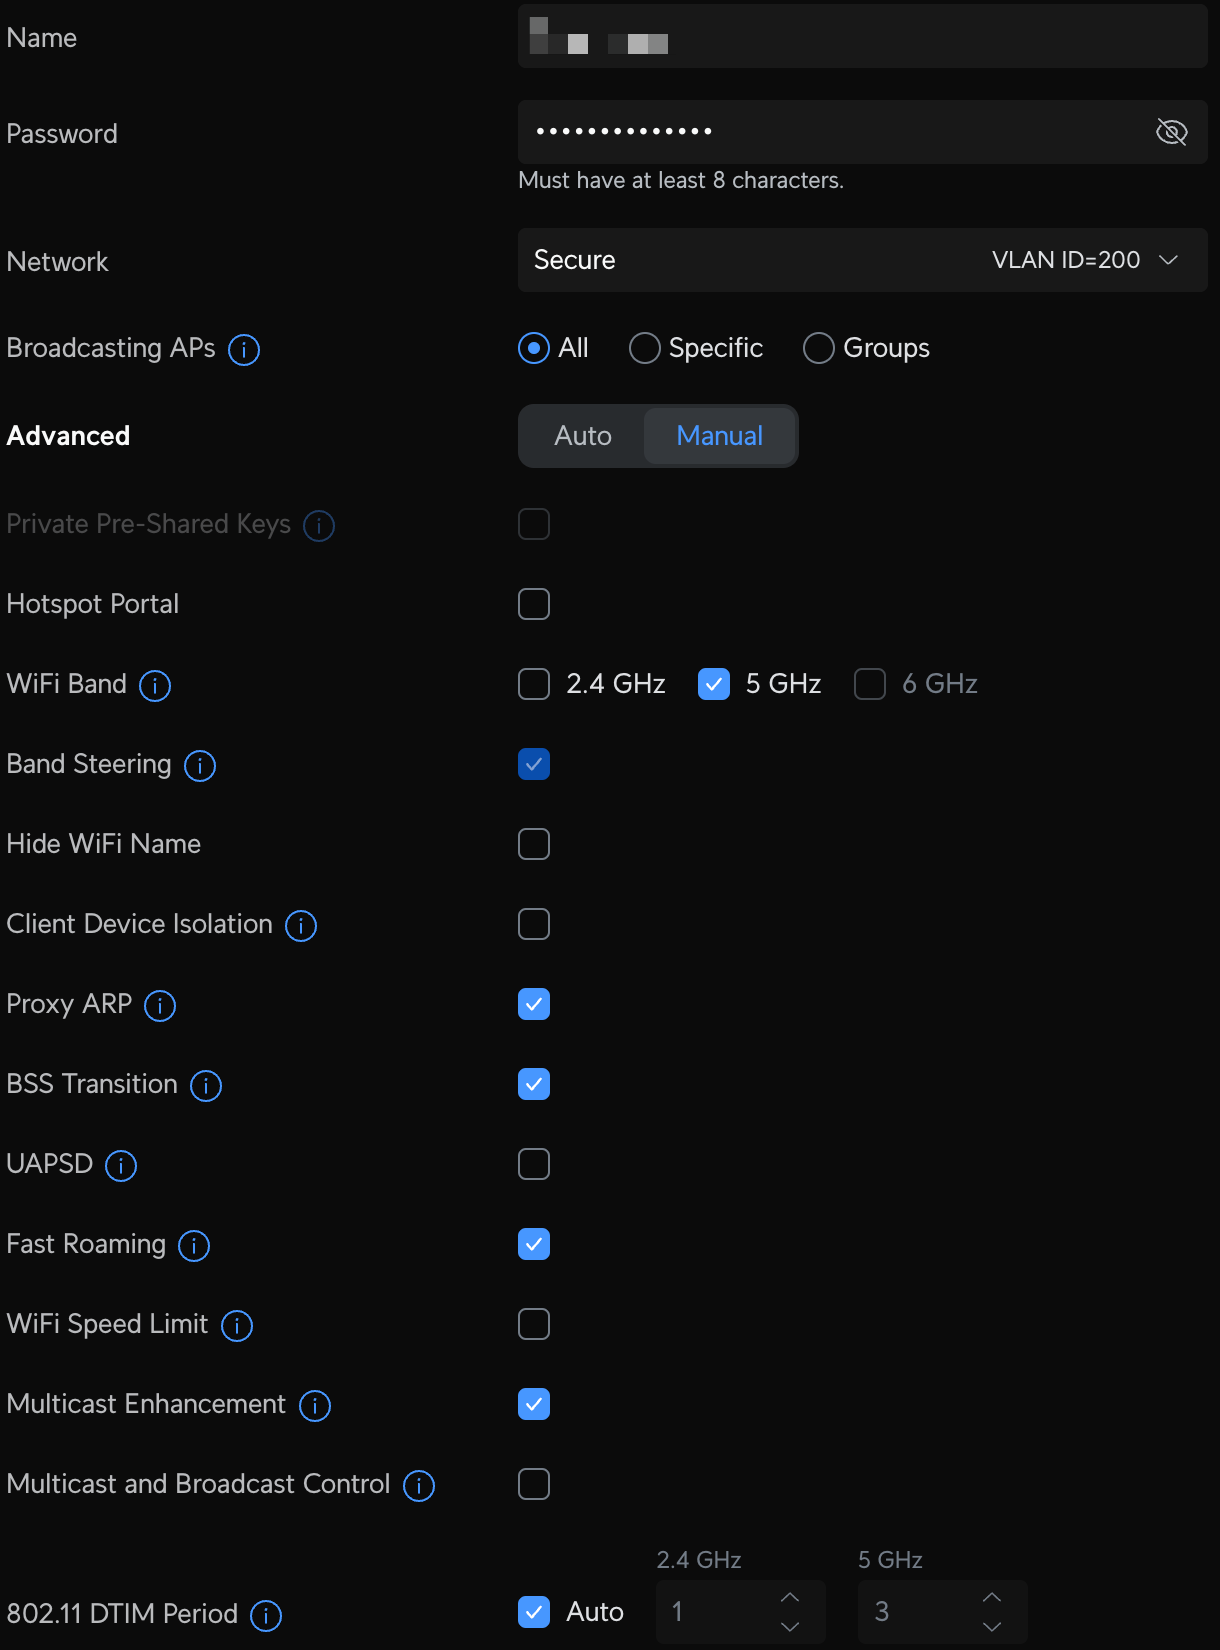
- Secure - a network similar to the Default network, but all internet access flows through an always-on Proton VPN tunnel. Once connected via a dedicated WiFI SSID, all traffic is secure, and no VPN app is required.
- Homelab - a network dedicated to hardware and services that I host within my homelab. Devices on this network have full access to the internet and can talk to other networks. I created this primarily to get a dedicated pool of IP addresses, so I have plenty of room to expand. I'm slightly less concerned about isolation between this and my default and IoT network. For example, Home Assistant lives on Homelab and interacts with select devices in IoT and Default, and that's what I need it to do. No WiFI SSID is associated with this network, as everything is connected via Cat-6.

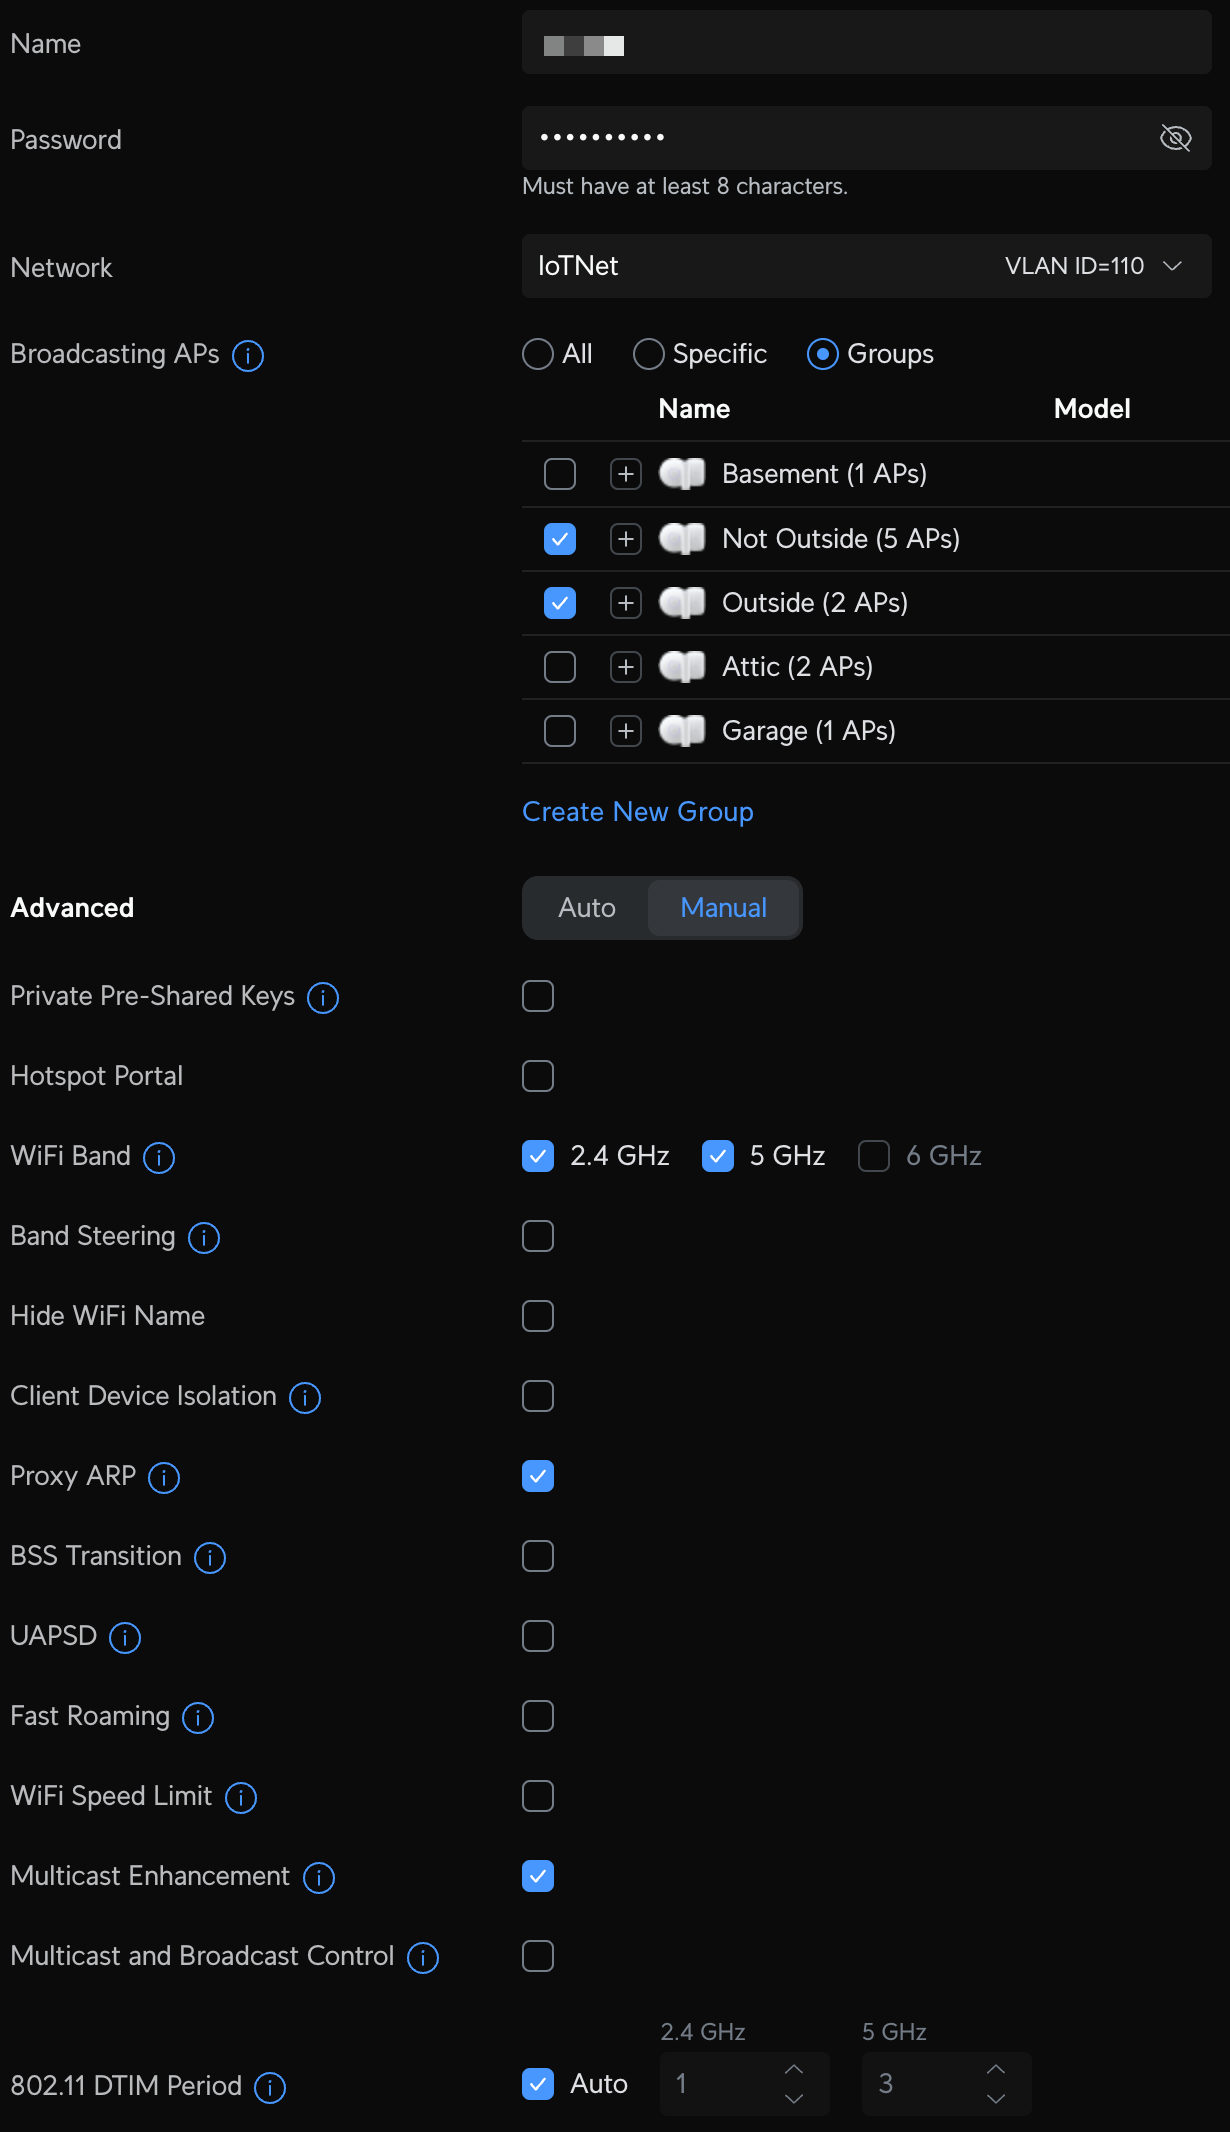
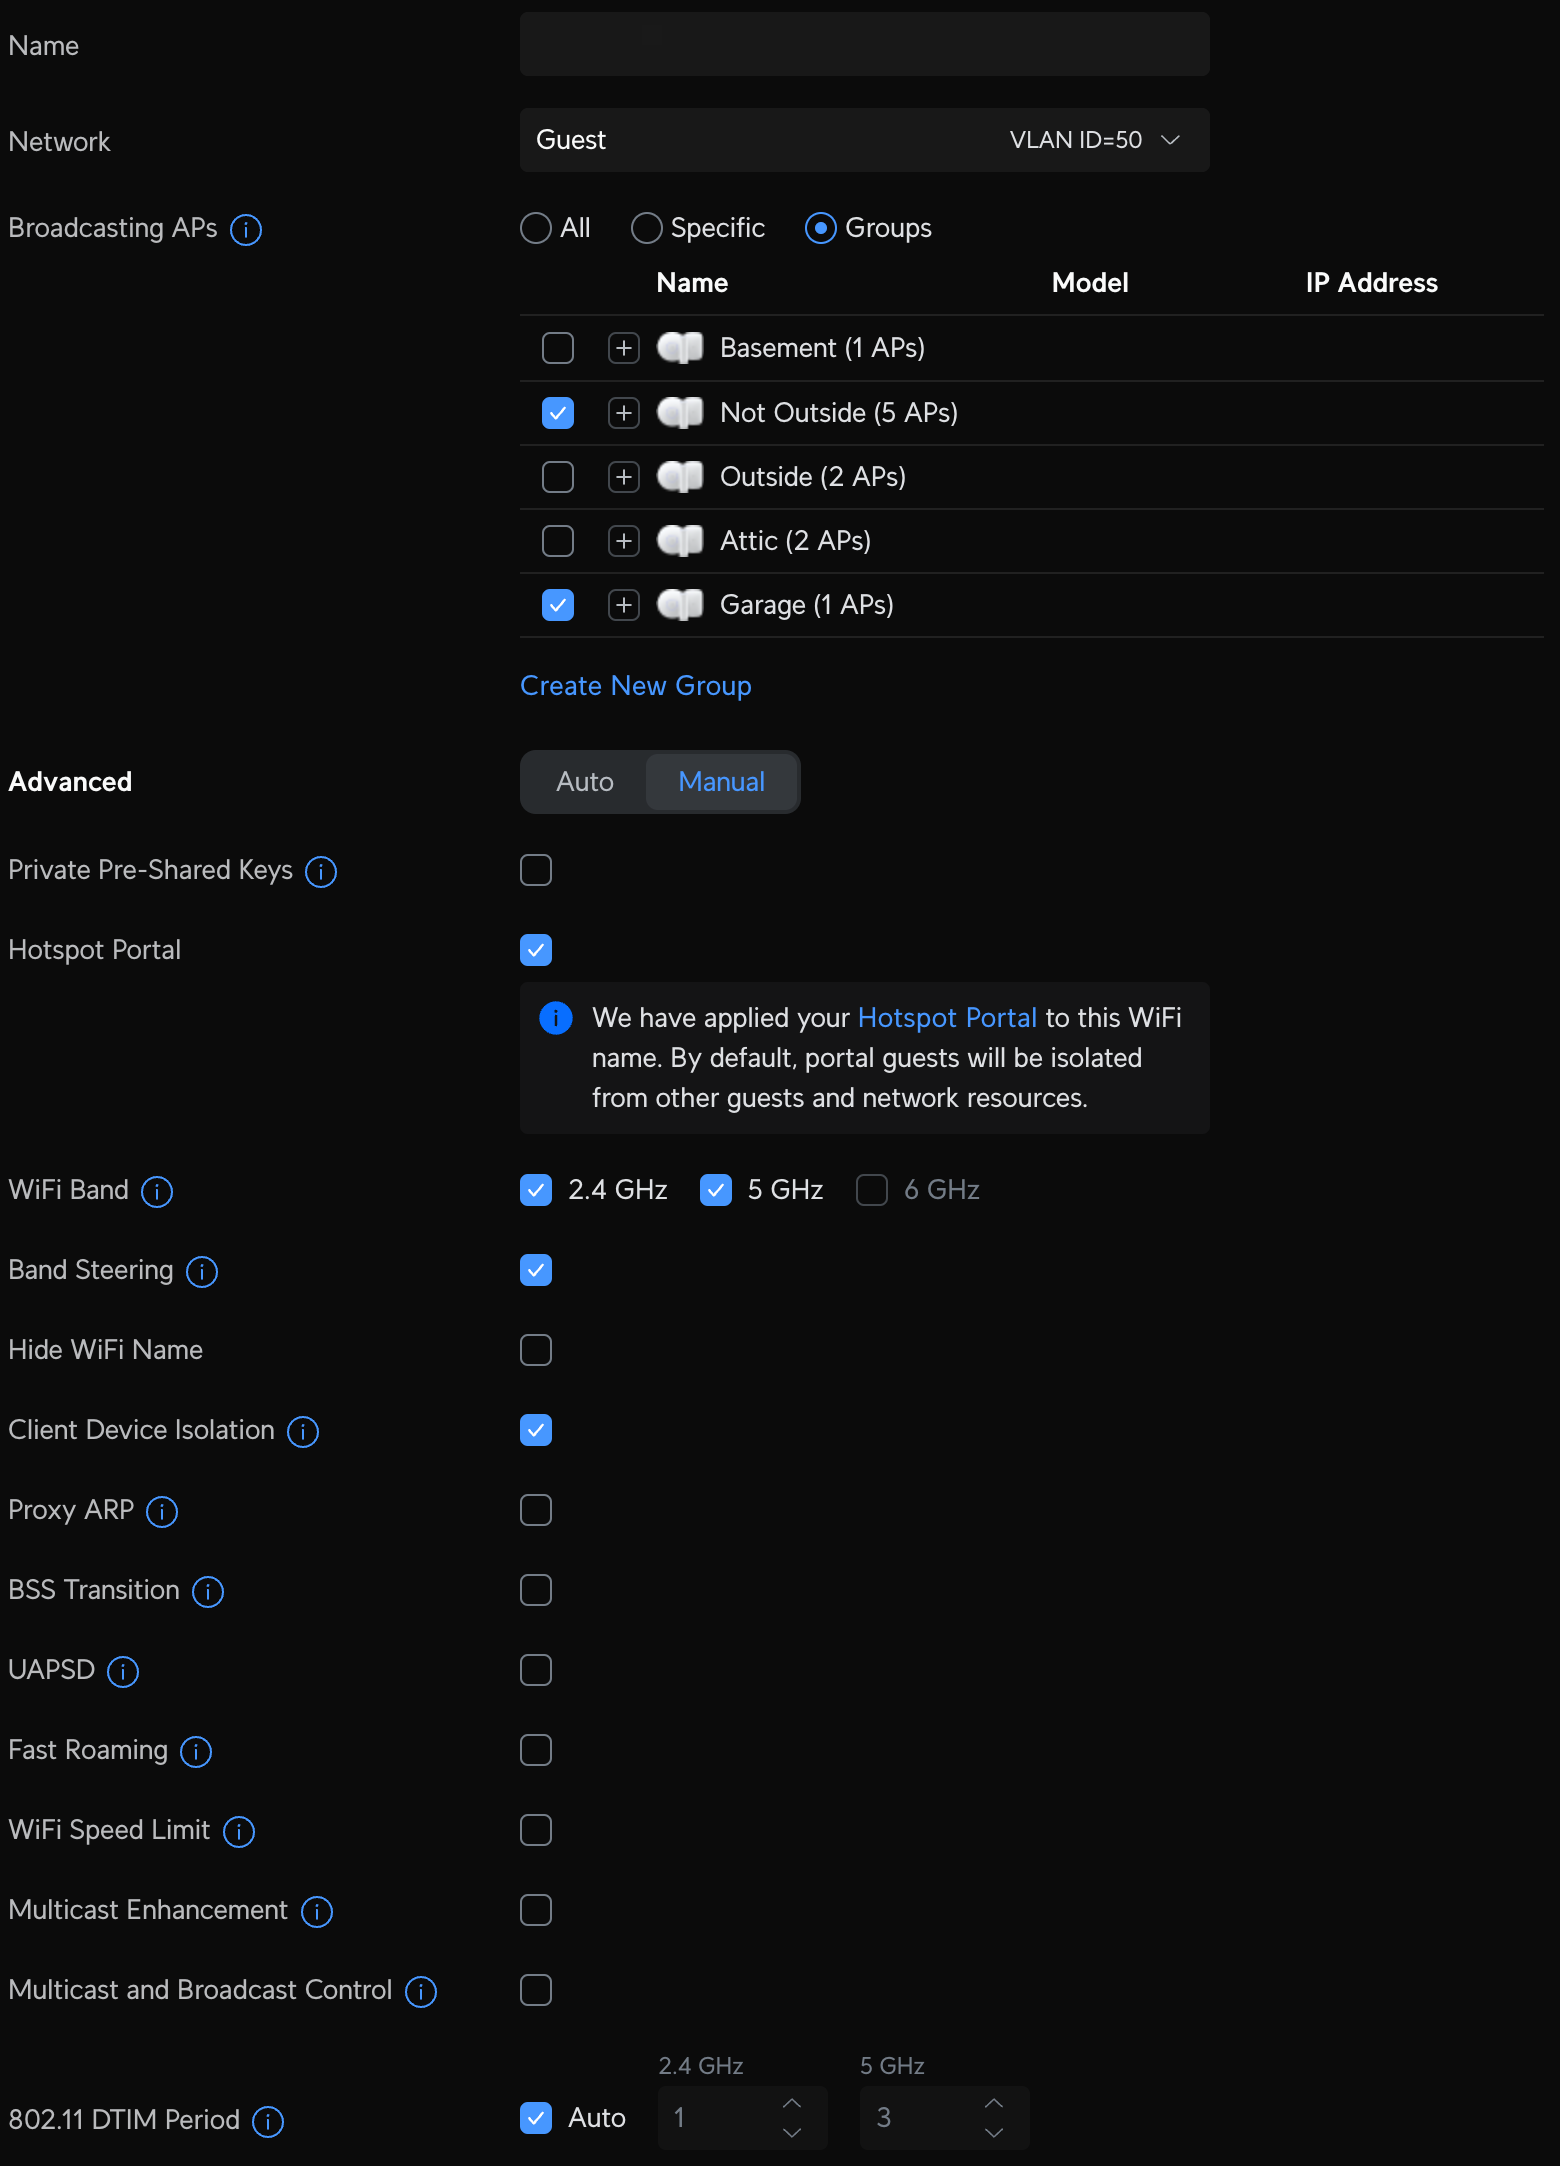
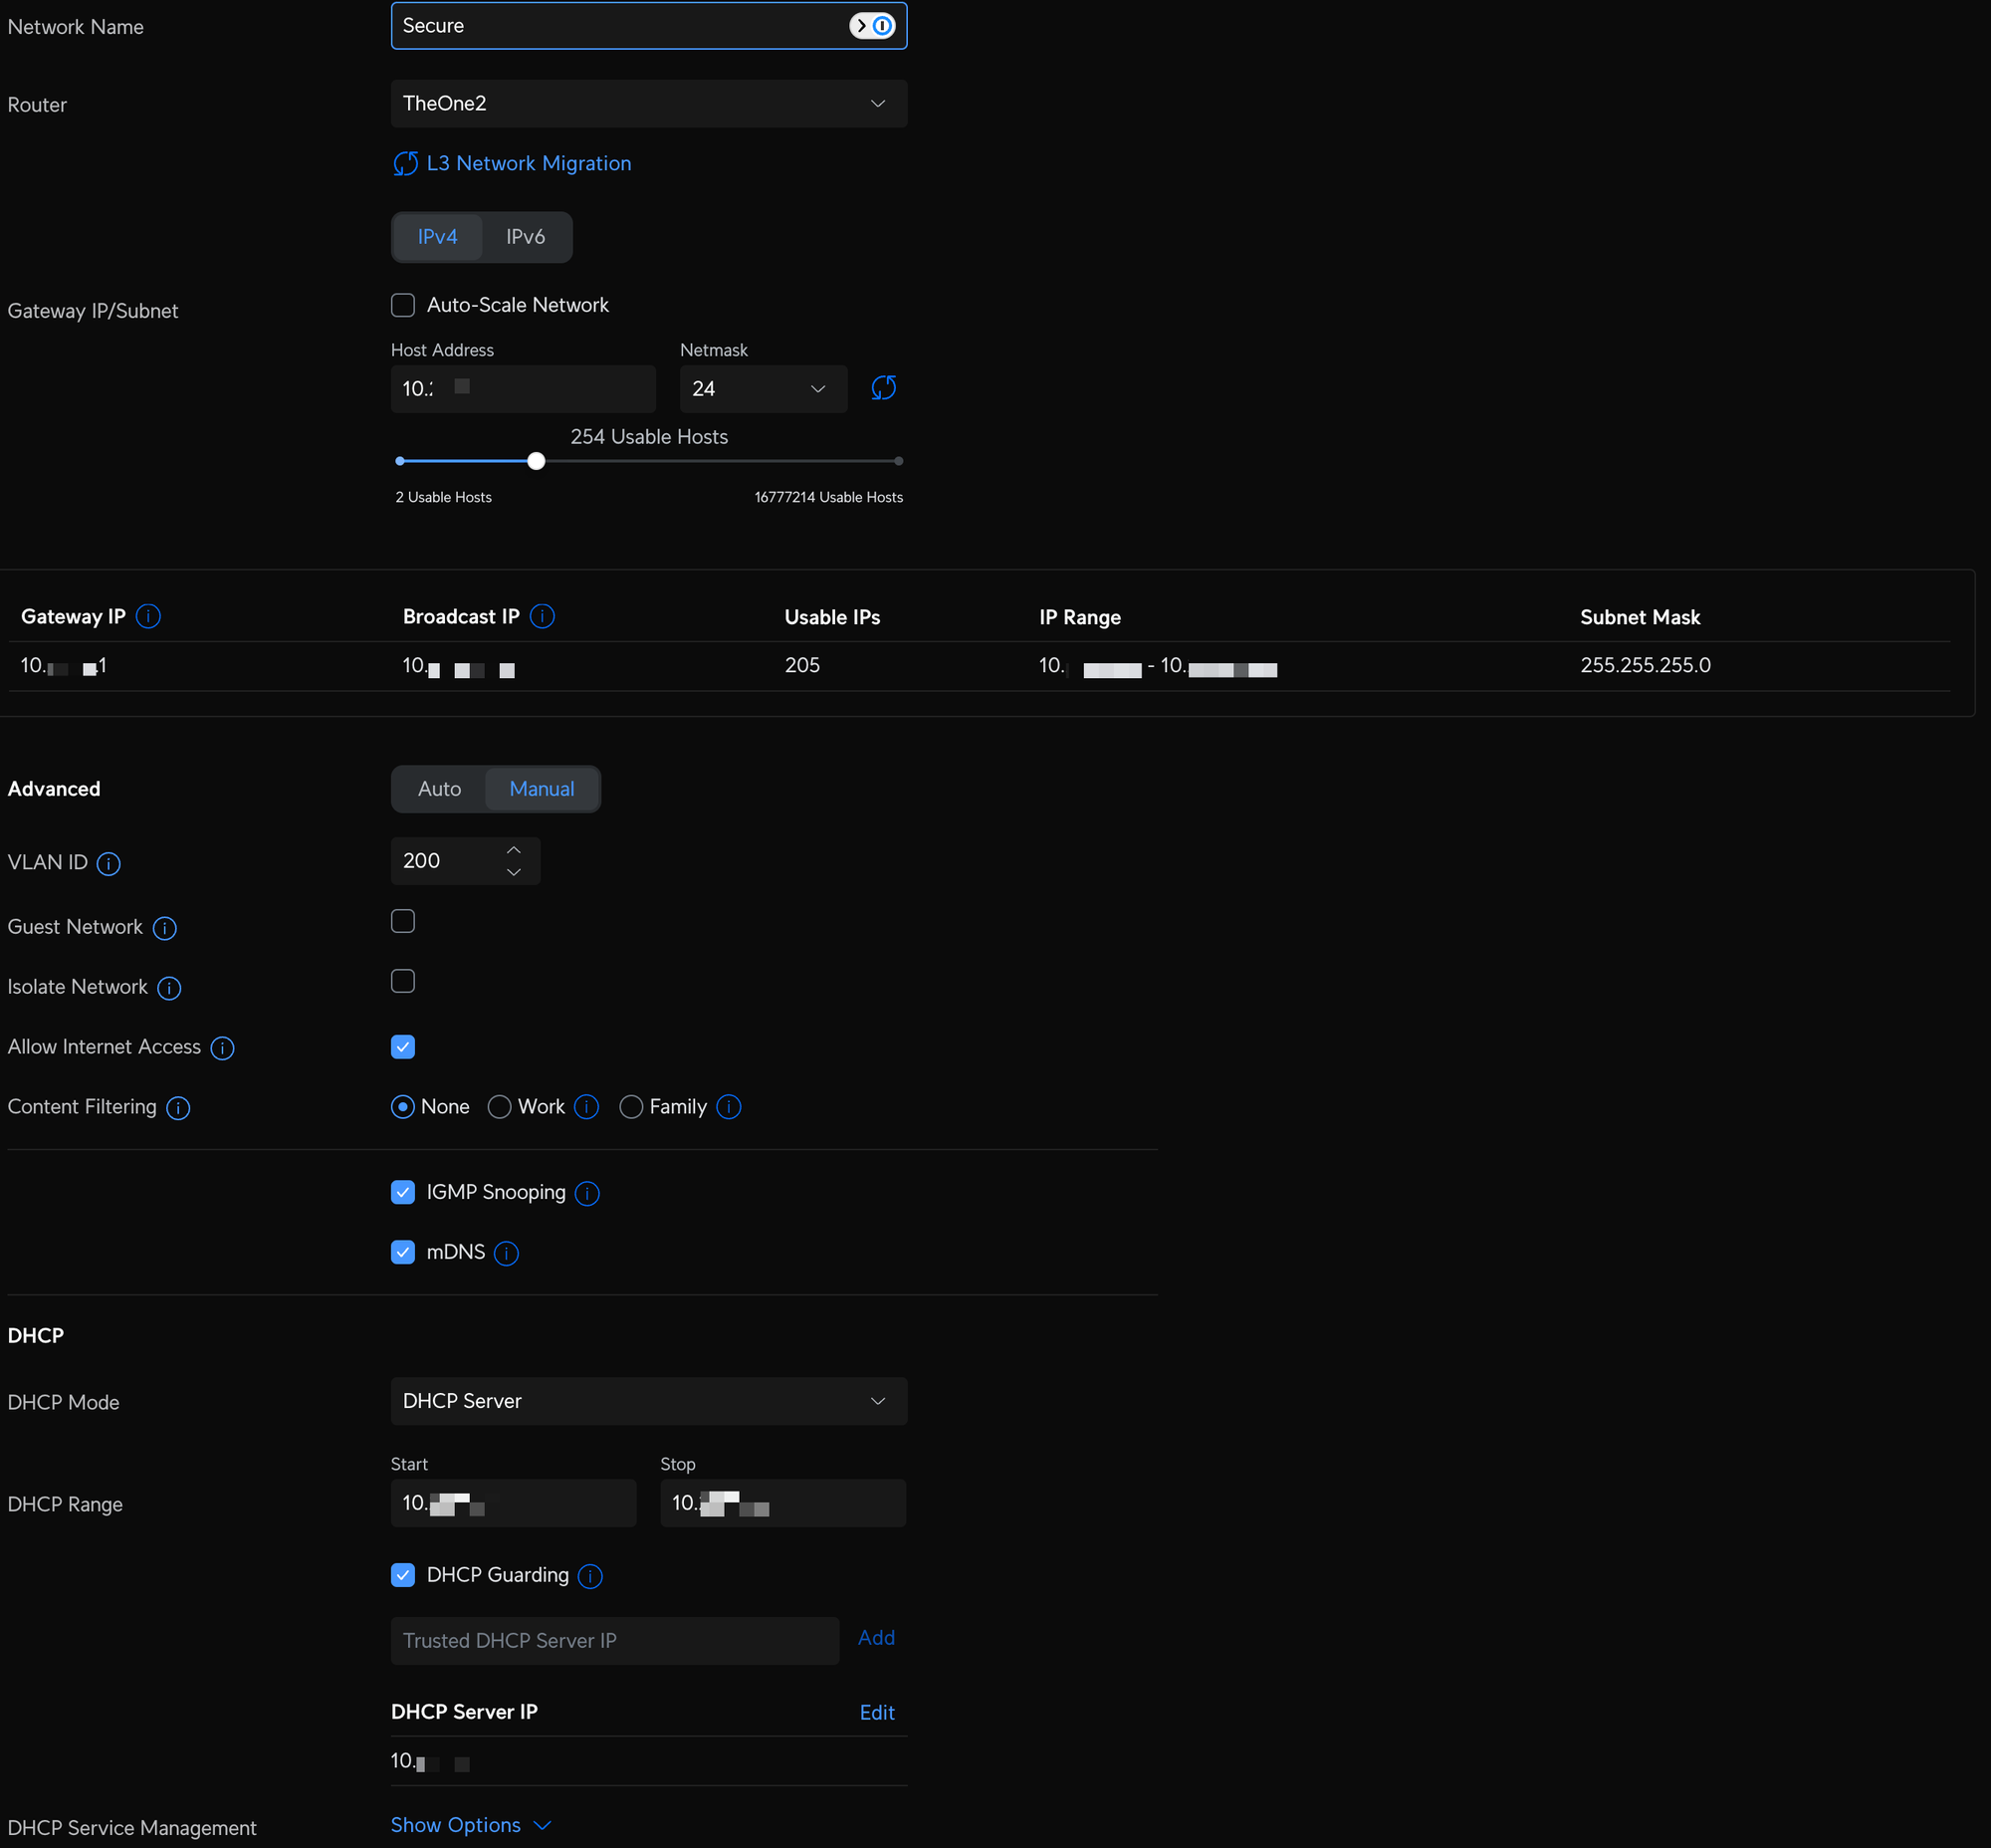
Unifi Network VLAN and WiFI configuration
VLAN Considerations
- For AirPlay, Chromecast, and similar devices on separate VLANs, enable IGMP Snooping and mDNS (bonjour) to ensure multicast works properly. If you are still having difficulty, you may want to specify LAN IN firewall rules based on the service
network/default/settings/security/firewall-rules. - Sonos with VLANS. Many have tried, many have failed. The tldr; is that Sonos does not play well with VLANs. Check r/sonos and r/UNIFI for the latest; however, I recommend leaving your speakers on
Defaultto save yourself the headache.
Firewall Rules & Profiles
The videos I reference above cover many of the basics, but I'll cover some of them here as well since they are essential for your initial setup. Once you start putting devices, like your Hue bridge for example, on your IoT network, you'll still want access from your personal devices in order to maintain the functionality you are used to. This will get you started.
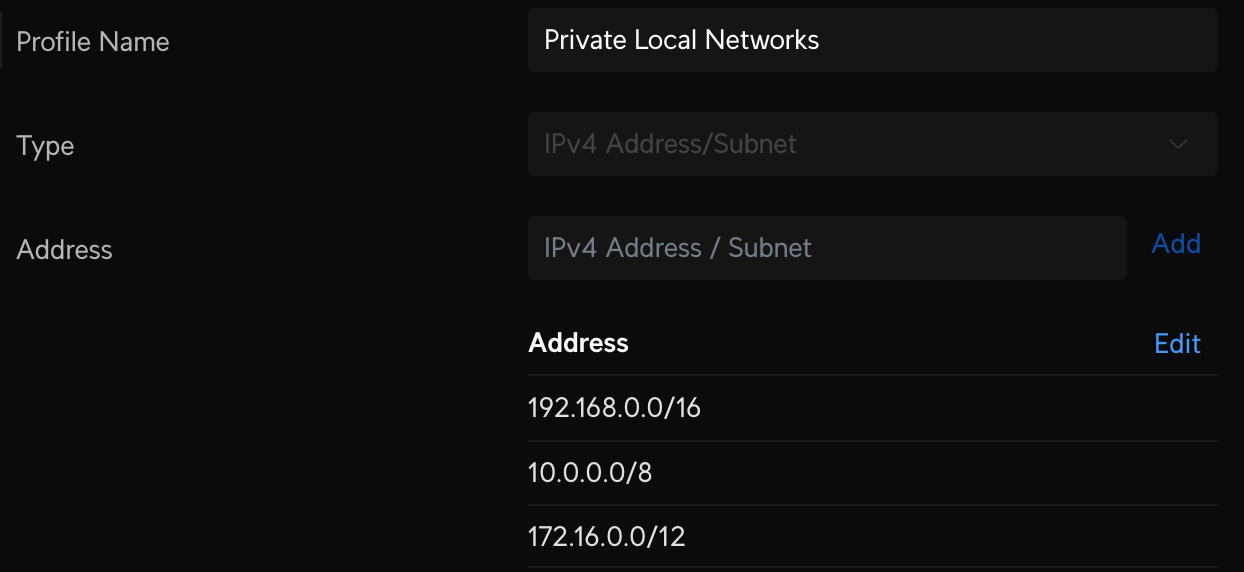
Create a new IP Group Profile called Private Local Networks network/default/settings/profiles/port-ip-groups and add the following:
- 192.168.0.0/16
- 10.0.0.0/8
- 172.16.0.0/12
Create a new LAN in firewall rule called Allow established and related. This rule essentially allows devices on other VLANs to "talk back" if established on the Default network, but devices on the VLAN cannot initiate a connection to the Default network.
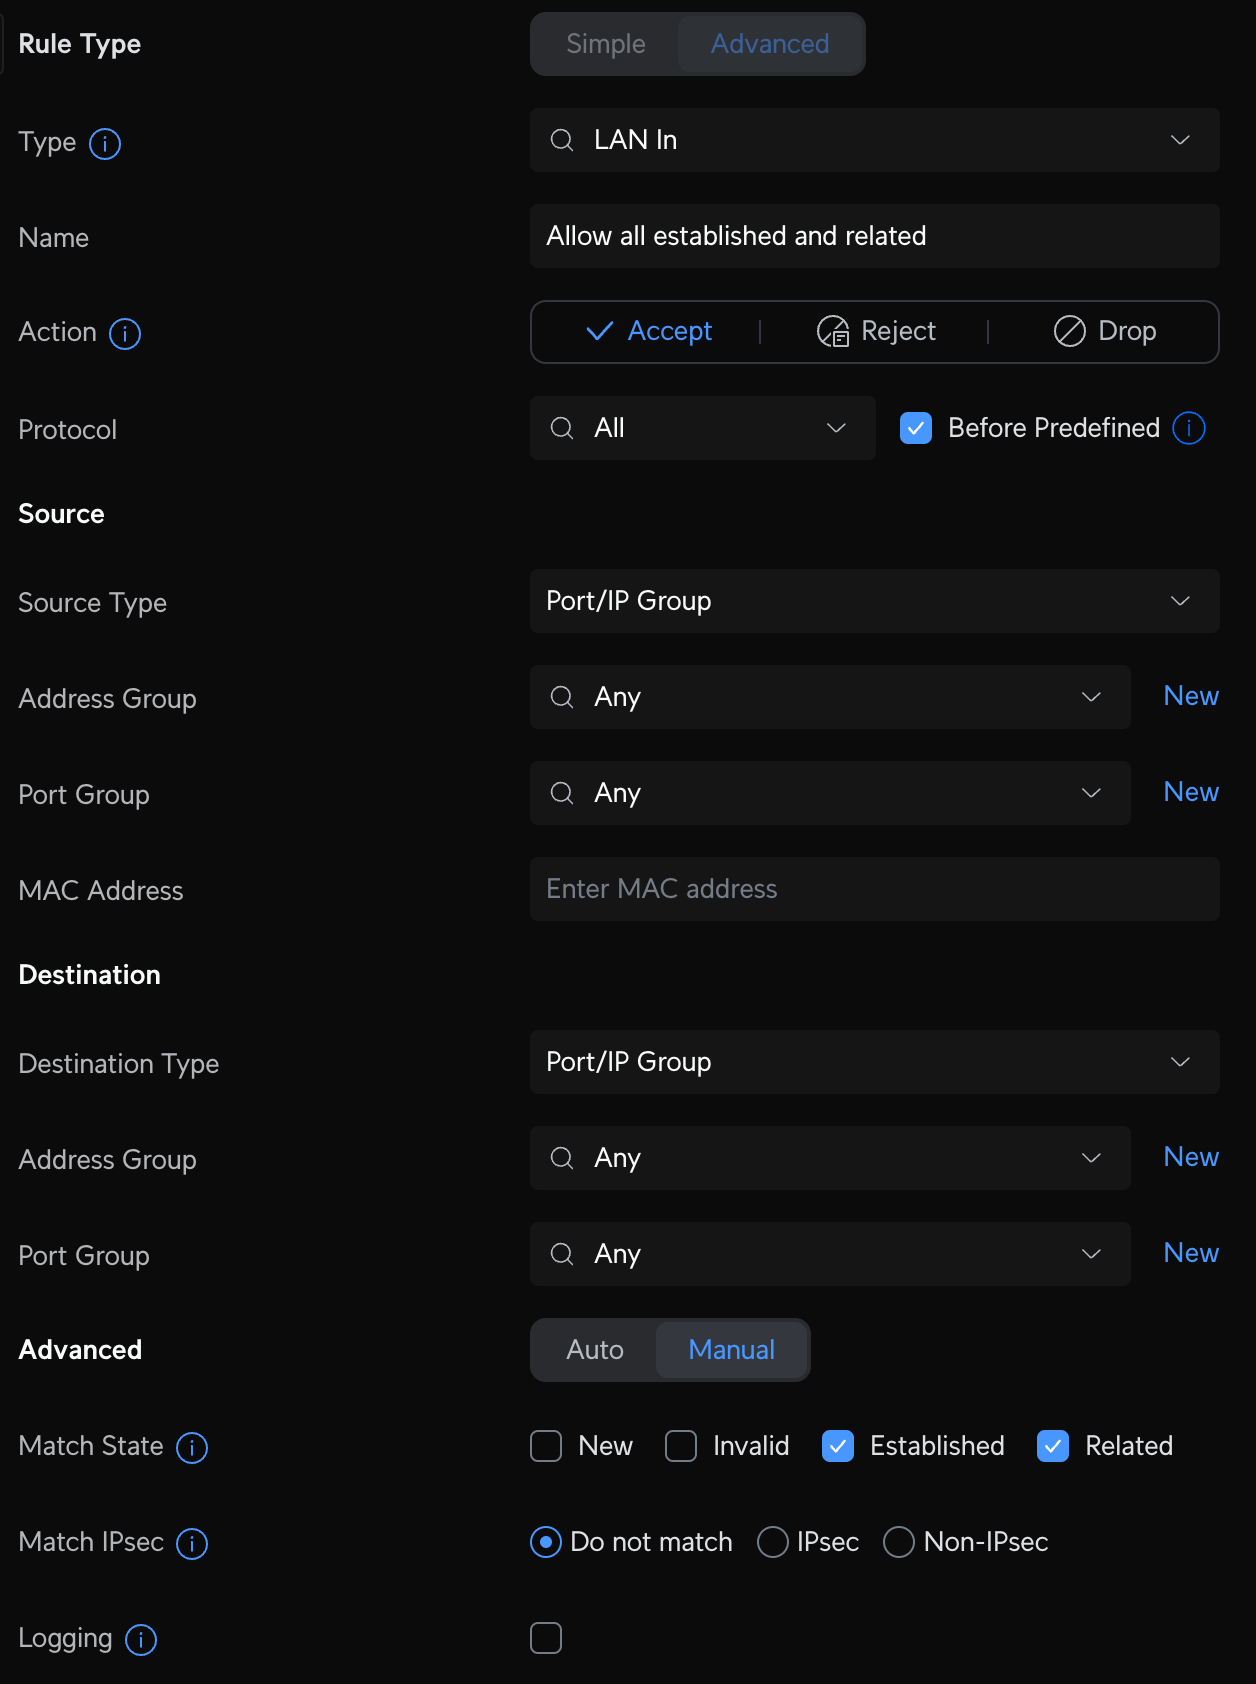
Create a new LAN in firewall rule called Allow LAN to anywhere. This rule allows devices on the Default network to communicate with devices on any VLAN.
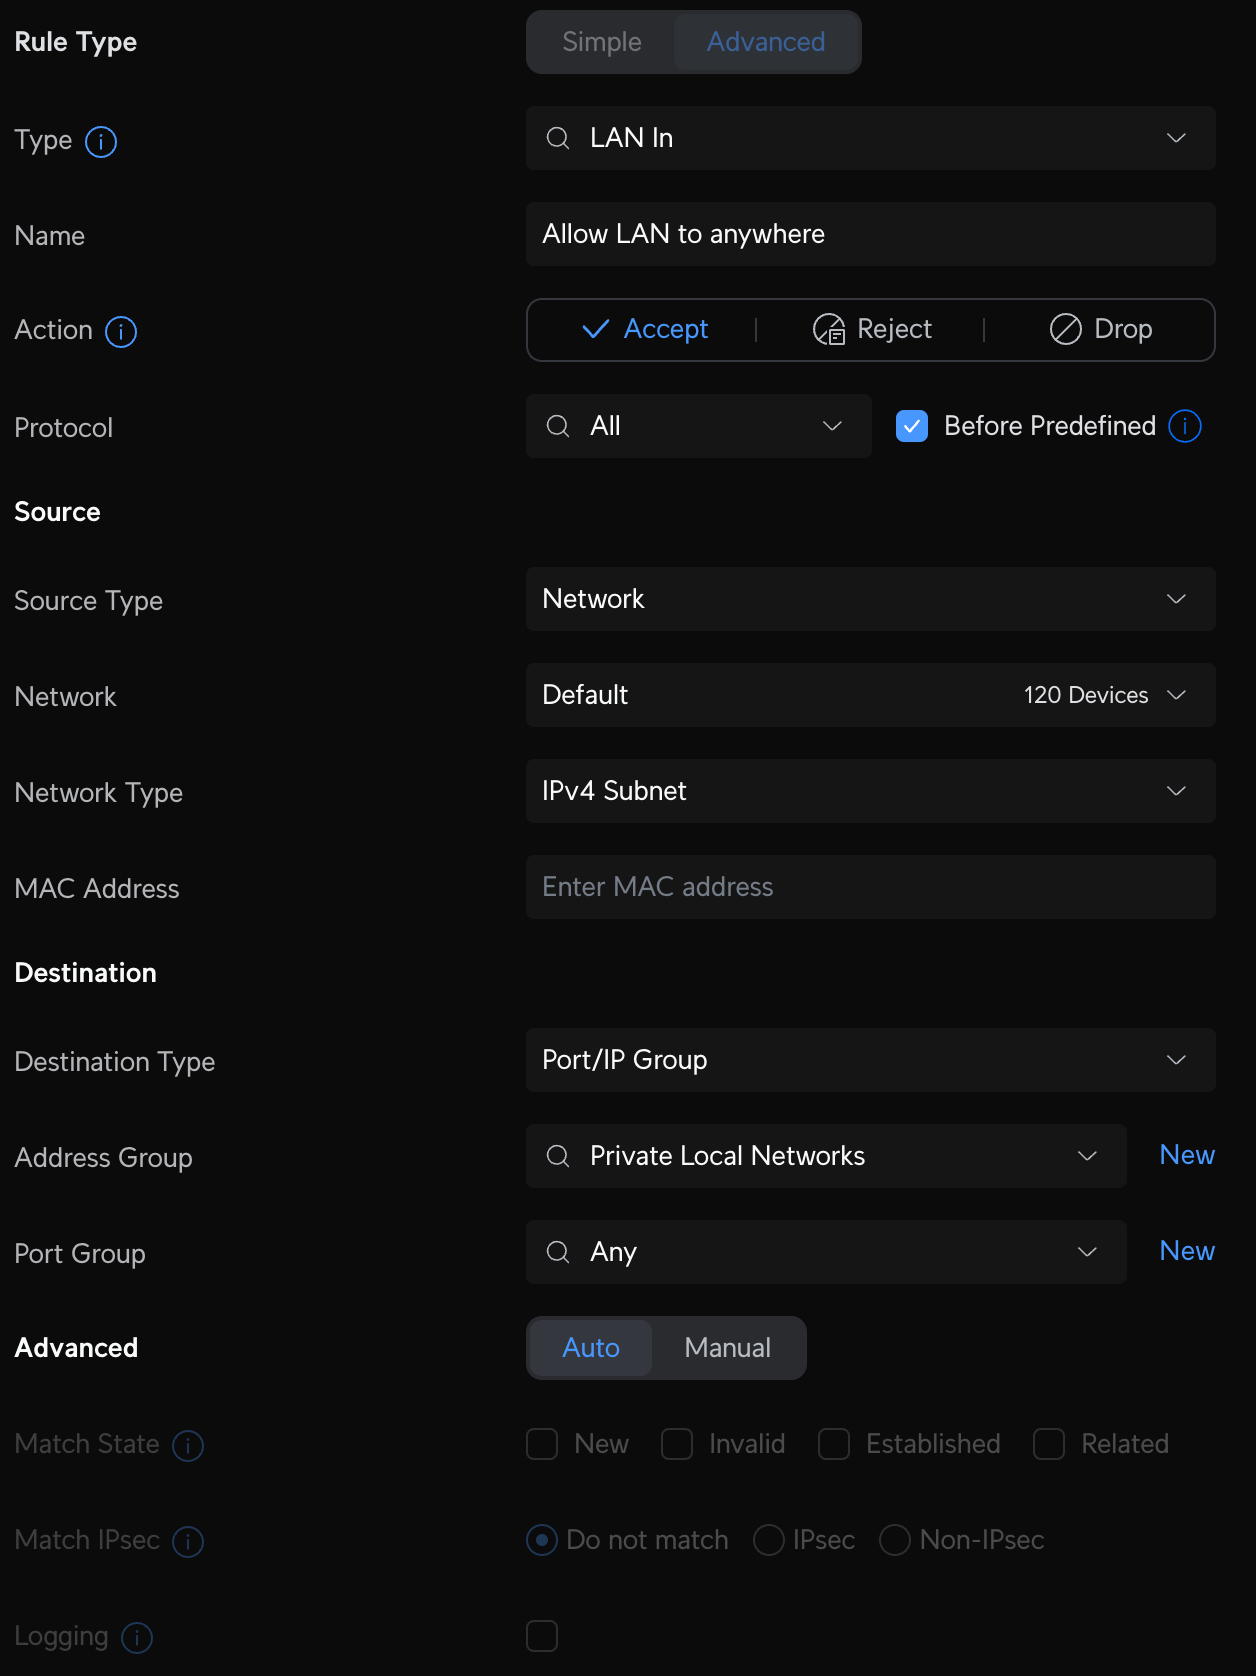
This is just the start and we'll cover more rules when I talk about services, like DNS, further down.
Storage
Your personal cloud storage for videos, photos, and backups
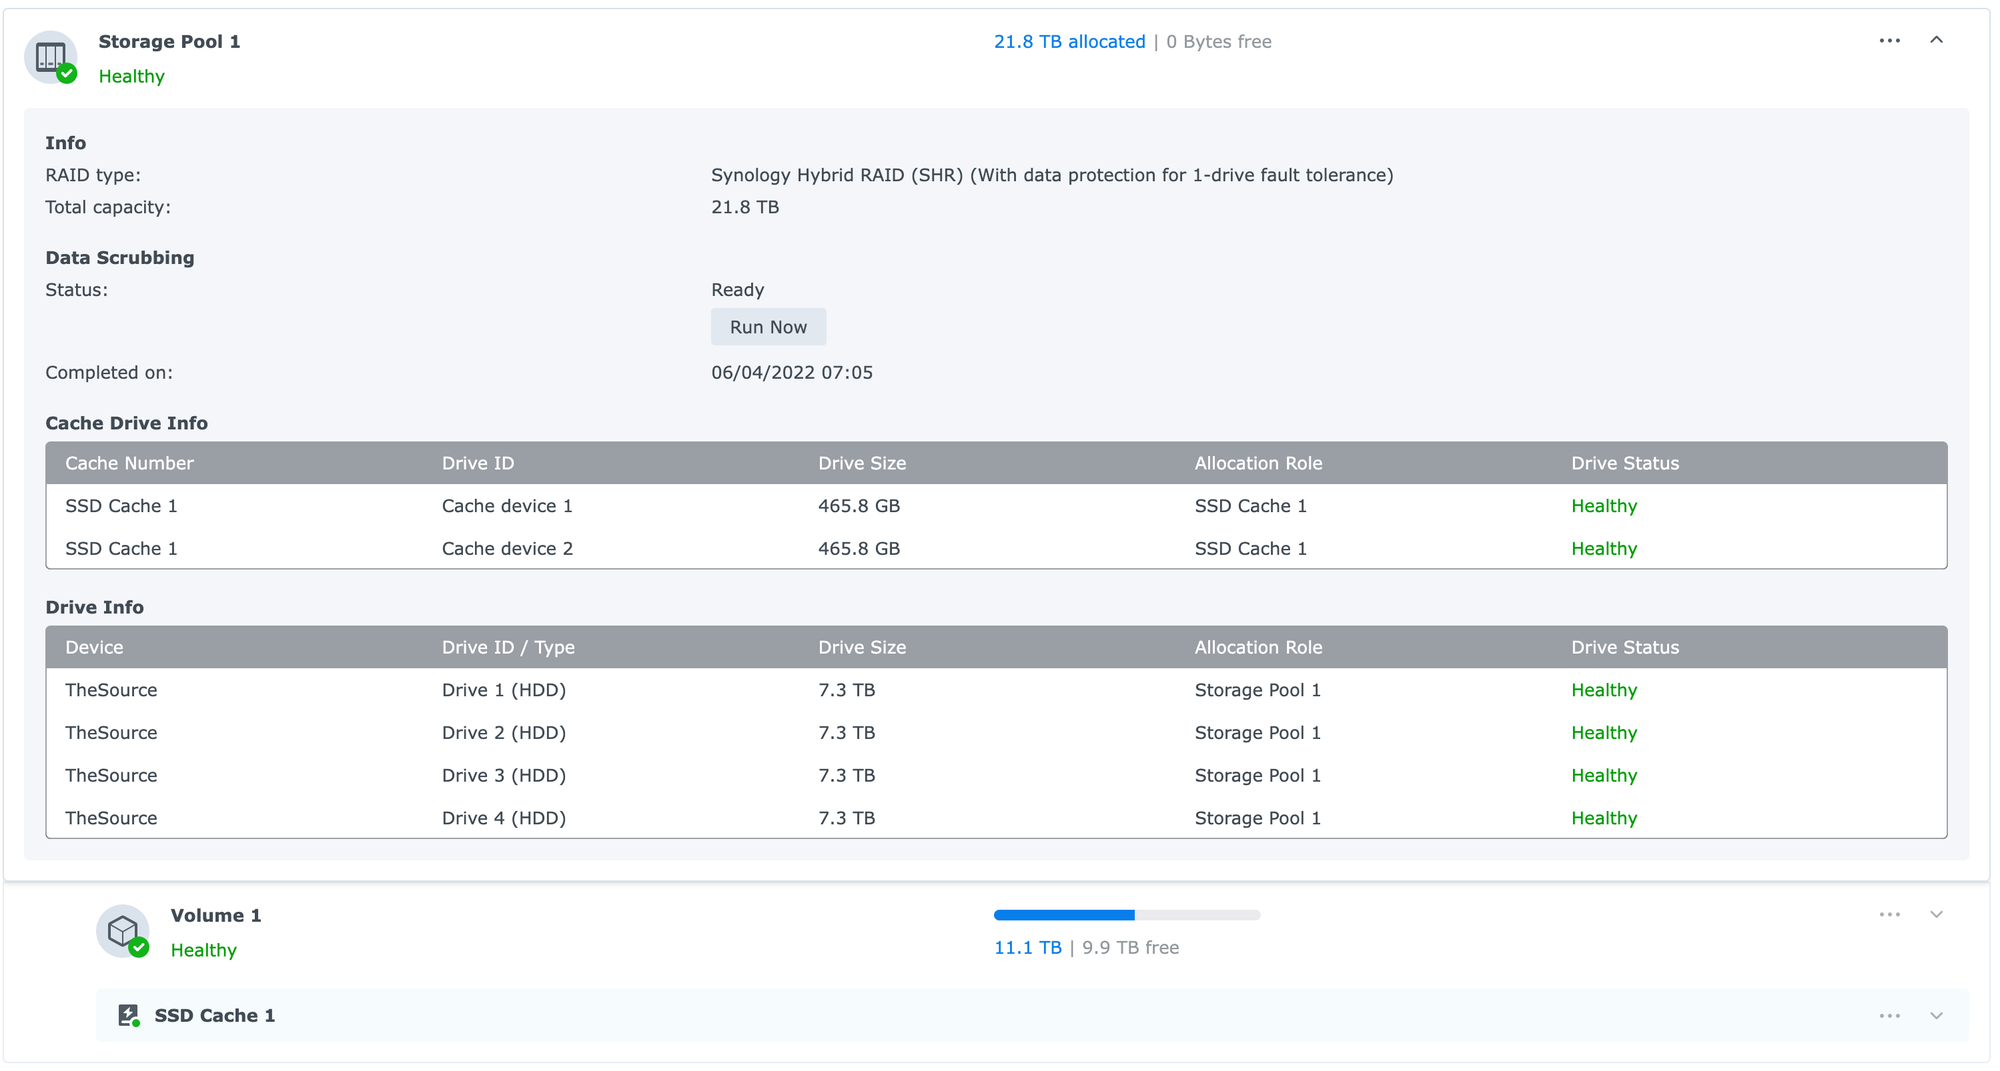
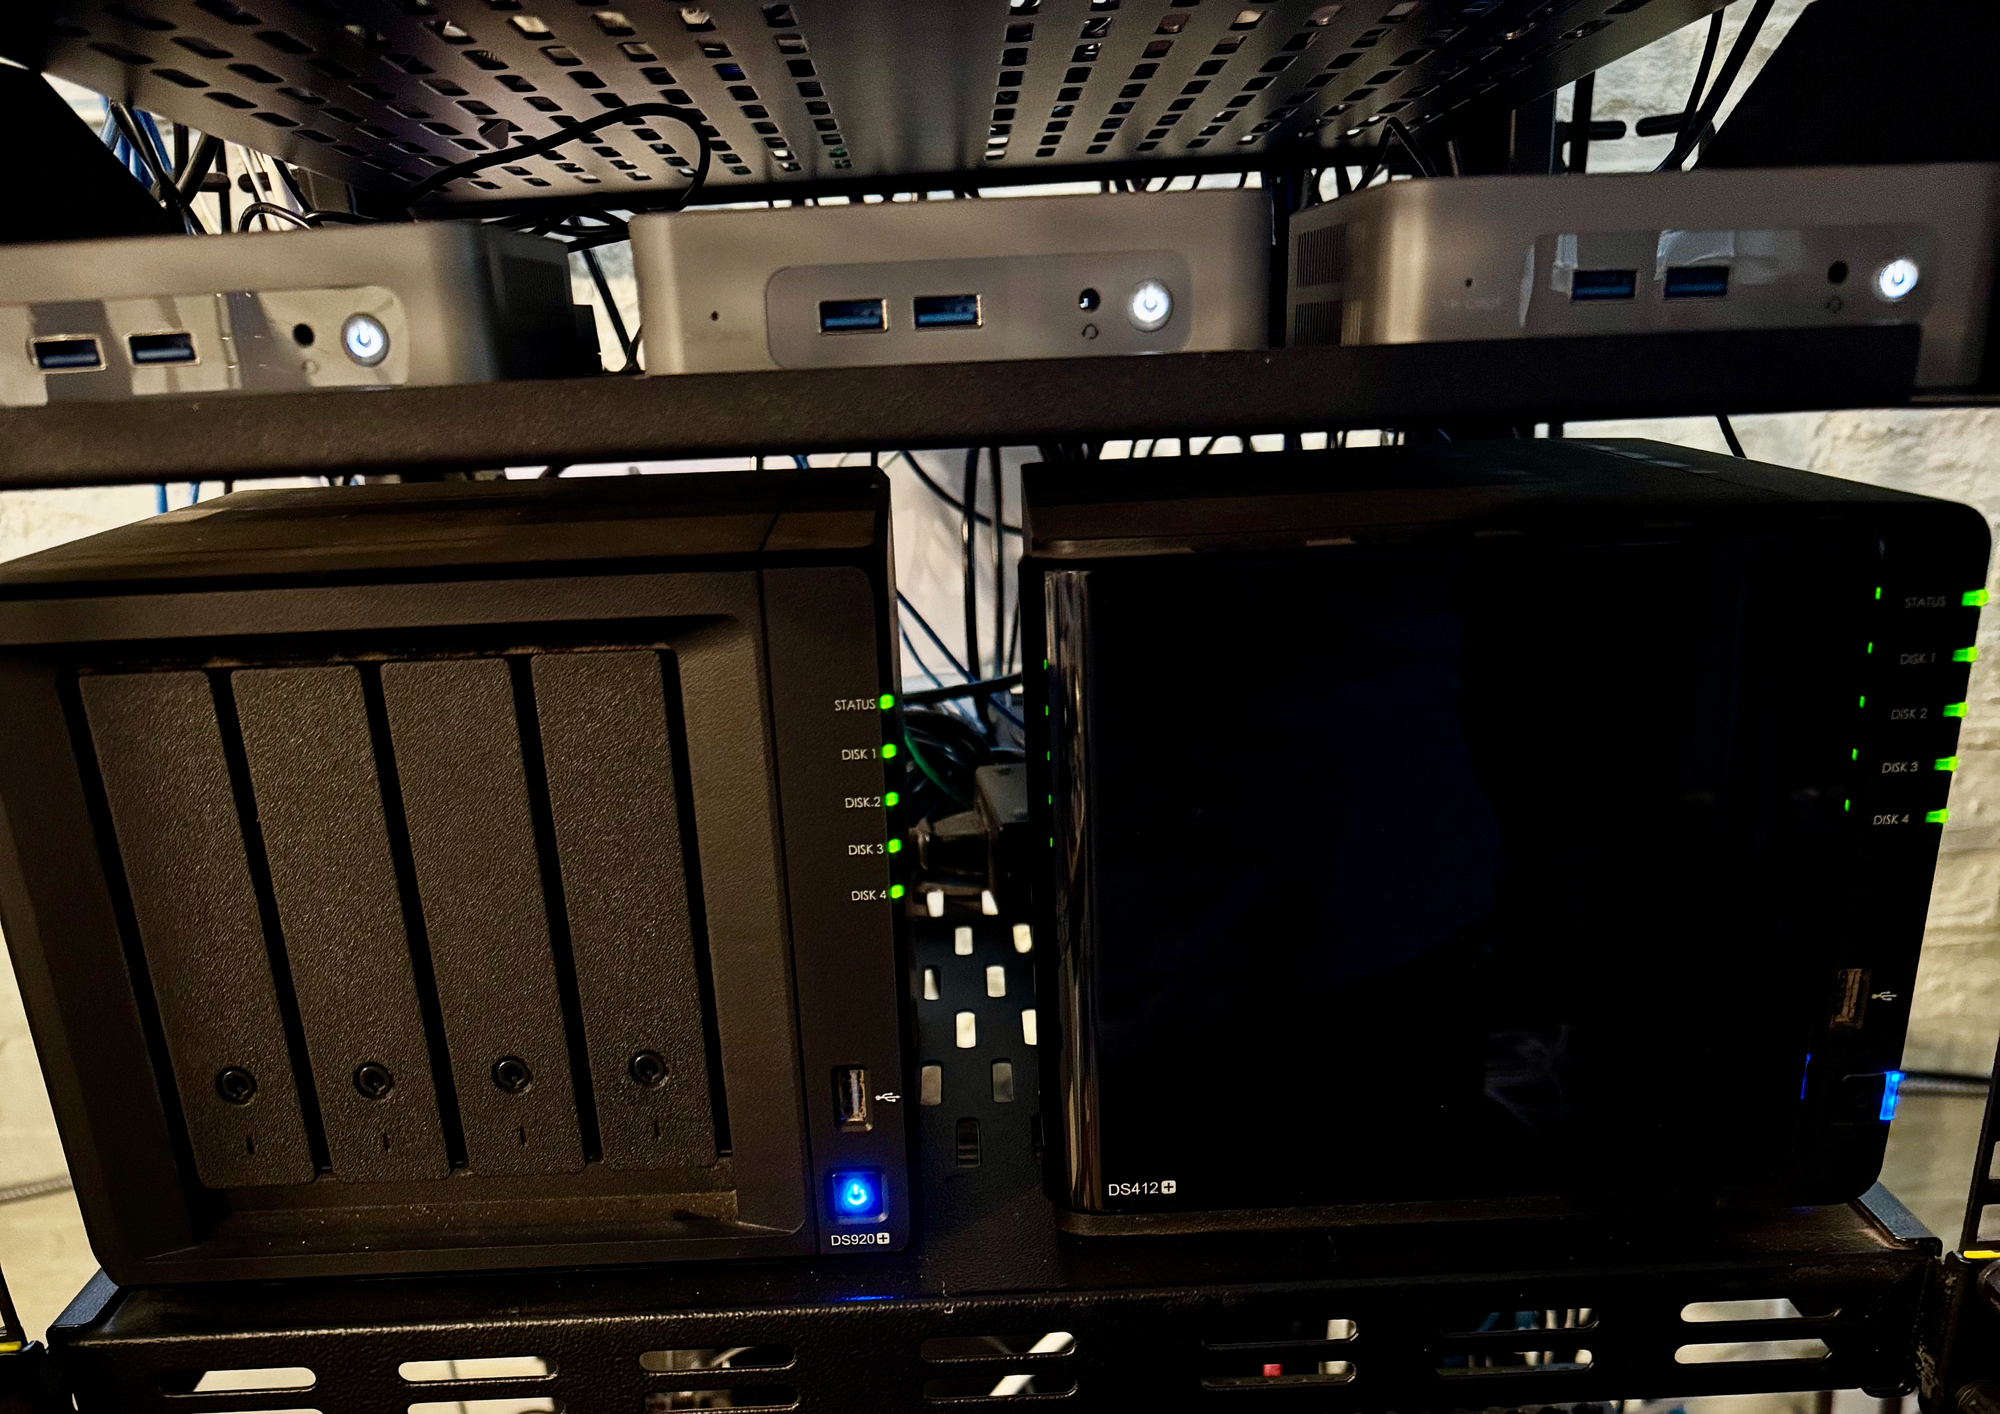
Resilient, high capacity, shared storage was at the top of my list, as it's central to achieving all my homelab goals. There are so many ways to approach this, however I will keep my recommendations simple here. Get a dedicated network-attached storage (NAS) device, add some Western Digitial Red drives, set up some shares, and now you've got plenty of storage accessible by any device on your network to store your photos, movies, backups, and more. I highly recommend Synology, as it's easy to configure, has a full suite of out-of-the-box and community software (photos, video, docker), you can expand your storage over time using their proprietary raid format (saving big money), and they seem to last damn near forever. I have two 4-bay NAS devices from them and my first one is still running on the original drives for 10 years now and counting (still gets security updates but no new features). Going on 4 years for my second NAS. If you don't want a dedicated appliance and feel like rolling your own, then it's TrueNAS. Powerful, flexible, and based on the hardware you have or buy, you could run your entire homelab in it with its equally expansive 3rd party app support.
Considerations
- Hard drives can fail, especially if you are not using ones designed for 24/7 operation. Multiple drives in a RAID or ZFS configuration are a must if your data is to survive.
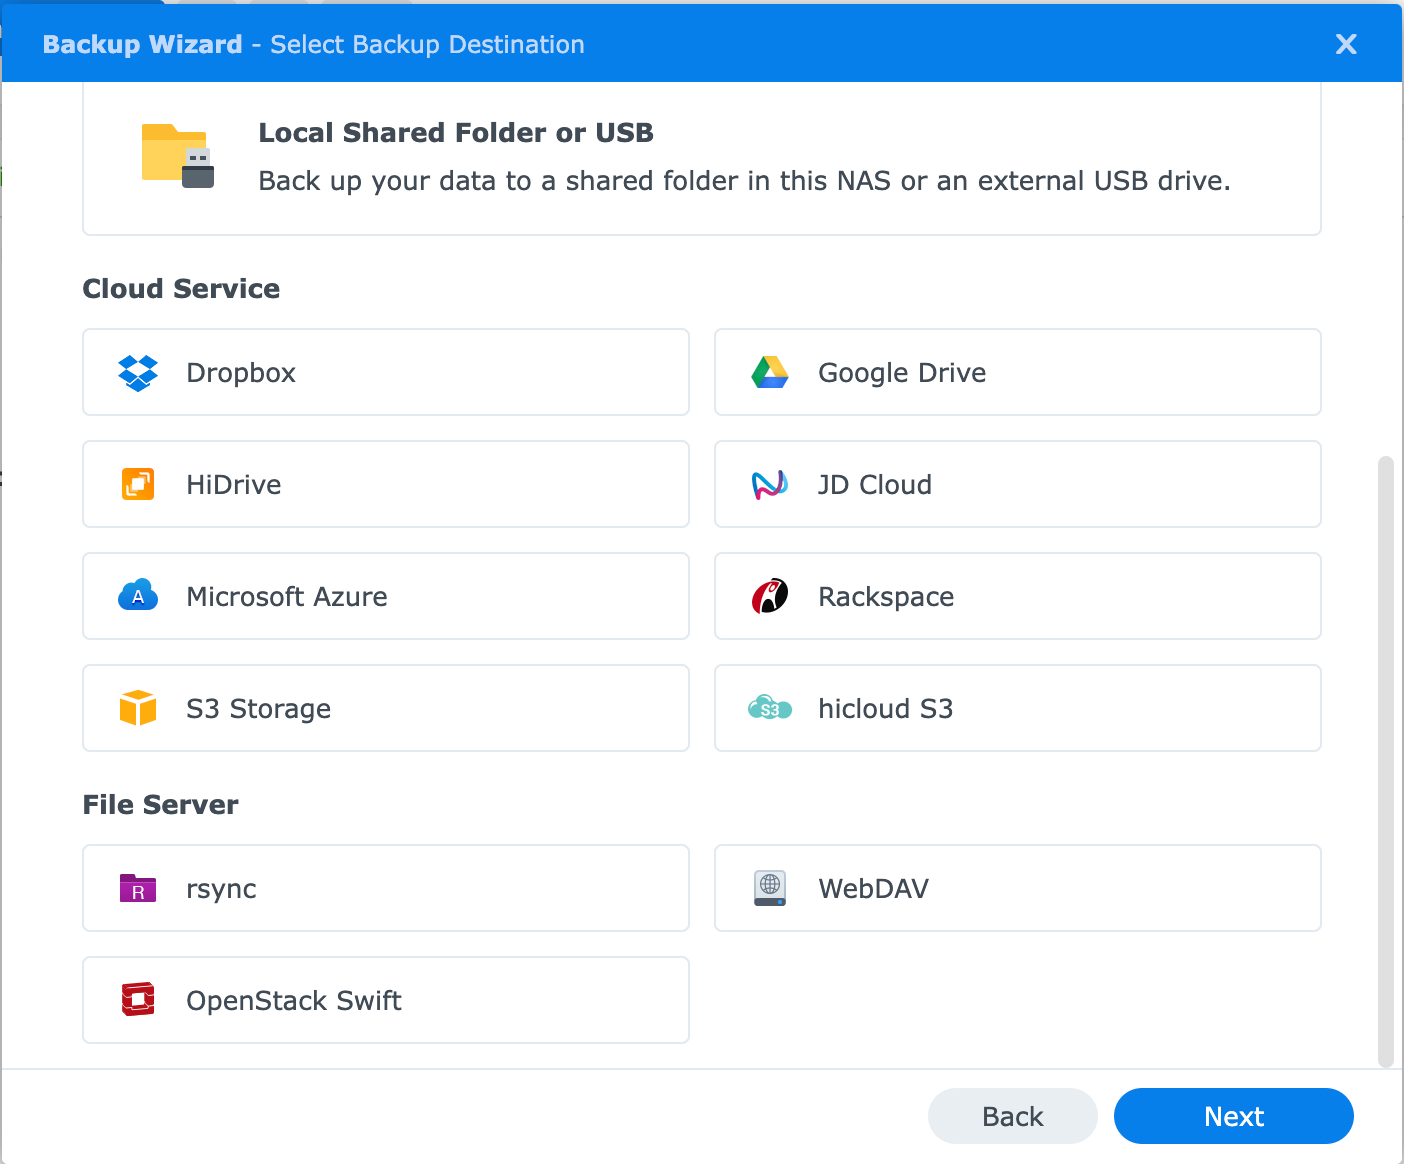
- Backup your must-not-lose data to the cloud on a regular schedule. Synology has an app called Hyper-Backup that allows you to select files and folders, encrypt them, and then send them to a cloud provider like Azure Blob Storage, AWS Glacier, Dropbox, and many others. It's cost-effective and will provide you with some peace of mind.
- A dedicated appliance can also host services like Plex, Pi-Hole, and Docker, as discussed below. Note that these devices are very constrained in terms of memory and compute power and lack dedicated GPUs for transcoding. Consider what your plans are for this device and shop accordingly. The higher desktop and rack-mounted Synology models pack considerably more computing, have memory expansion and high-speed networking...and are considerably more expensive. For me, it's storage, backup, light media and containers, and that's it. It keeps my costs down and gets me exactly what I want from a device like this.
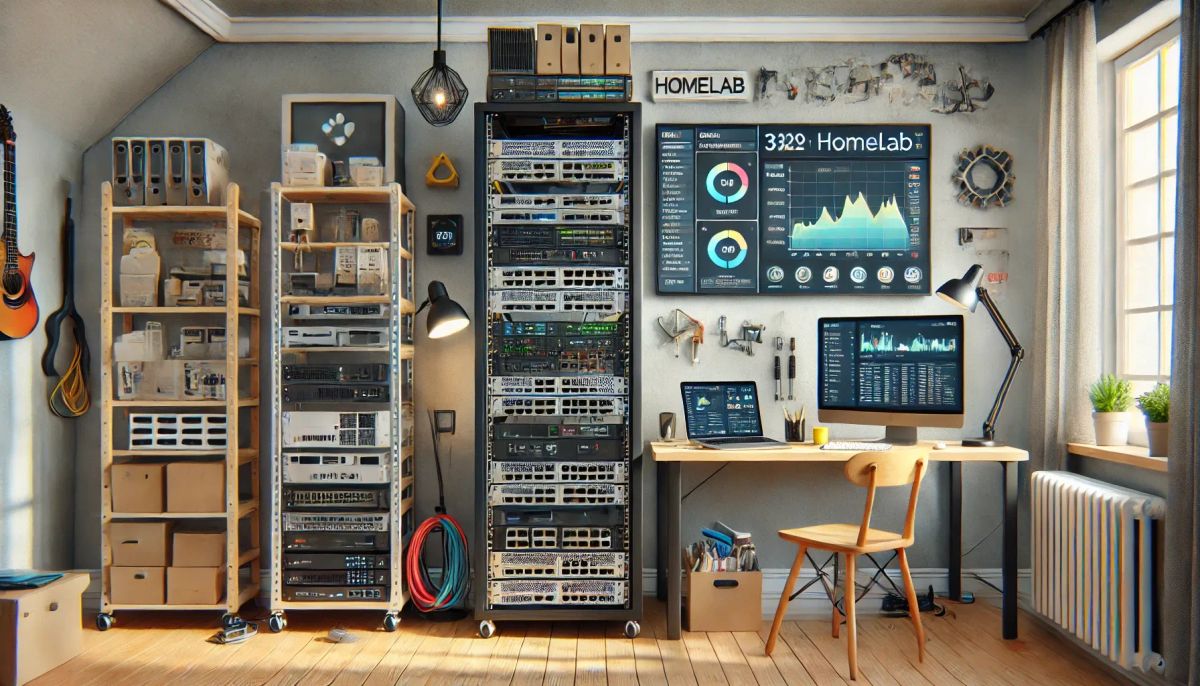
Taking up Space
Time to get the tools out and install some stuff
Homelabs come in all shapes and sizes. For me, it started as an old Dell Windows desktop and a Raspberry Pi and then moved to a 42u rack with networking, storage, IoT, and mini-PCs. Budget, space, power, and climate are factors I would consider when approaching this, but this is what's worked for me.
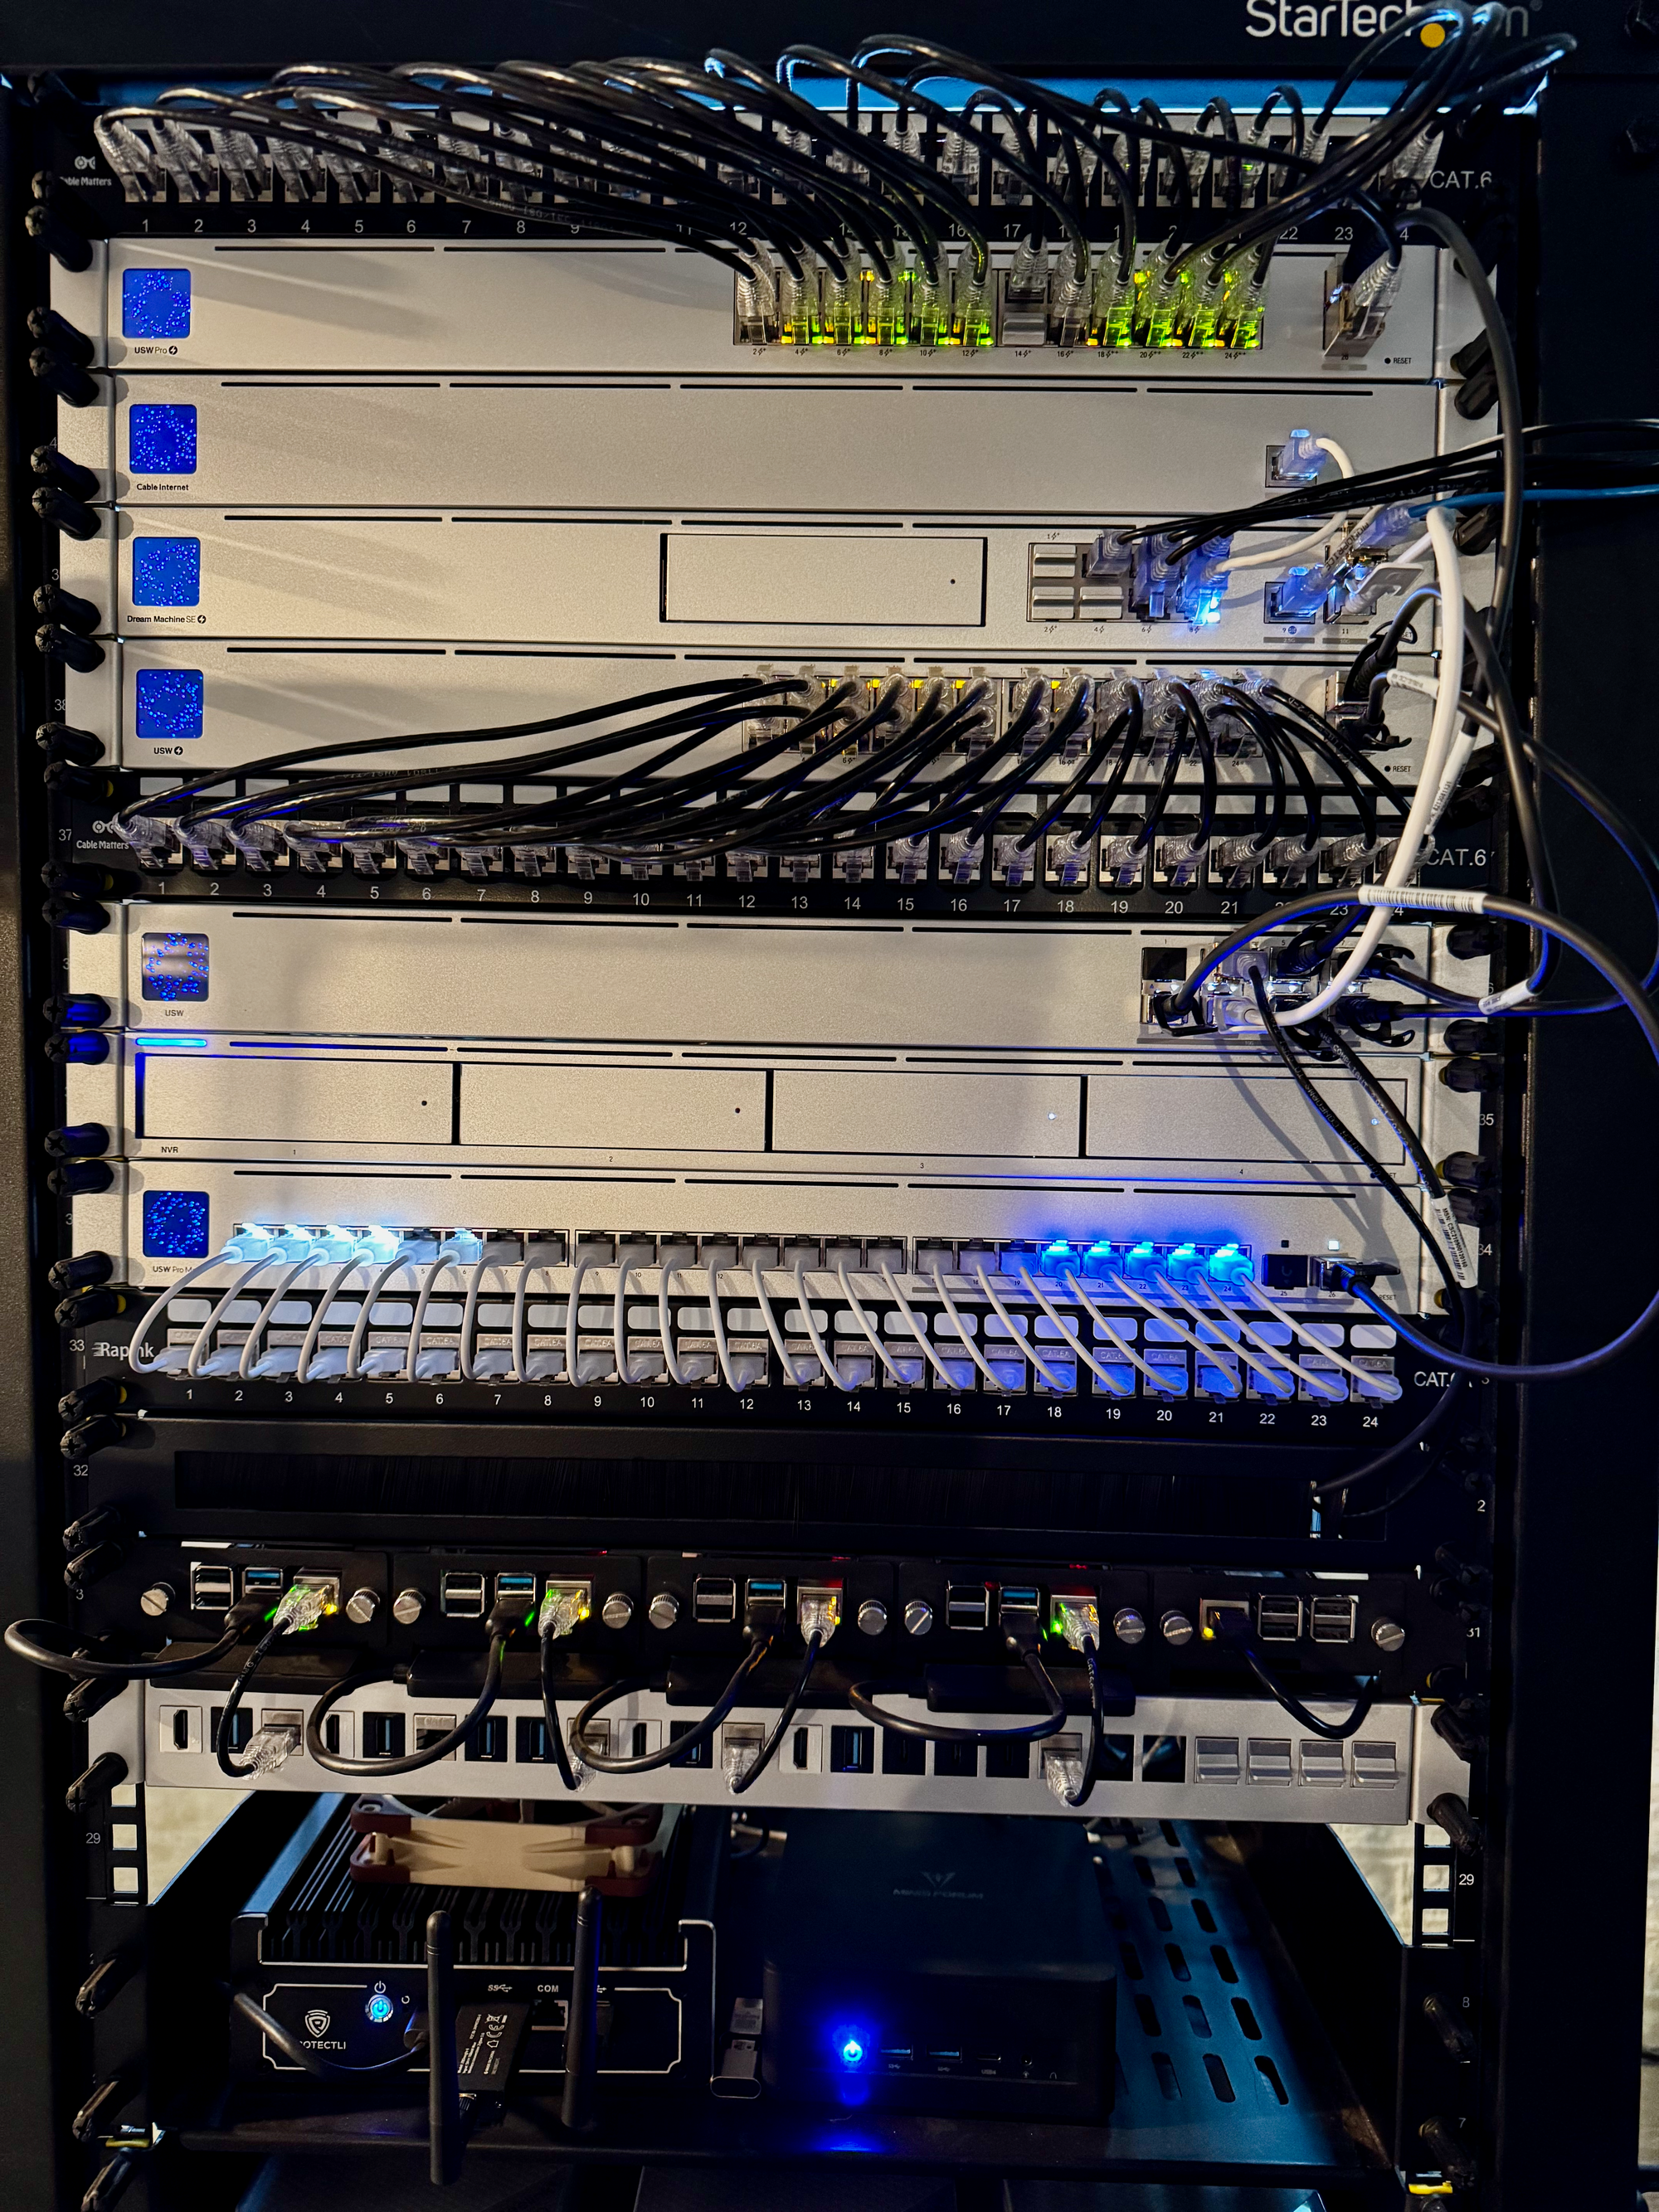
Rack mounting
Rack everything that can be racked. It's a universal standard for networking equipment, servers, along with shelves, storage, and so much more. I have two racks in two separate locations. one 42u rack, which I consider the homelab and where the majority of devices are, and I have a 25u rack in my office, which keeps my office networking, receiver, and game consoles (you can rack those).
- StarTech open rack. I rack gear on the front and the back, as you can control the depth, and it's affordable. It's also easy to keep cool, and I still have a bit more room for future expansion.
- StarTech shelves. These are for anything you can't rack, like your NAS, your Starlink router, mini-pc's, etc. I have many of these and I love them. I recommend the 2u for heavy stuff and the 1u for the small and light stuff. There is no need to take up more space than you need.
- Rack Studs. Forget the nuts and screws, Rack Studs all the way. You will thank me...and them for making such an awesome thing.
- Rack mounted PDUs. I use these, as well as Unifi's power gear, but they are a cost-effective way to get started with power management.
- Slim Cat-6 patch cables. I LOVE these, and they can also handle PoE (it varies by brand). They are much easier to manipulate and cable manage and come in all sizes. I make a lot of my own cable as well, but I use these on the rack.
- Rack patch panels. You can buy them with the inline keystones or by the panel and keystones separately; it just depends on what you want to do. I have some patch panels with inline keystones and some blank panels. I love the blank ones for putting in a mix of USB, HDMI, and Fiber keystones for easy connectivity to rack-mounted gear.
Metal
You'll need some metal to run your local data center properly. My current setup relies on mini-PCs and a few Raspberry Pi 4s. They are inexpensive, cool and quiet, and power efficient. I'm not trying to be a data center; I'm just trying to block some ads. There are quite a few choices here, and they do matter based on your plan. I suggest keeping it simple, though I rarely follow my own advice 🤓.
- MINISFORUM PC. I only have one, and it hosts many of my more resource-intensive services. There are lots of sizes and shapes, but if you want a mini-PC with a discrete GPU, more CPU and RAM, and 2.5G networking, then look no further. I love it and will buy more when I need to expand.
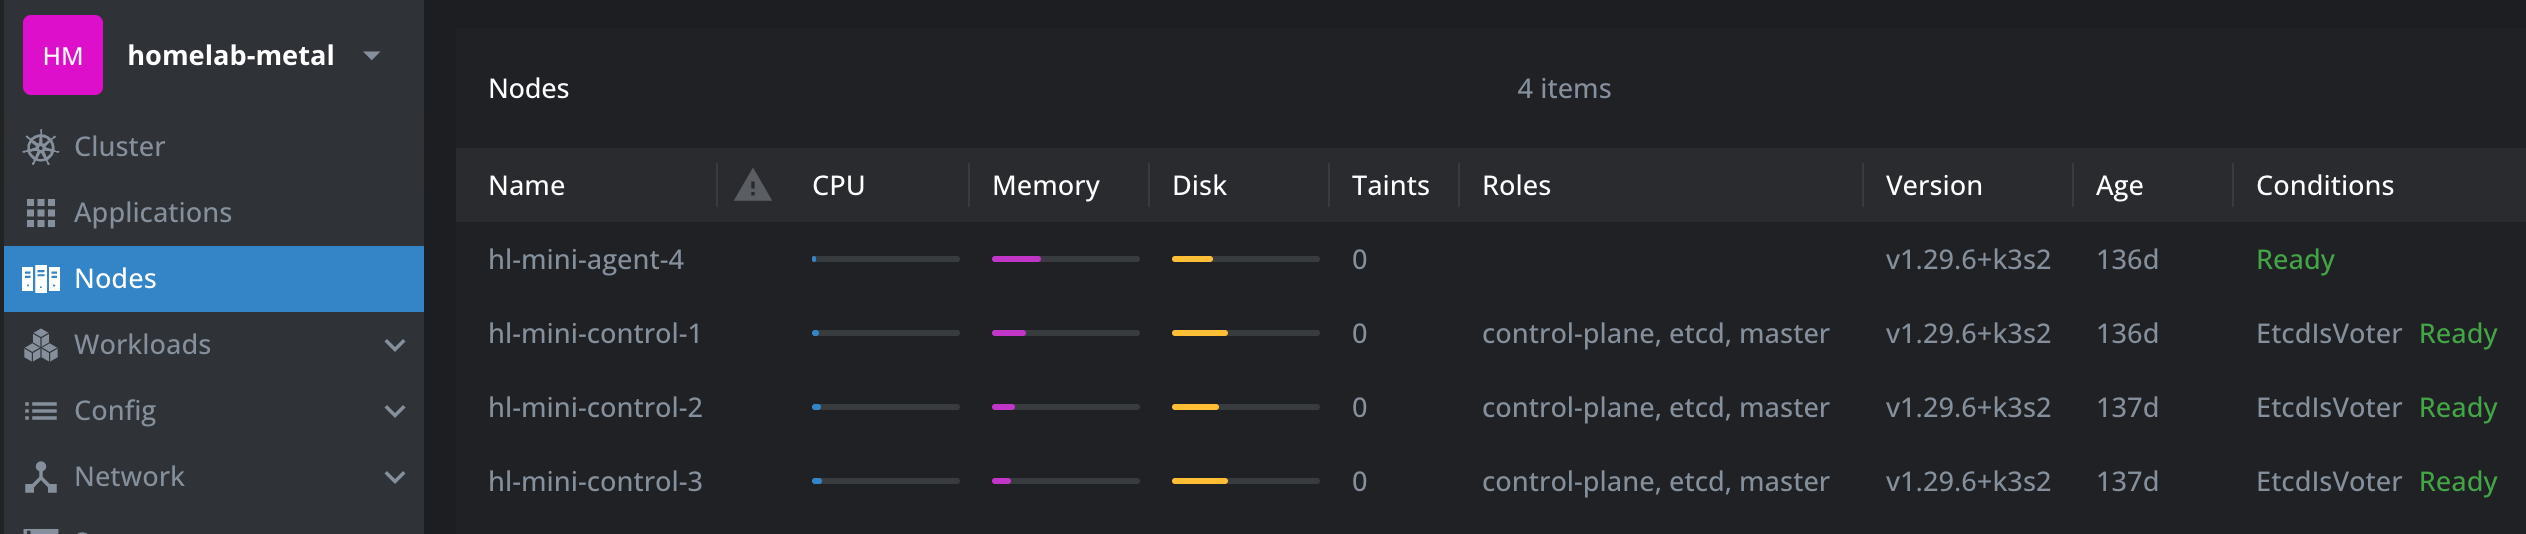
- Beelink Mini PC. I bought three of these, primarily to serve as my K3s control-plane nodes. They are very inexpensive, have some expandability, and have dual 2.5G networking—a perfect combo for me. Three of these cost as much as one of the MINISFORUM. For me, these are about introducing some physical High Availability, not about the muscle.
- Rack-mounted Raspberry Pi 4's, with SSD's and PoE hats. I love Raspberry Pi's, they have amazing utility. They aren't the device to do anything substantial, but for services like DNS, reverse-proxy tunnels, cron jobs, they are perfect. They run on 5W of PoE each and are an indispensable part of my homelab.
My WIP rack is still in need of better cable management
Virtualization with Proxmox
Bring the cloud to your homelab
It's time to get into some software. I will keep this simple. Other than my PIs, I don't run any services on the metal directly. Server management is hard and can get very enterprizey very quickly. Hardware management is virtual now, we spin up a new VM or service in Azure or AWS and delete it when we're done. It should still be that easy at home, so let's discuss how we can get close to that. This will get you started, but there is much more to delve into as you get comfortable.
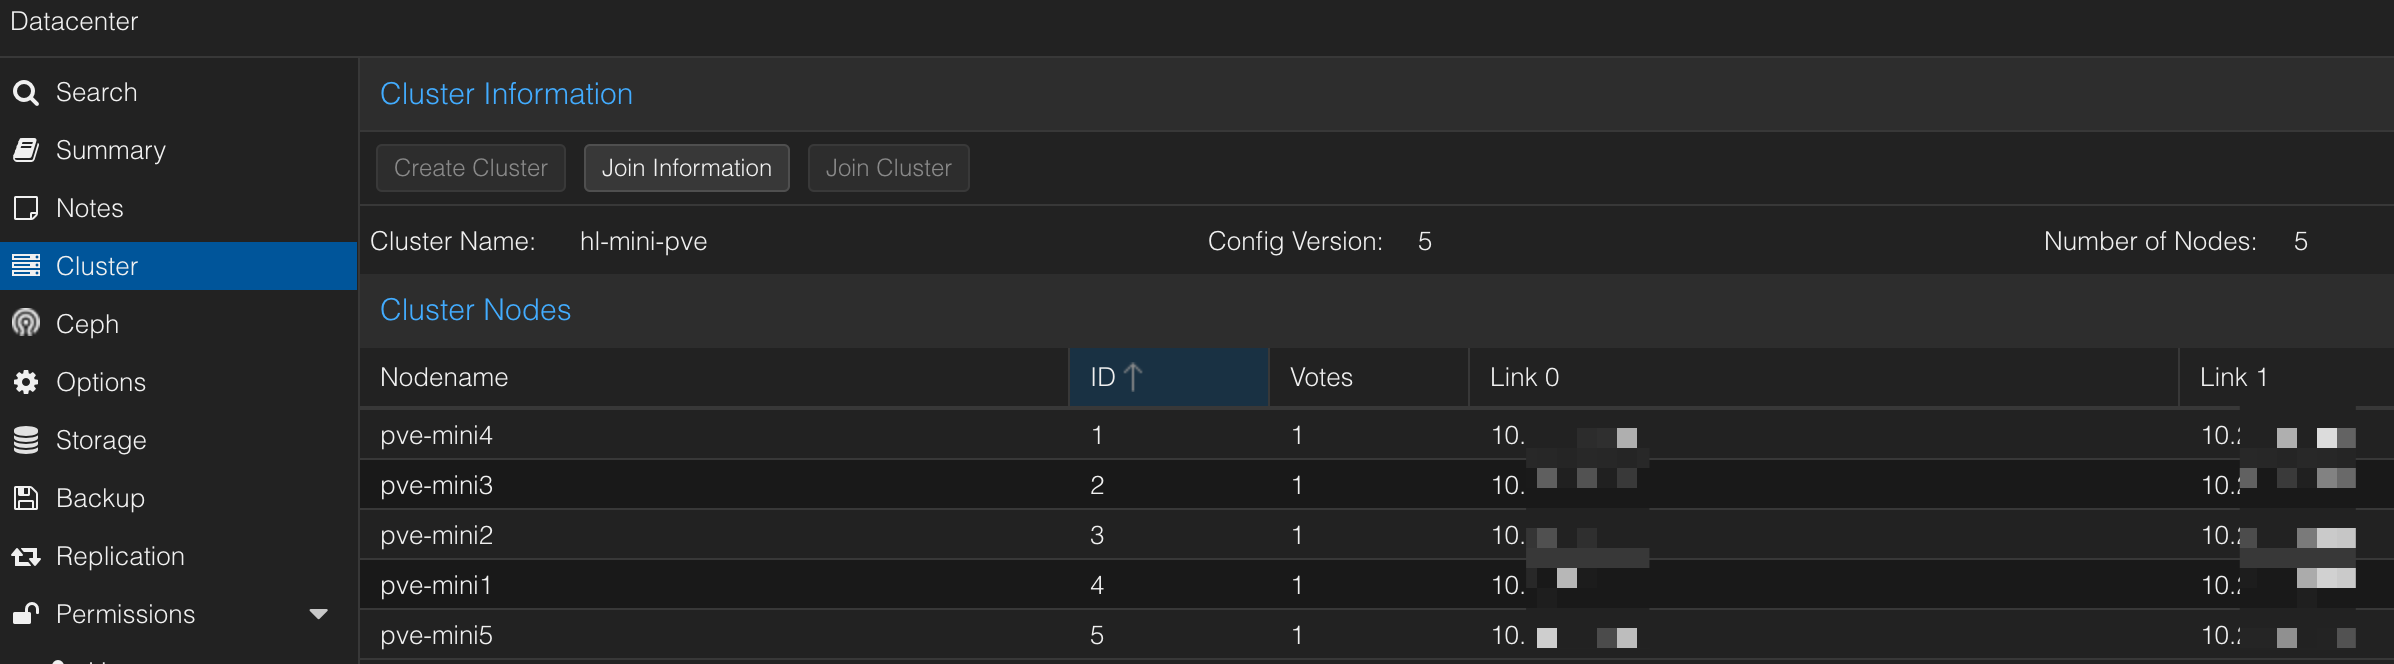
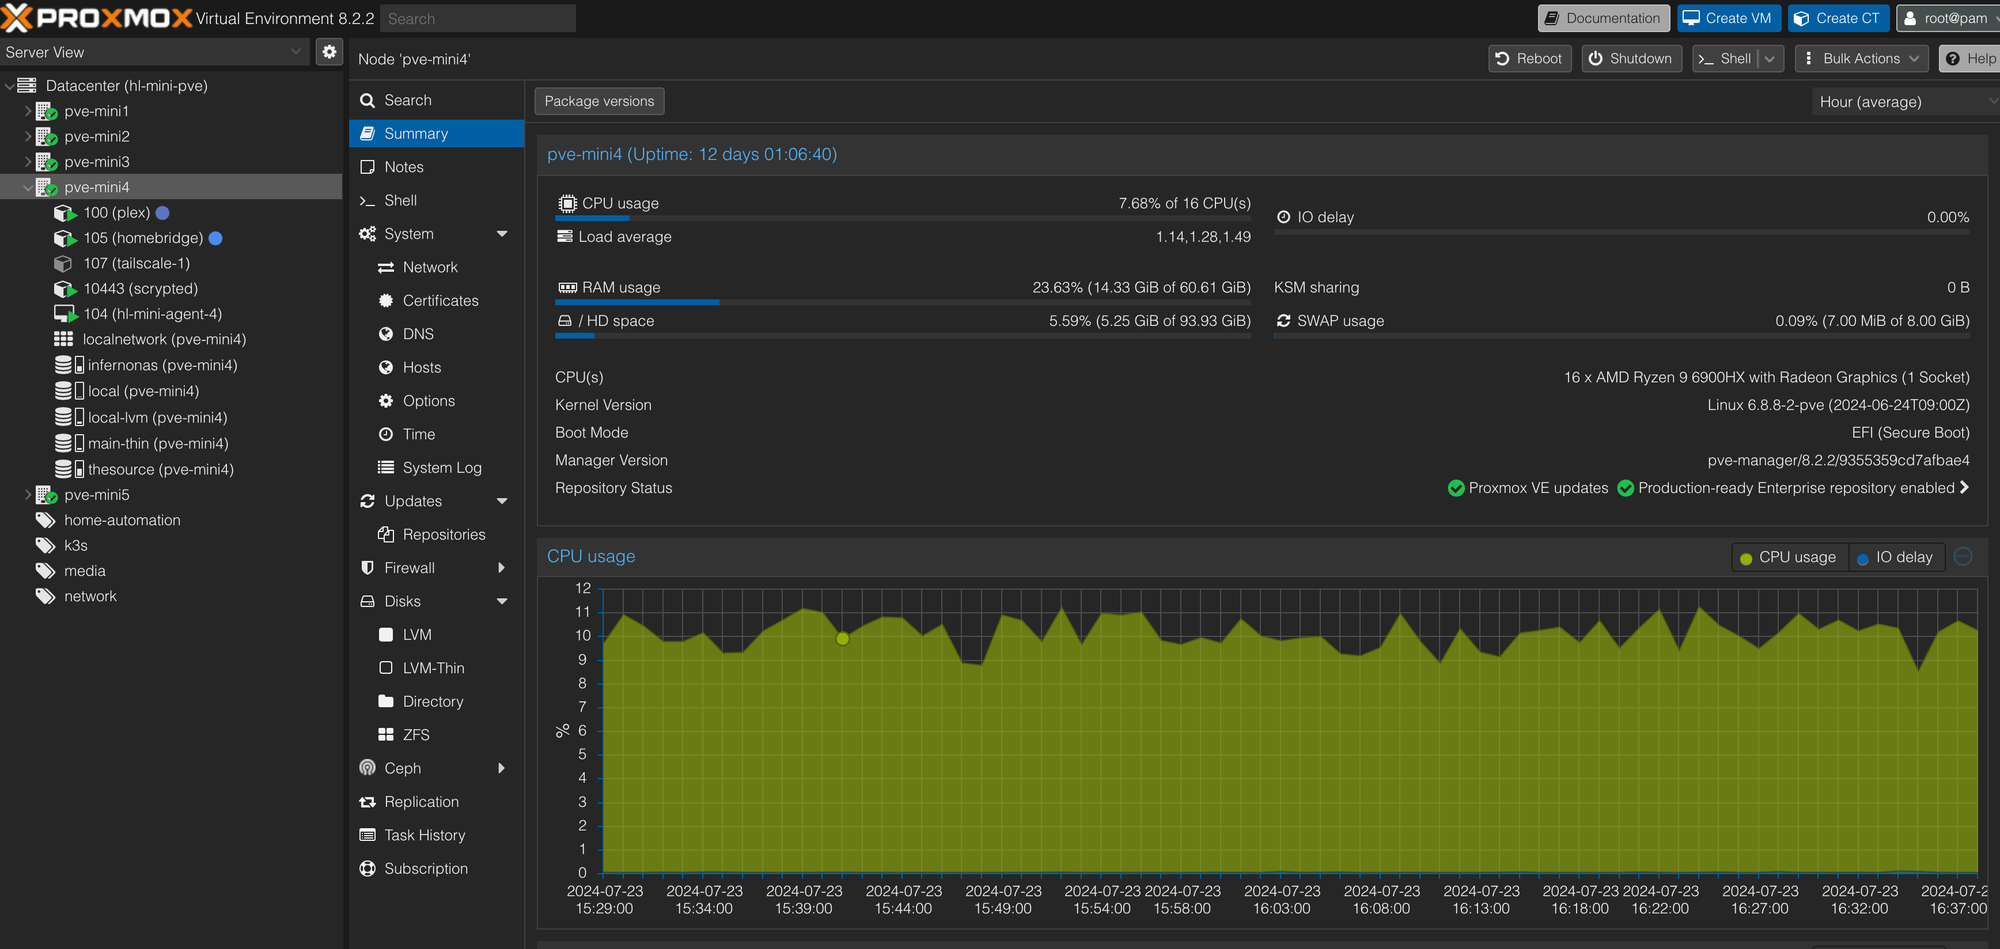
Other than the Pis, if it's running in my homelab, then it's running on Proxmox VE. Proxmox not only makes hardware management easy through its easy-to-use UI and terminal but also supports clustering and high availability out of the box. I won't list all the features here; know it's free to use, supports near-native performance VMs and Linux containers, and runs on almost anything. There is an excellent support community, which I contribute to, and has helped me out more than a few times. I've used Proxmox VE for many years, and I expect many more years to come...don't homelab without it.
Proxmox VE helper scripts. An assortment of scripts to help you automate and manage Proxmox. Along with some useful scripts to help you set up your services in Proxmox containers. Thanks for the tip Andy!
Volumes and backup
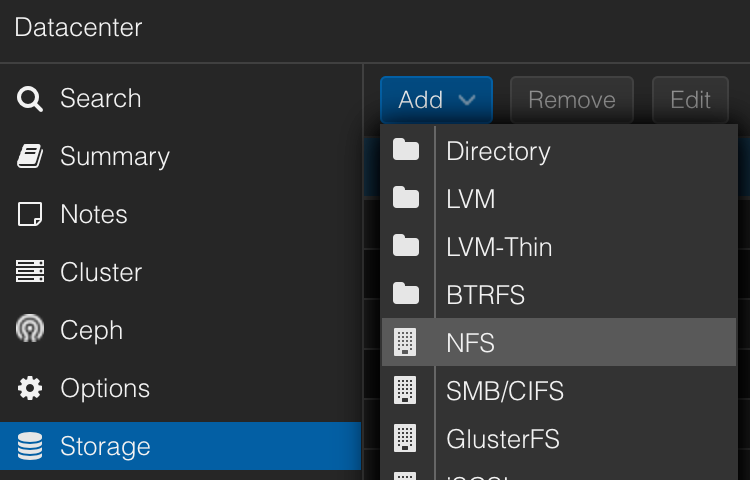
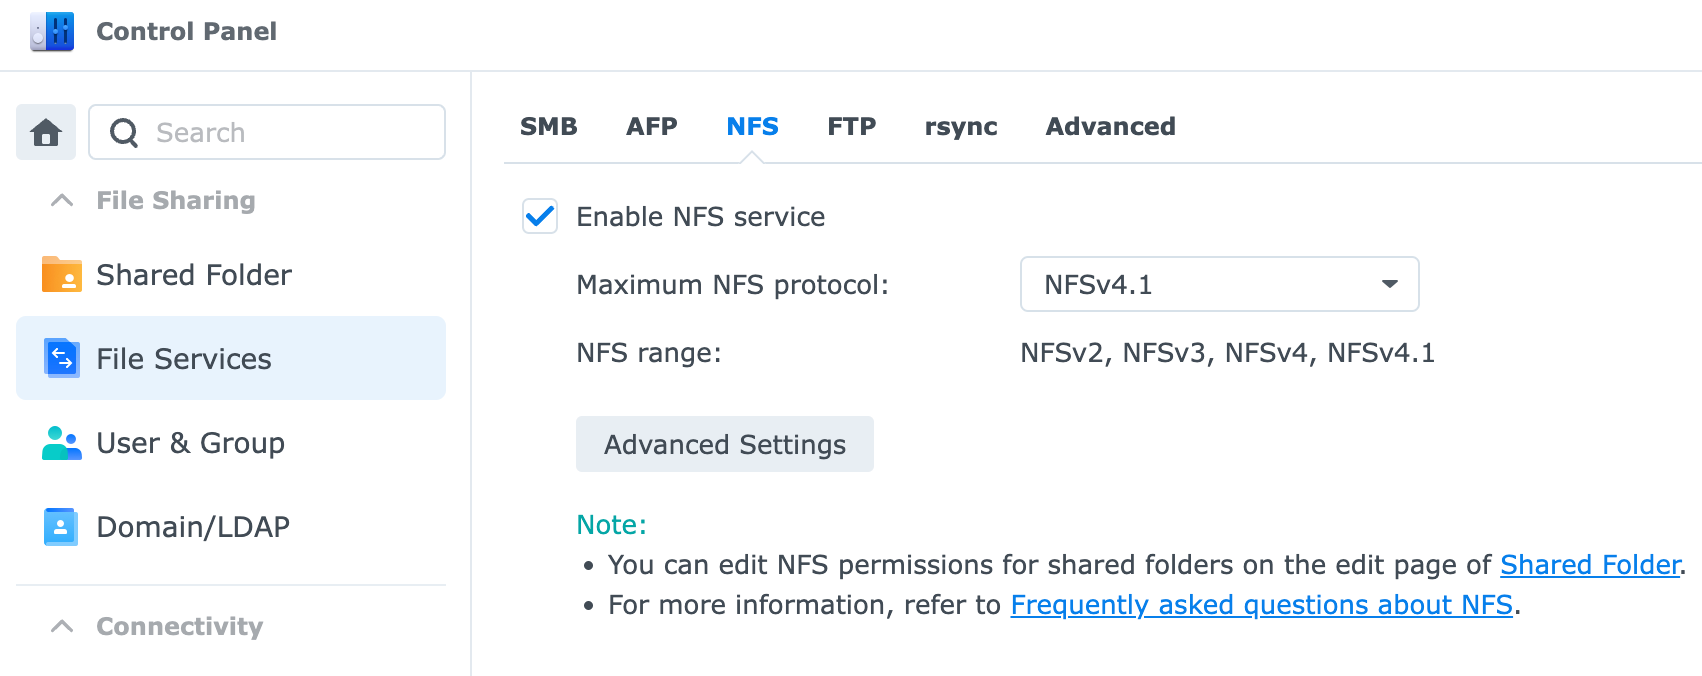
Using your NAS as a primary storage device for Proxmox is a great way to get started. First, add a volume share to Proxmox using NFS: Datacenter -> Storage -> Add -> NFS. This is now shared with every node in your cluster and can be used to store your virtual disks, backups, and ISO images. It is network-attached storage, so it will be a bit slower (1G fine, 2.5G better). However, you get the full resiliency of your NAS to protect from data loss. Unless disk latency is paramount, consider this as a good option for all of the above. For everything else, a local volume running on an SSD with regular backups to the NAS.
Networking
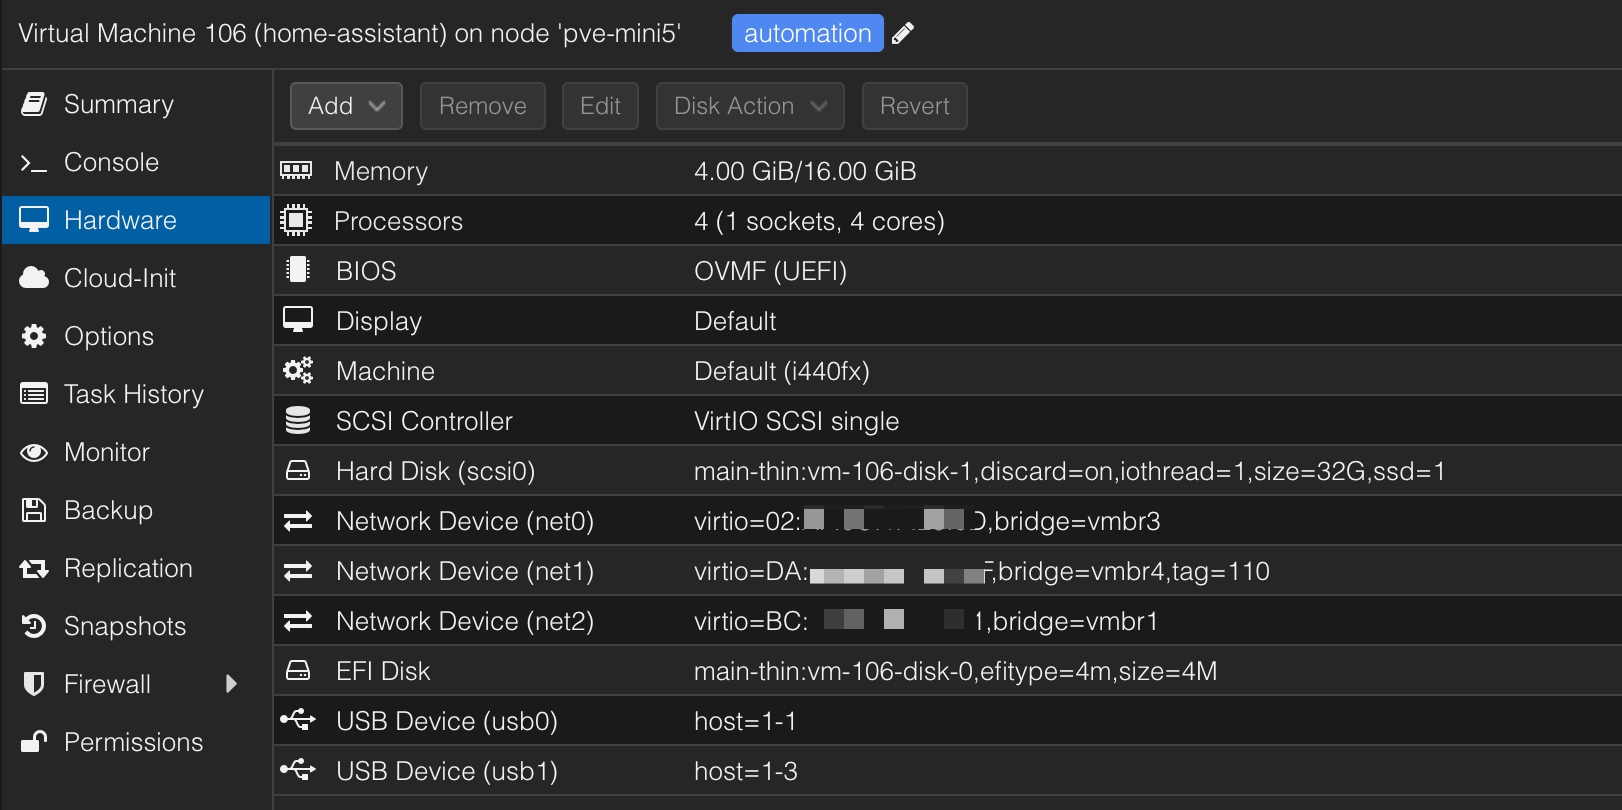
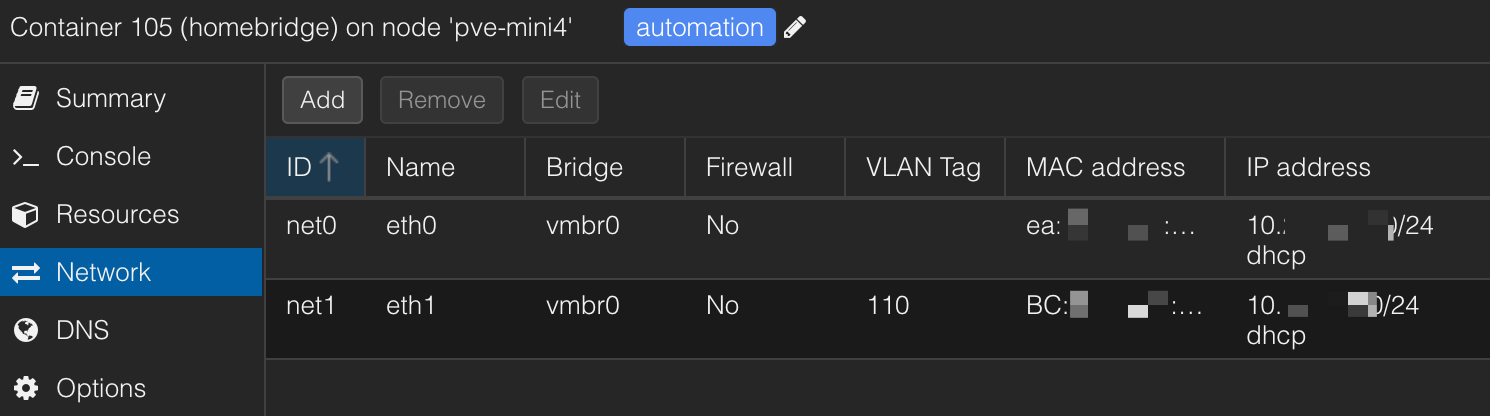
One of my favorite features of Proxmox is the software-defined network. In these screenshots, you can see that I have two bridge networks defined on the host bound to the physical network devices: vmbr0 (bridge) to enp1s0 (nic) and vmbr1 to enp2s0 and I've given the bridge a static IP on the homelab network. Now see my homebridge container, which has two virtual network interfaces, one on the default VLAN (homelab) and one on a separate VLAN (110 aka IoT). Both interfaces use the vmbr0 bridge, which is assigned to only one physical nic. This allows homebridge to easily discover devices within the IoT network while existing and being managed on the homelab network over a single physical device. I use a similar configuration for Home Assistant. Overall, it is more flexible than using port profiles and attempting this same configuration on my managed switches. Sometimes, what should work doesn't, so this is a clean way to cut through that. I find it best to keep the configuration close to the implementation.

Cloning
This feature can be your best friend when setting up multiple VMs of the same type or having a ready-to-go Ubuntu VM fully updated with your SSH key to save you time. Set up your VM in the usual way and get it all configured, then right-click the VM and select Clone. This is a massive time saver and worth mentioning.
Kubernetes
Containerize your homelab
Proxmox is up and running, managing the metal and some key services, so it's a solid foundation for the next layer. With Kubernetes, we have a fully managed way to host services that are resilient, auto-scale, and easy to manage and deploy with Infrastructure as Code (IaC) tooling like Terraform and Helm. This is where things really get fun. So let's set up a cluster and get things ready to deploy some homelab essentials. I highly recommend running k3s in your homelab, as it's a certified Kubernetes distribution with a single binary and can run on a wide variety of devices.
Rather than repeat myself, I have a good setup guide in another post. I discuss how to get your k3s cluster up and running, along with setting up kube-vip, which I recommend you do as well. For each node in your cluster, I recommend three Proxmox VMs running the latest LTS release of Ubuntu server.
 Chris Kirby
Recommended Addons and Tools
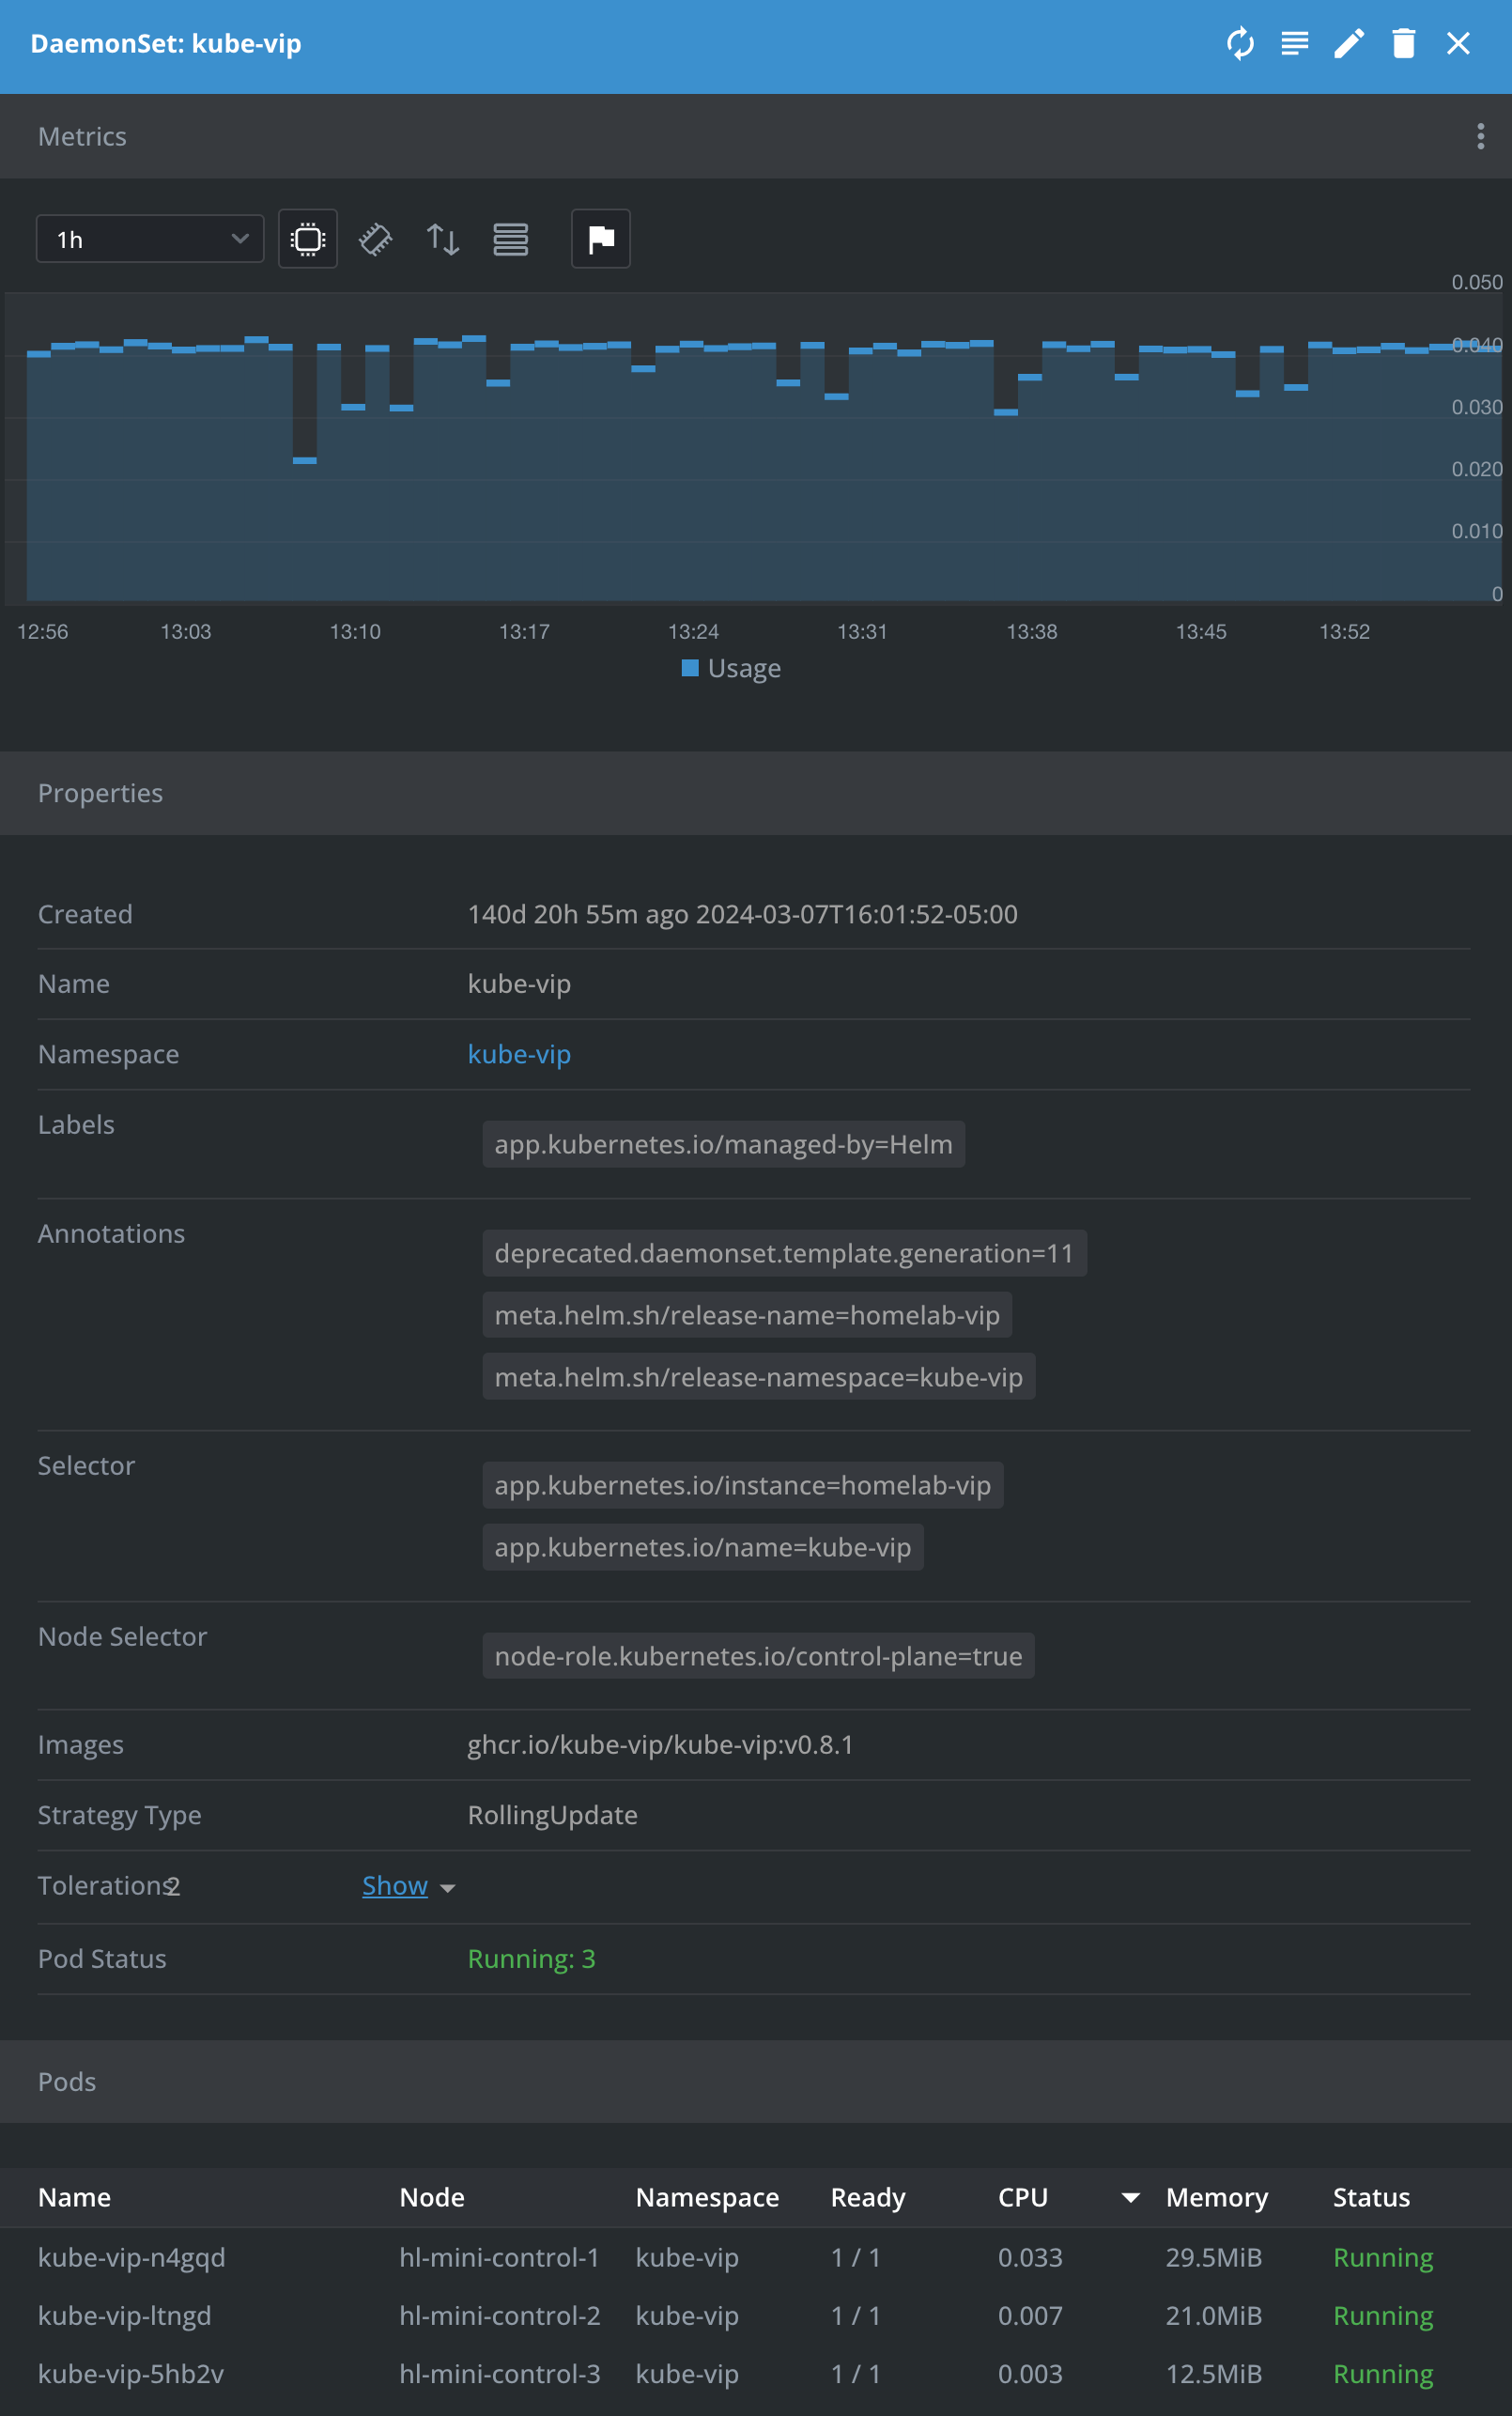
- kube-vip - Adds high availability to your cluster through a virtual IP (VIP) and control-plane and service load balancing. Use their Helm chart to deploy or via kubectl to apply directly.
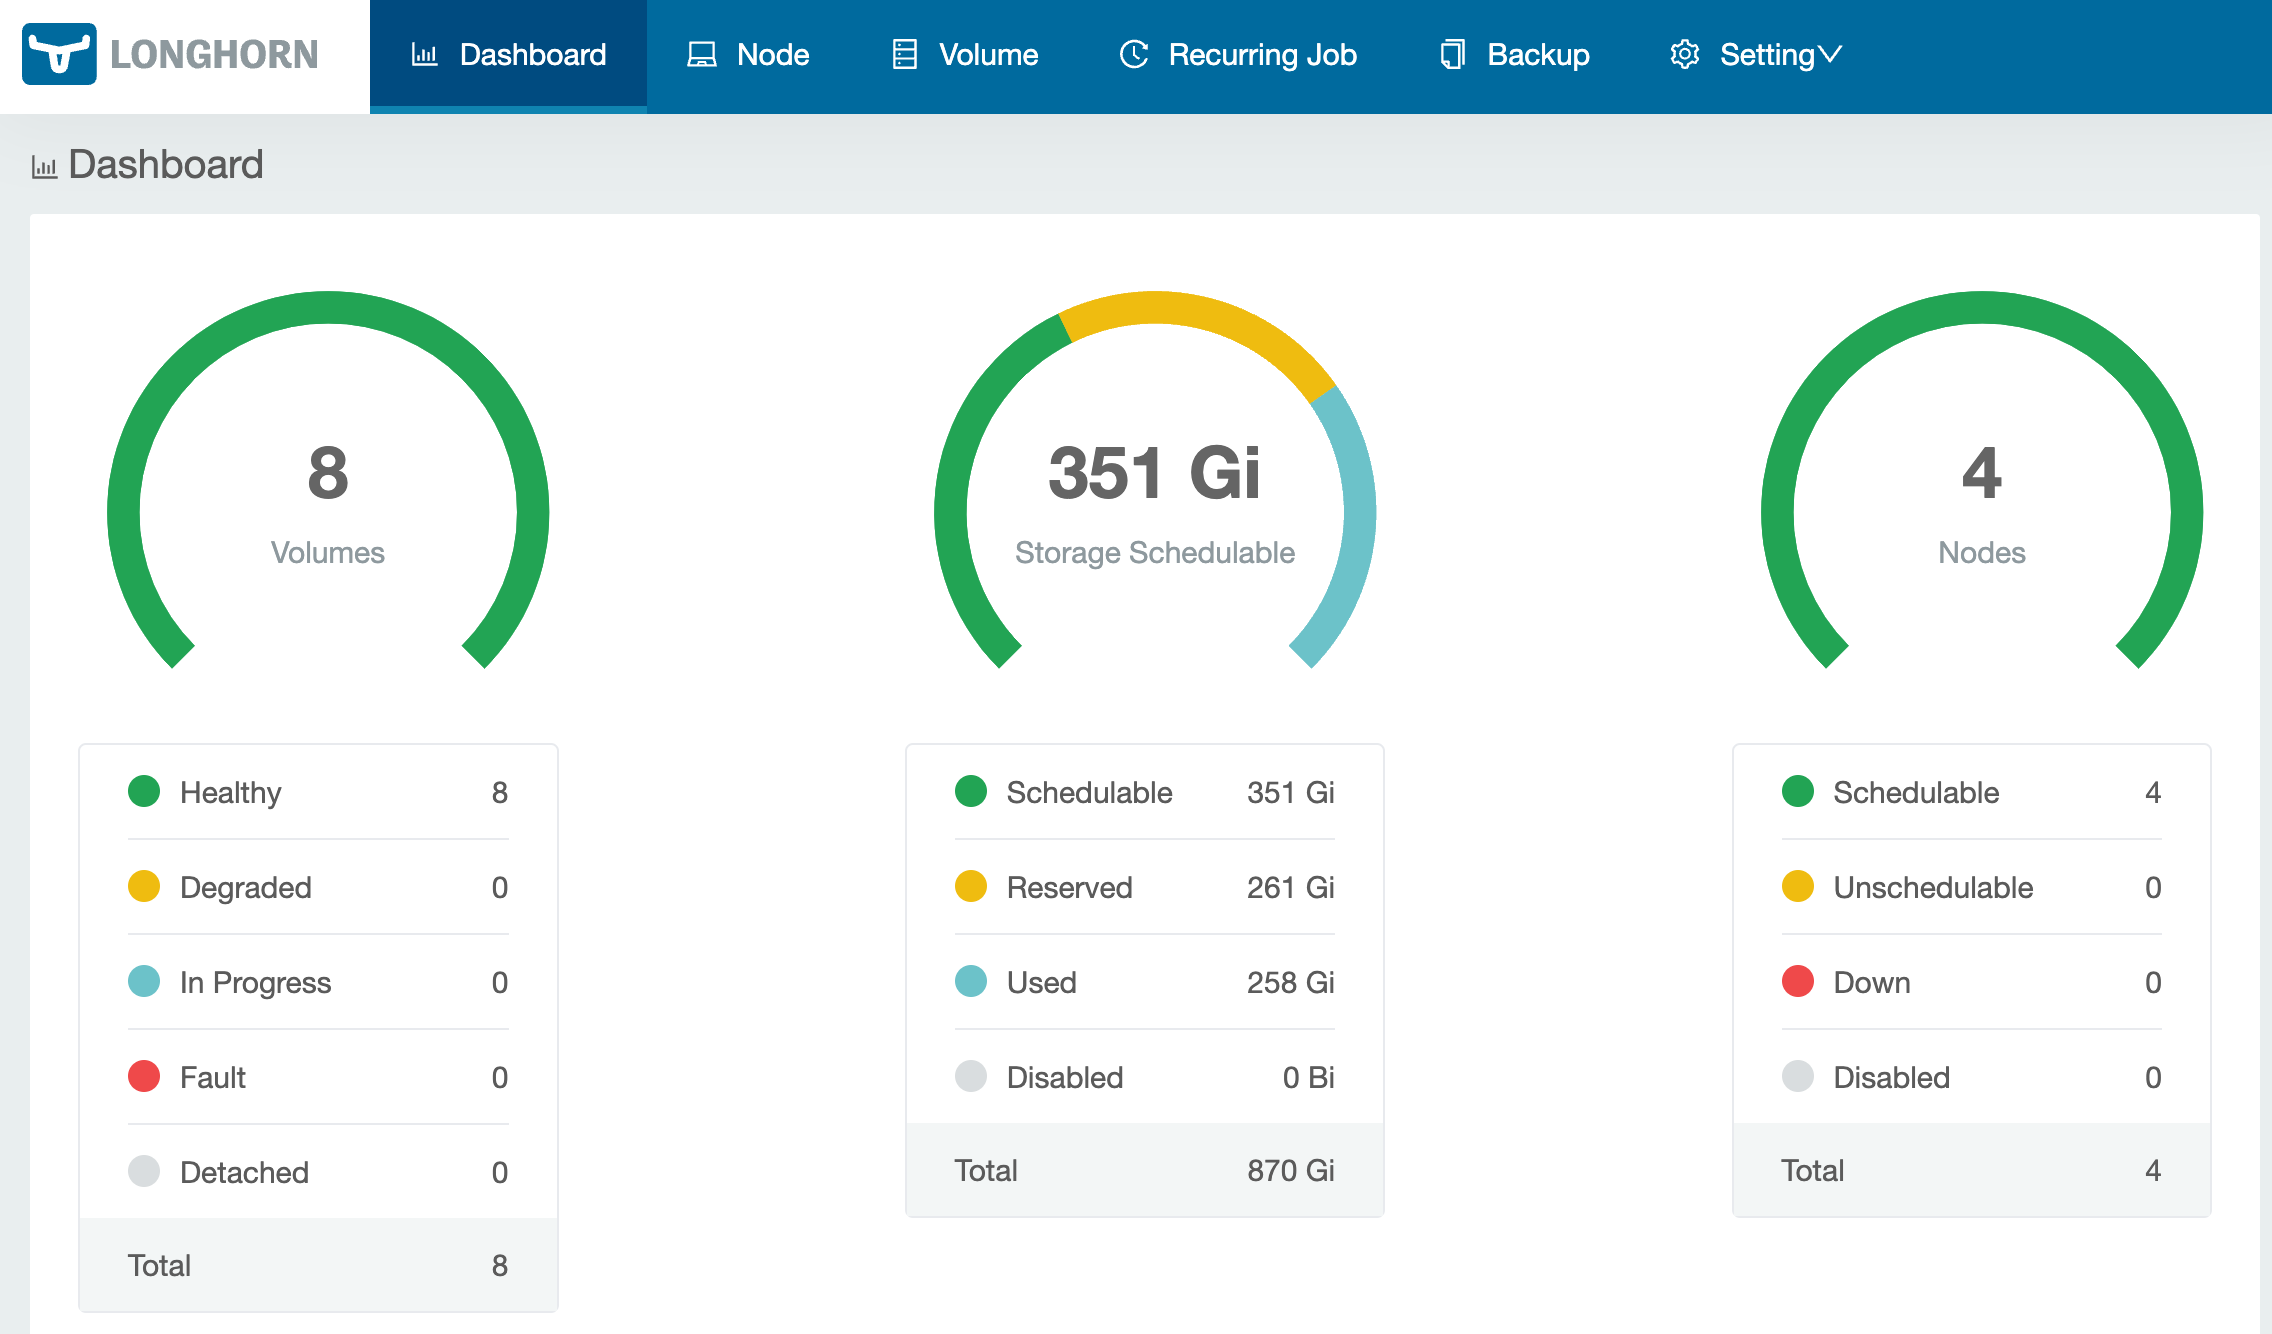
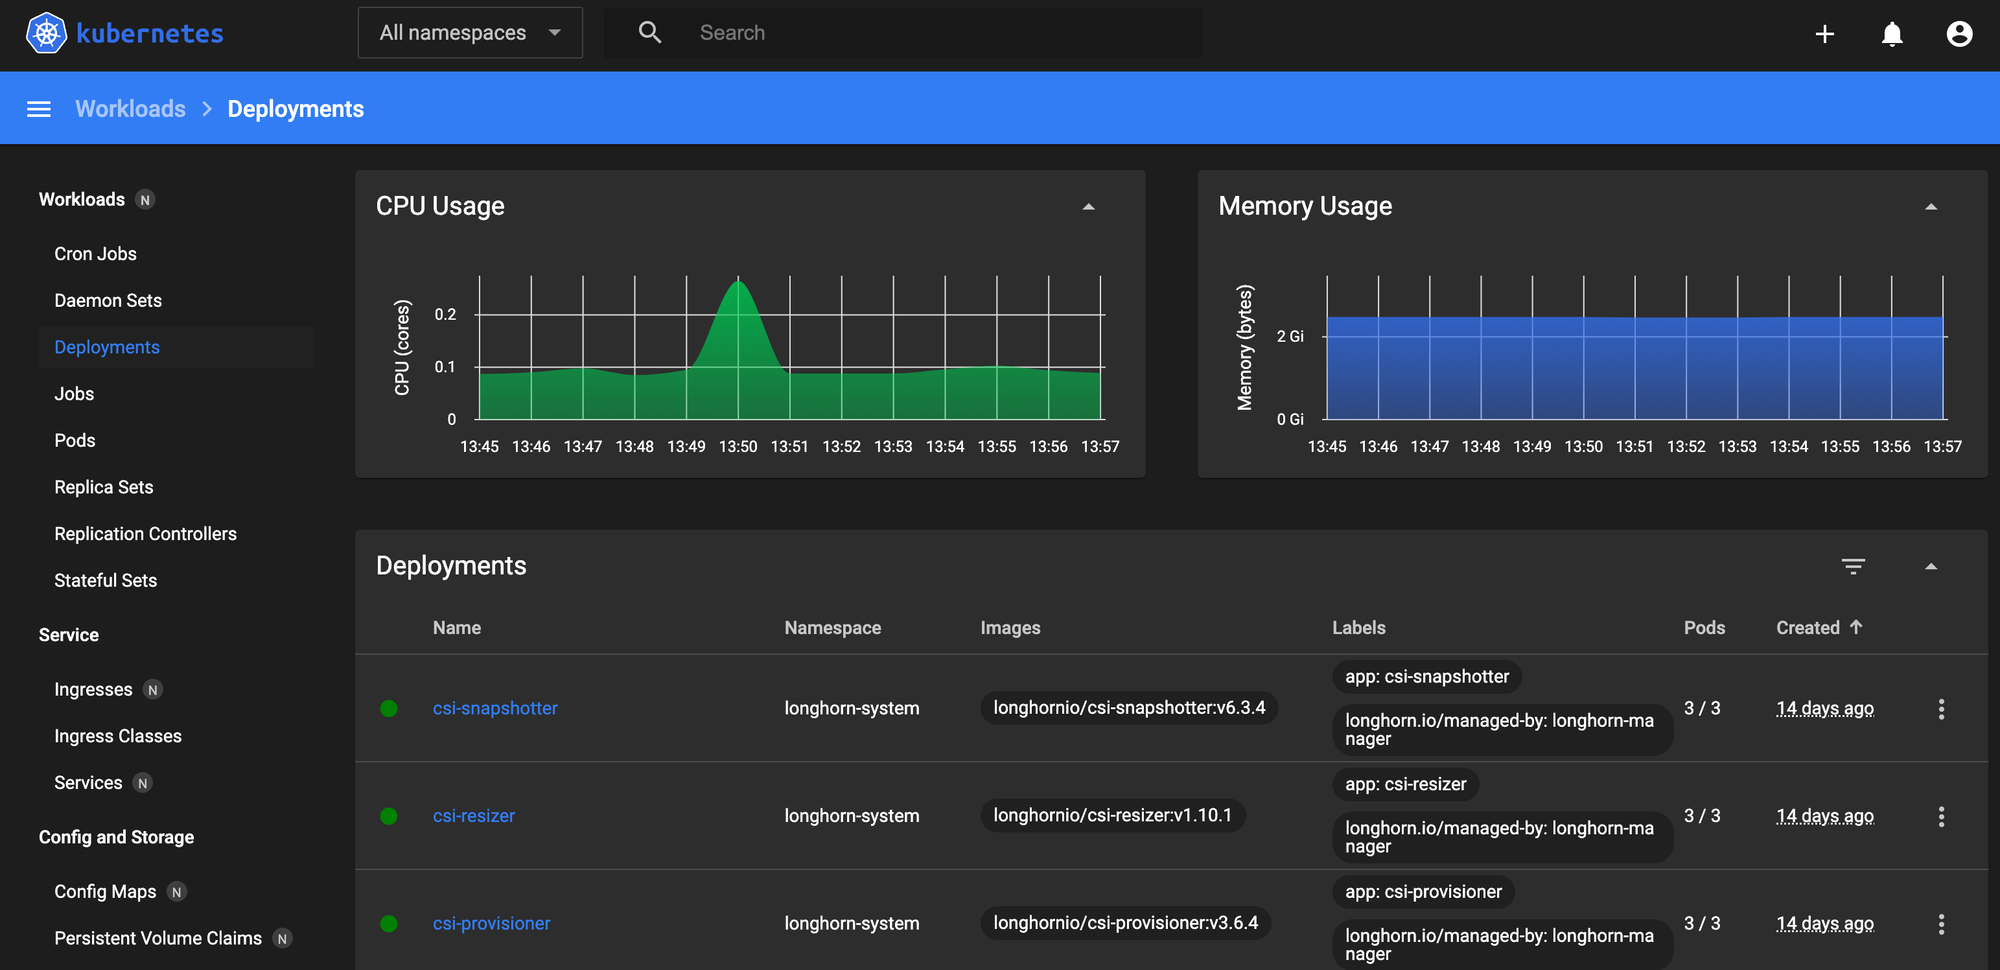
- longhorn - Adds highly available distributed block storage to your cluster. A great way to add persistent storage to your cluster, along with regular volume backups. This has saved me more than a few times and gives me confidence when doing some basic maintenance.
- nginx - k3s ships with traefik, which works well, however some may prefer or be used to nginx. Many helm charts ship with annotations for nginx, so you may just want the option and have both.
- Kubernetes dashboard - A nice web interface for managing your cluster, with your cluster.
- Lens - The best way to manage your cluster. It's free for personal use and will help you better understand Kubernetes and well as easily maintain your cluster. Absolutely indispensable for me and probably wouldn't continue running Kubernetes in my homelab without it.
- Warp - The best terminal for Mac, Linux, and now Windows.
- CLI Tools -
brew install kubernetes-cli helm
Services
Deploy, configure, get your homelab up and running
We've now covered how I organize, host, and run my devices, which is ever-evolving. Now let's go through what I run in my homelab to bring it all together.
Secure DNS with Pi-Hole
Basic privacy starts with DNS. It is such a simple thing yet it has quite a bit of complexity. DNS is an OG internet protocol and service that has received many privacy-related upgrades over the years; however, backward compatibility remains. By hosting your own, you get the best of both: maximum compatibility with the latest security.
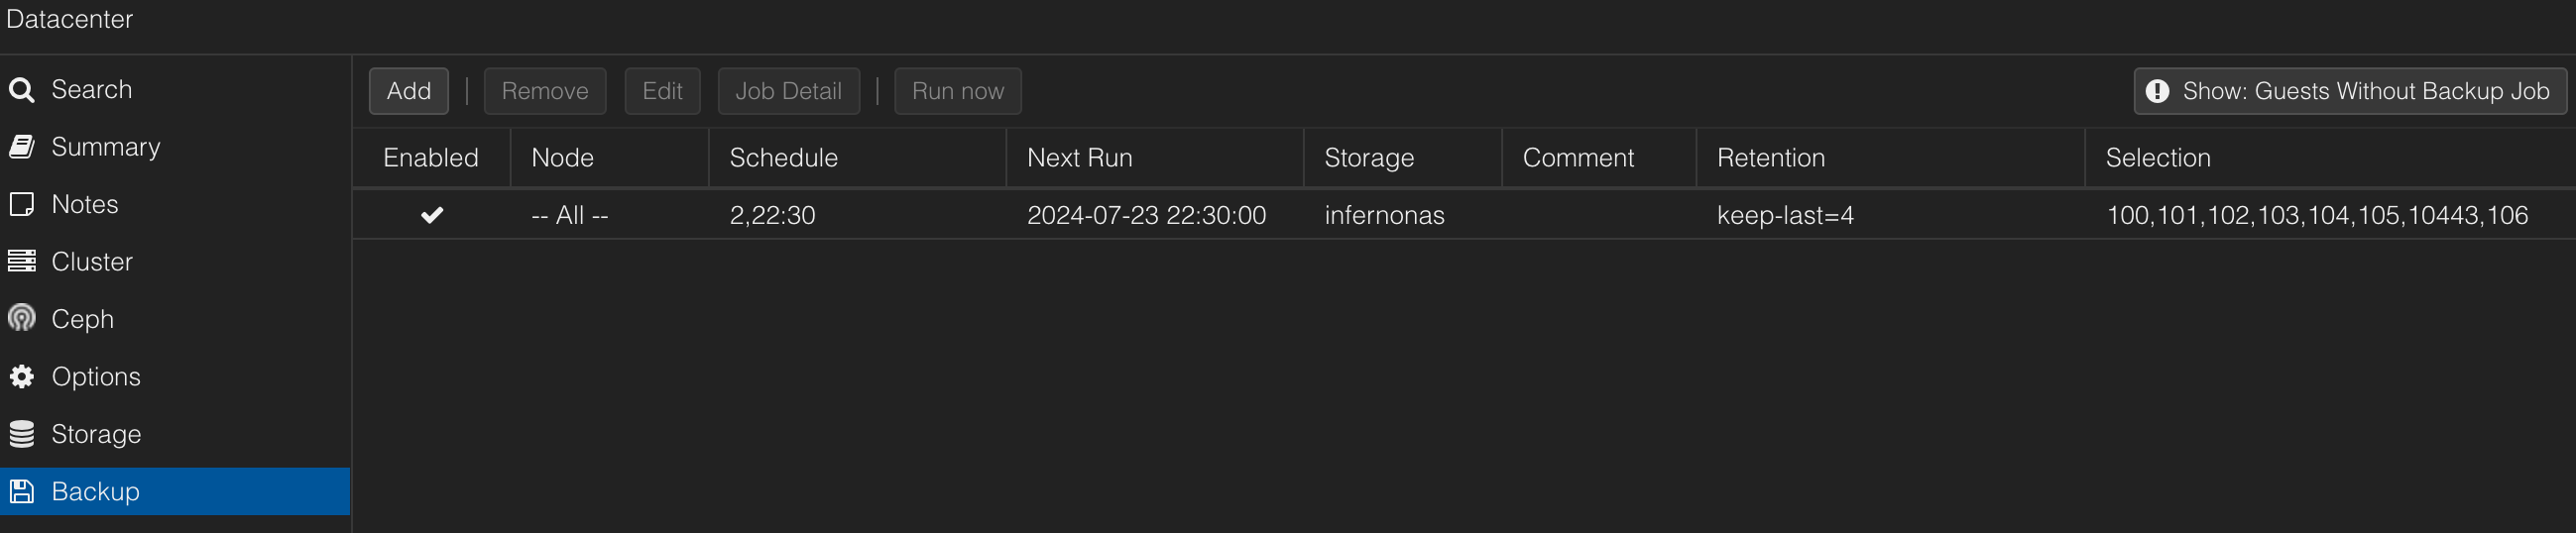
First, decide how you want to run Pi-Hole. There are so many ways, and I've probably done all of them. I started with a single Raspberry Pi until the SD card failed...which took down the "internet." If I was going to do this, then I needed to do this. It should be highly available, to make it hard to kill, along with faster and resilient storage, making it hard to break (sounds like a 90's Segal or Van Damme movie 🥷). I have several other posts on this as I progressed in my journey; check these out as they cover the majority of my setup. once back, let's get into some firewall rules to round things out.
Chris Kirby Chris KirbyChris Kirby
Ok, so Pi-Hole is up and running, is highly available, and is resilient. Now I want to ensure every device on my network can only use Pi-Hole to resolve DNS queries. Now this is a little difficult. Devices can set their own DNS servers, even when using DHCP. Certain devices from Amazon, Apple, and others are especially disobedient and will either try to force 1.1.1.1 or even a public DoH address. My solution is a set of firewall rules to drop the DNS requests that misbehave. No Pi-Hole, no internet. It's not perfect, especially with DoH, as they just look like normal 443 traffic, but there are ways, and this will get you started.
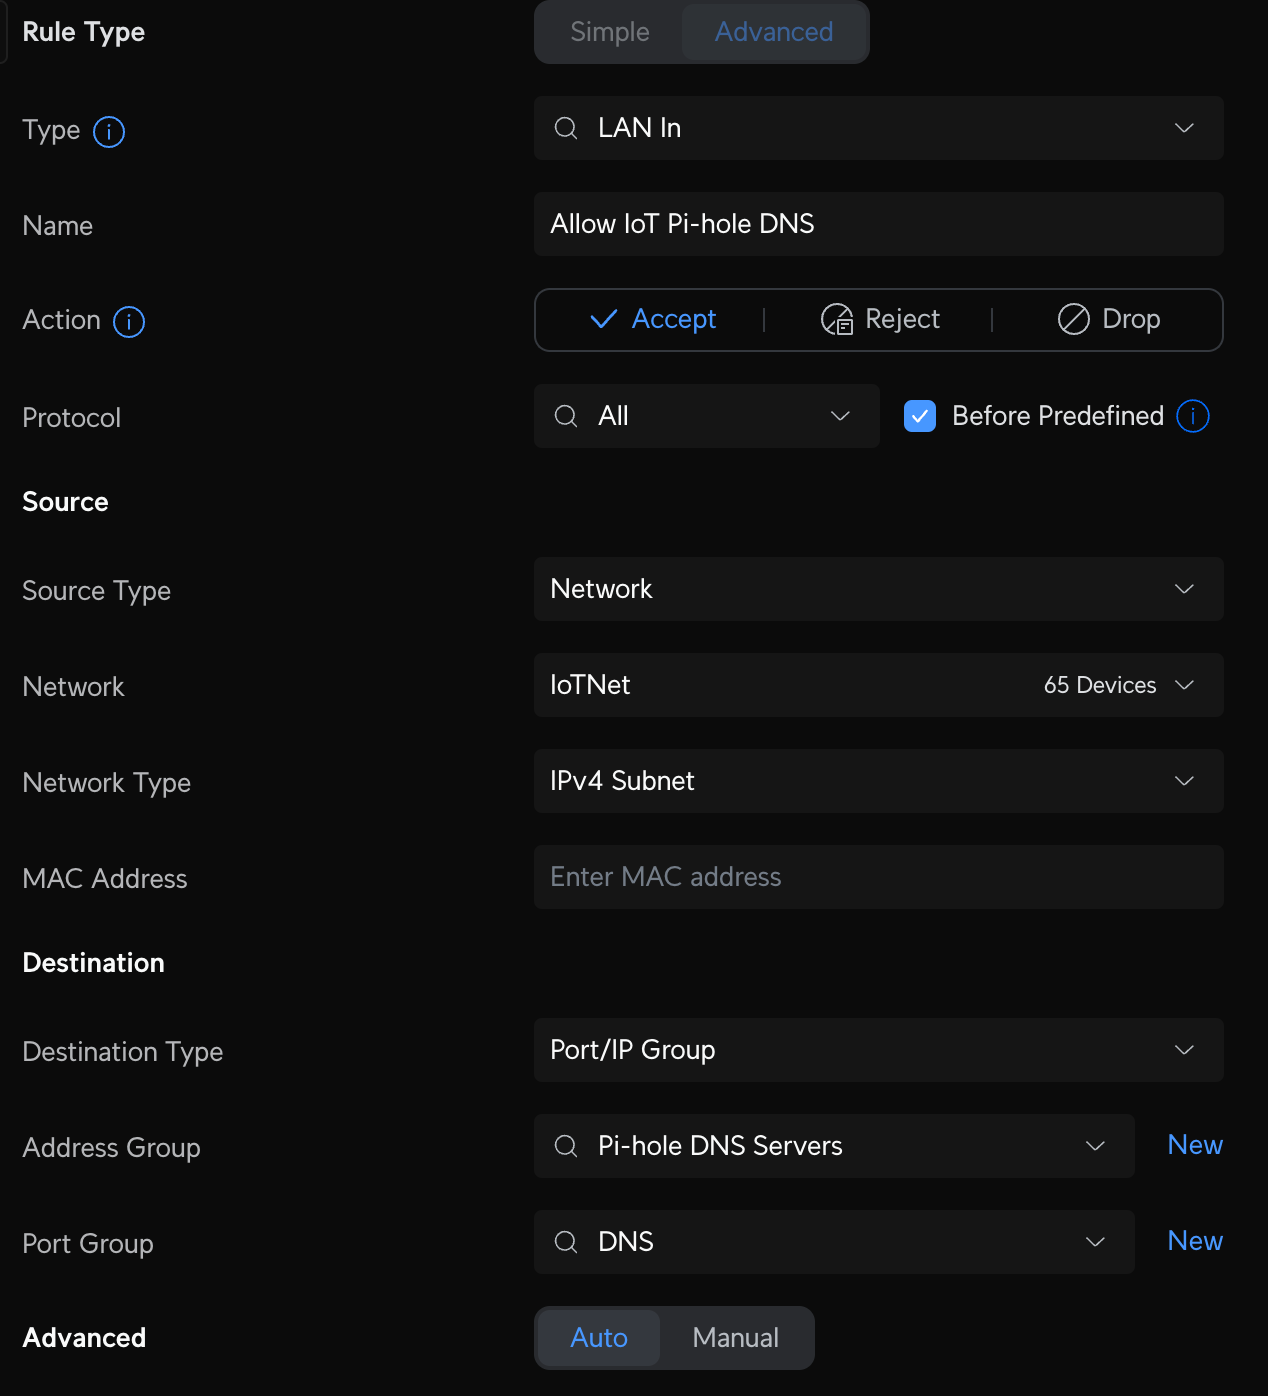
VLAN access to Pi-Hole
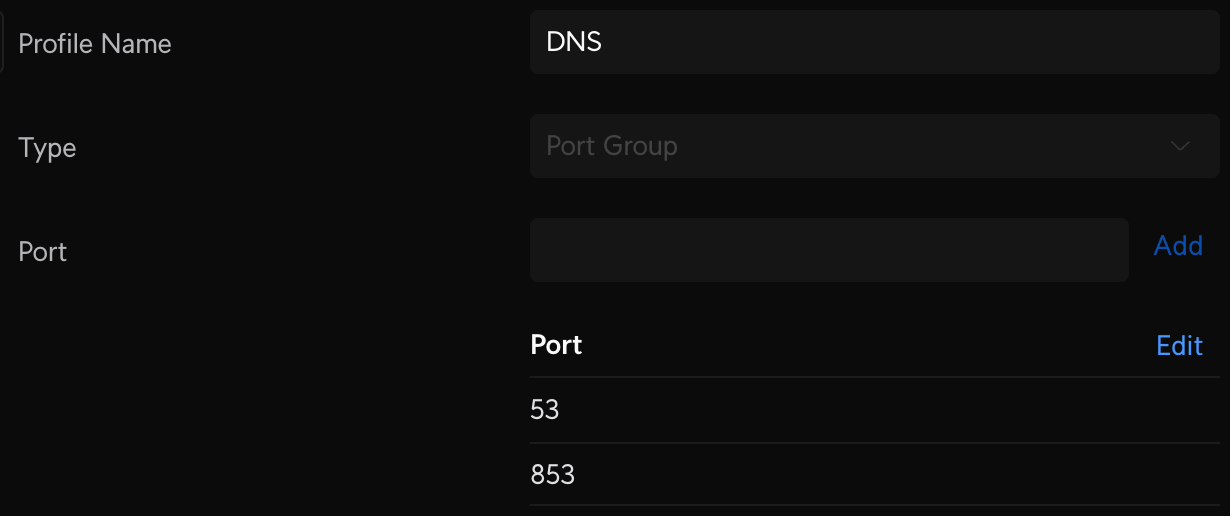
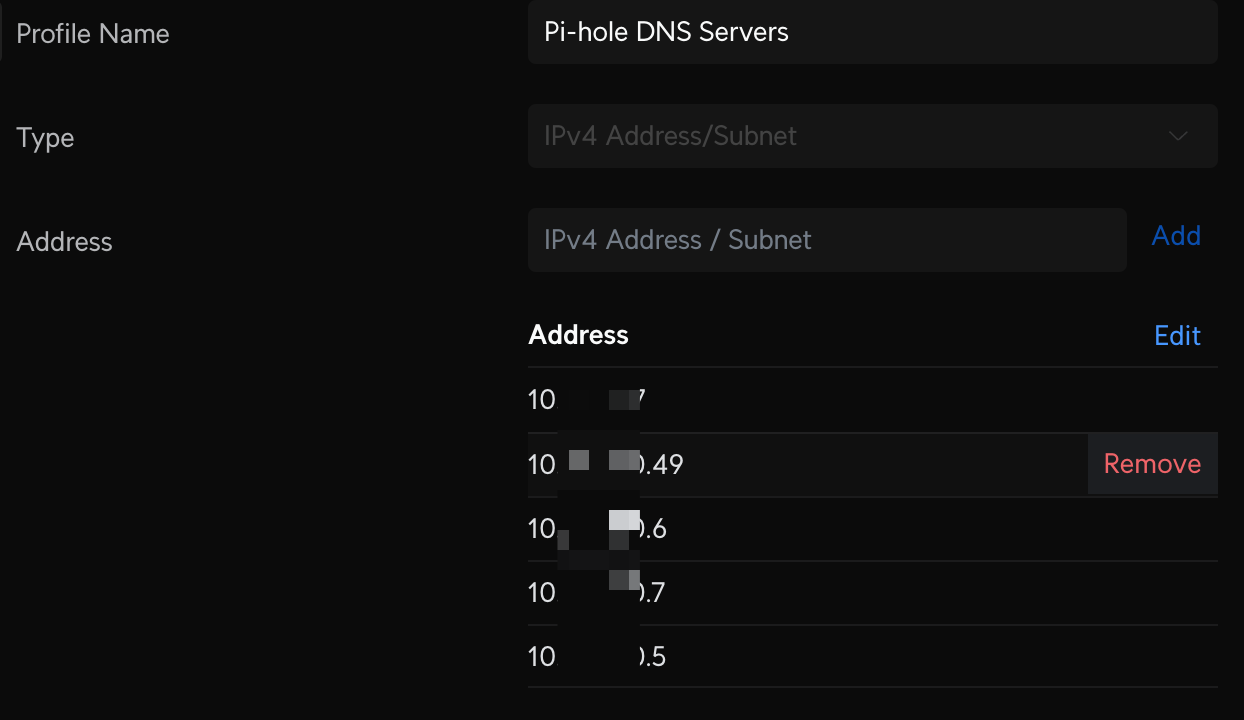
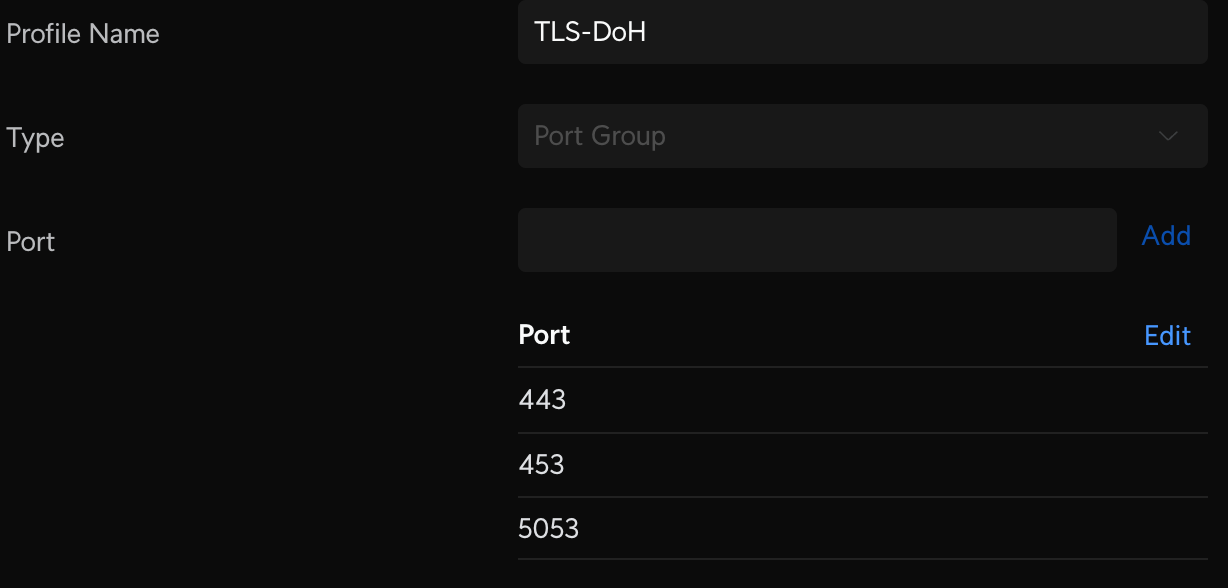
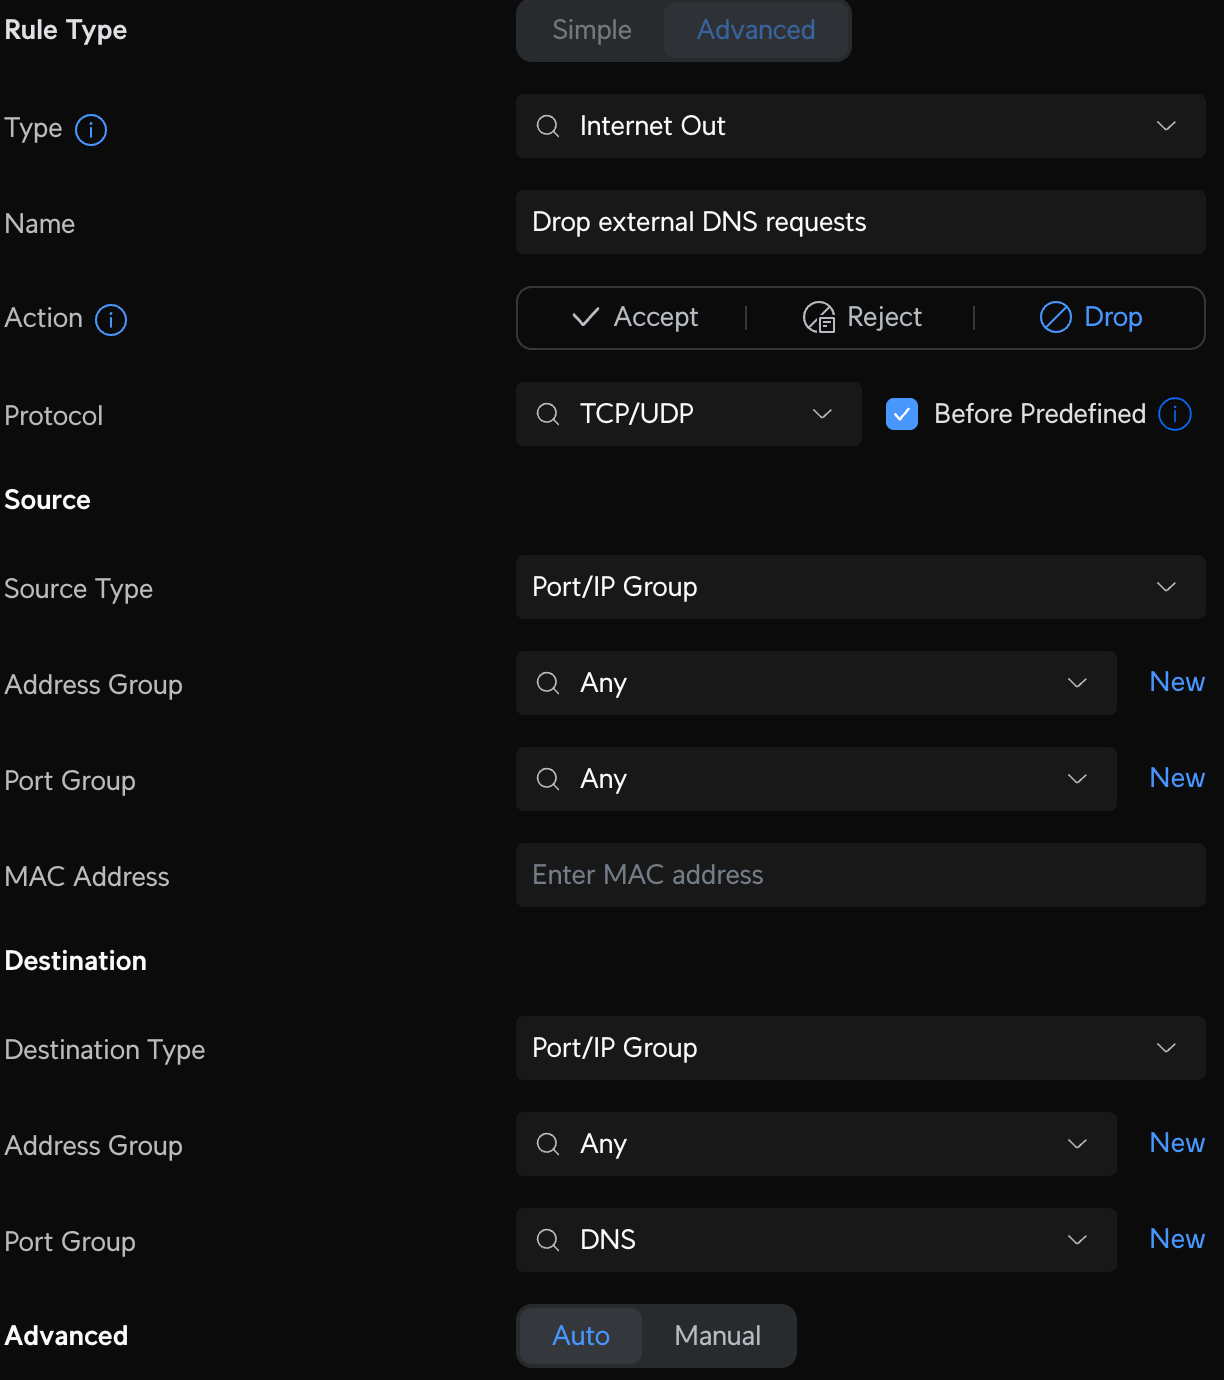
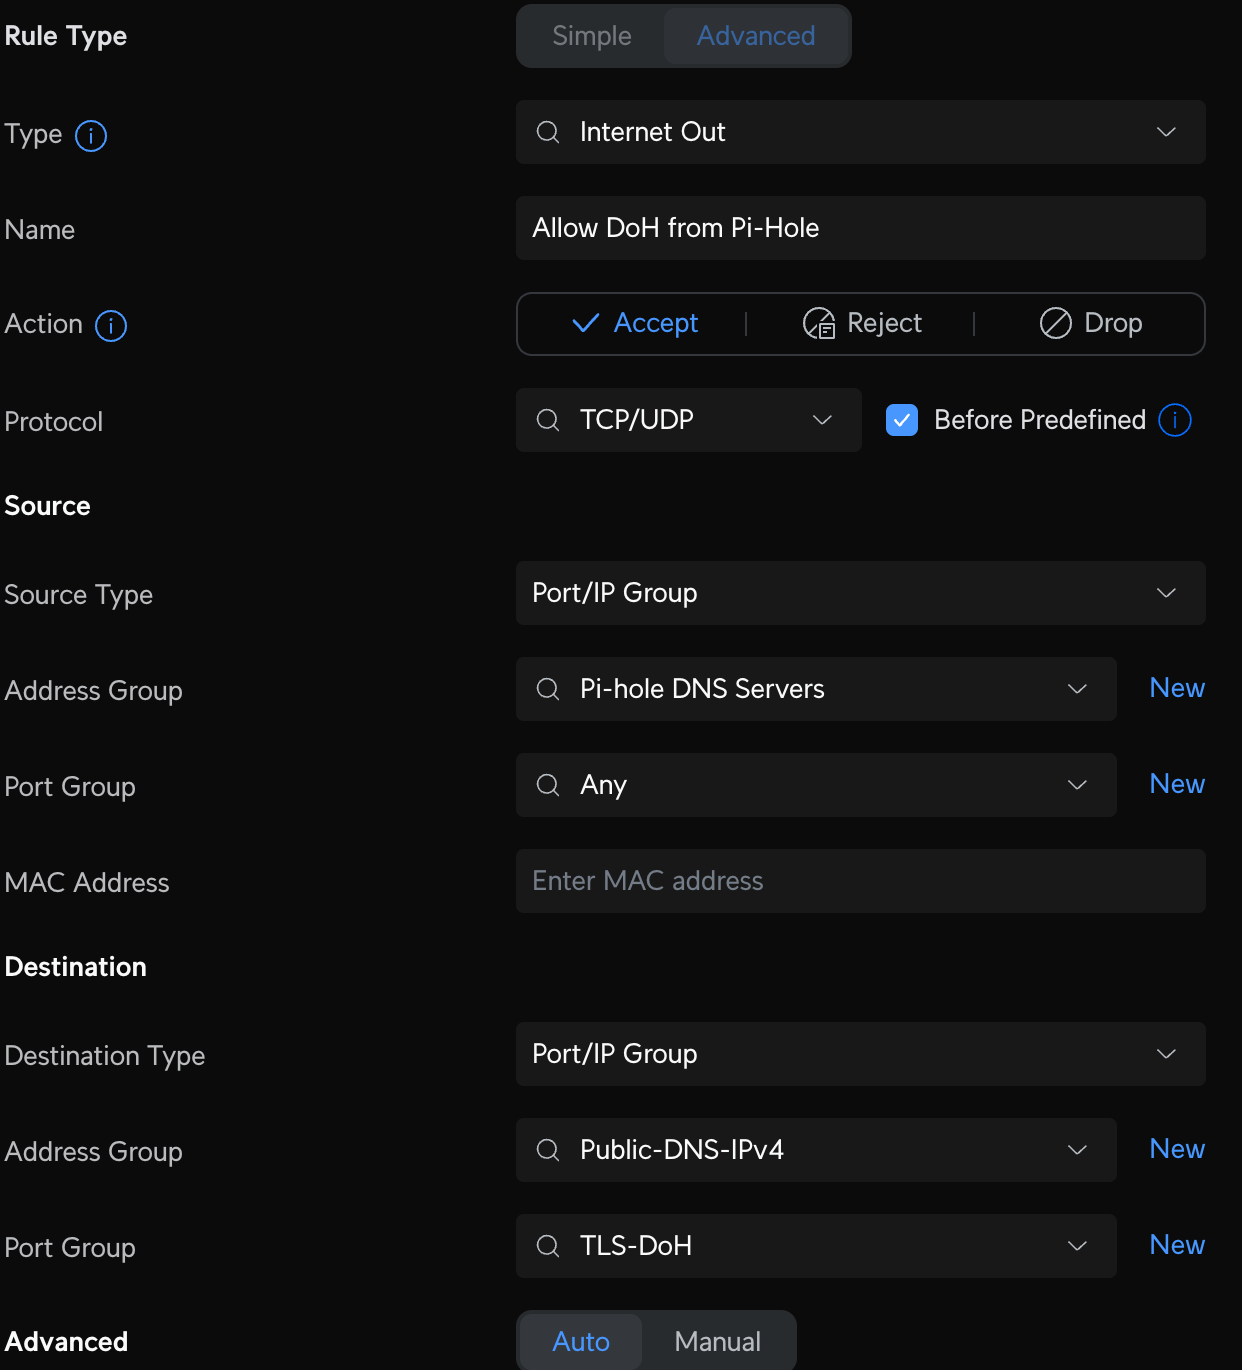
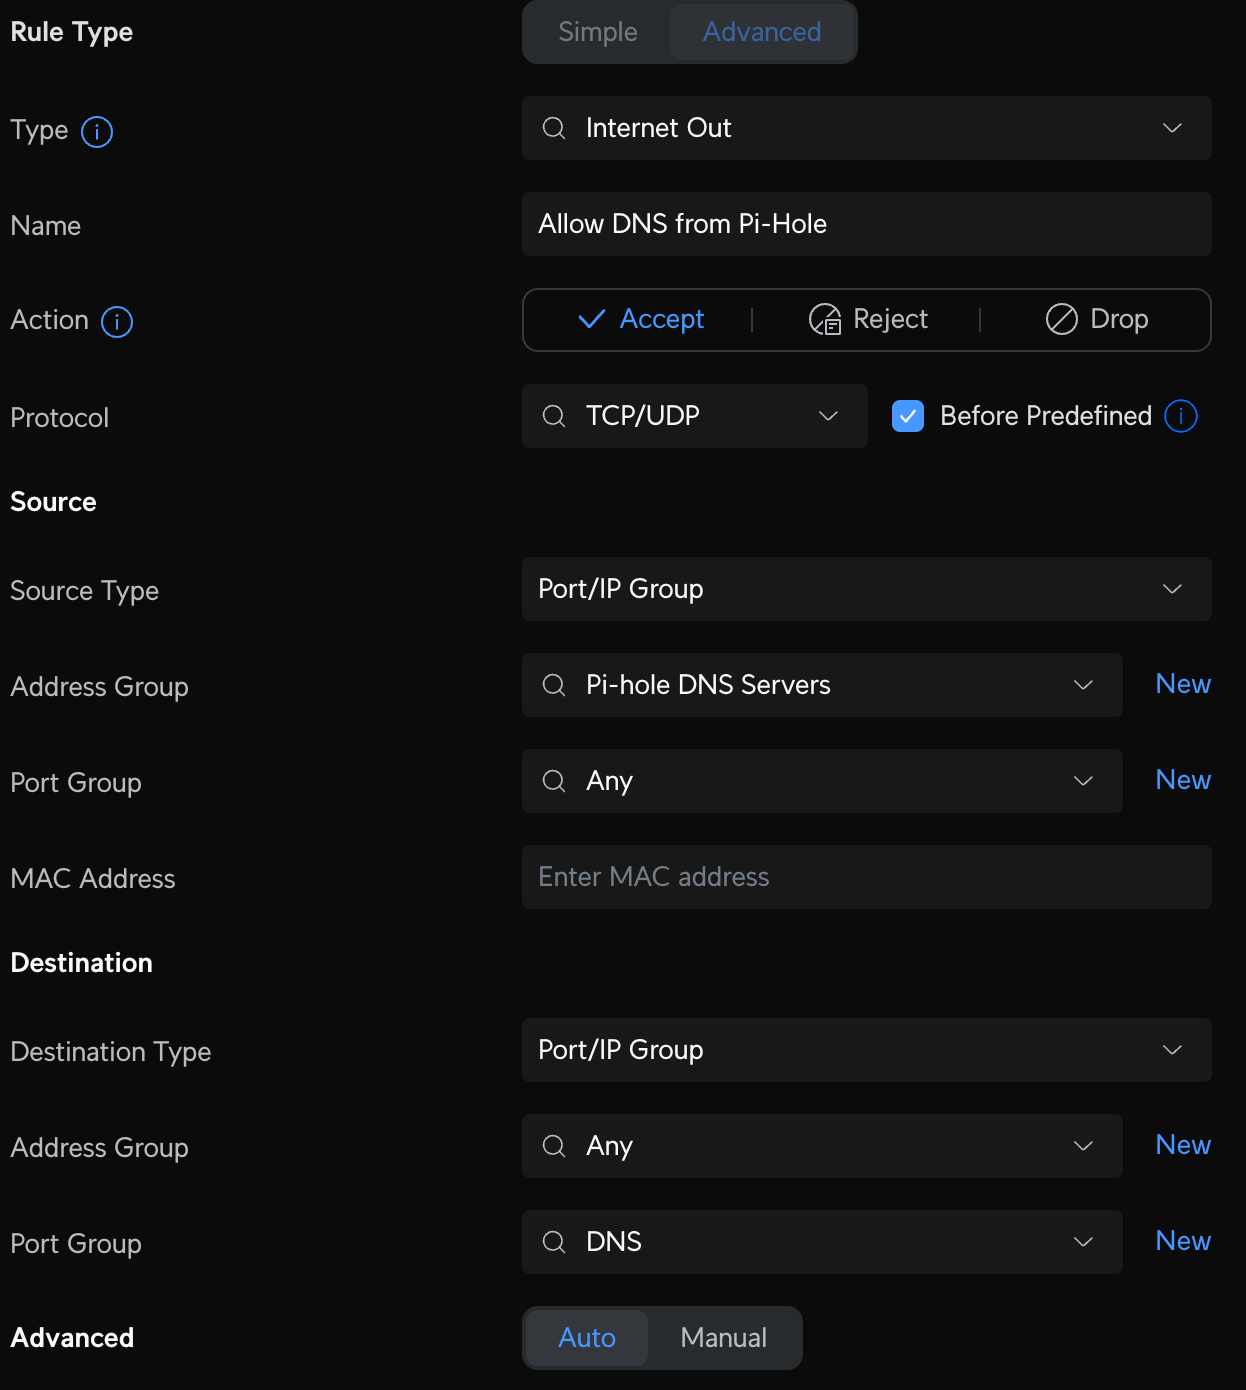
Make sure your devices on other VLANs can reach your Pi-Hole servers. First create a Profile IP Group Pi-Hole DNS Servers and enter the IP addresses of each server. Then create two additional Port Groups: one to define the DNS Ports called DNS, and one to define DNS DoH ports called TLS-DoH (you'll use this later). Finally, create the LAN In rule to allow devices on your VLAN to access Pi-Hole DNS on any other VLAN called Allow IoT Pi-Hole DNS.
Block 3rd Party DNS
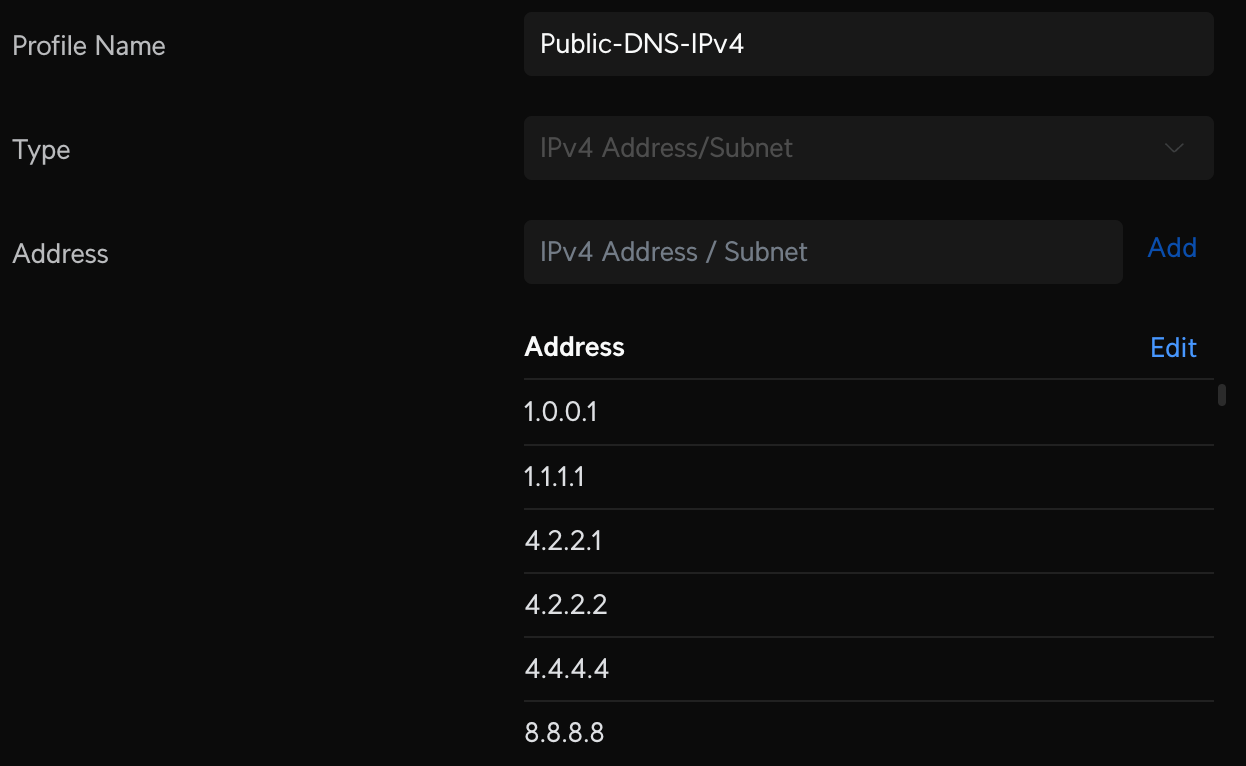
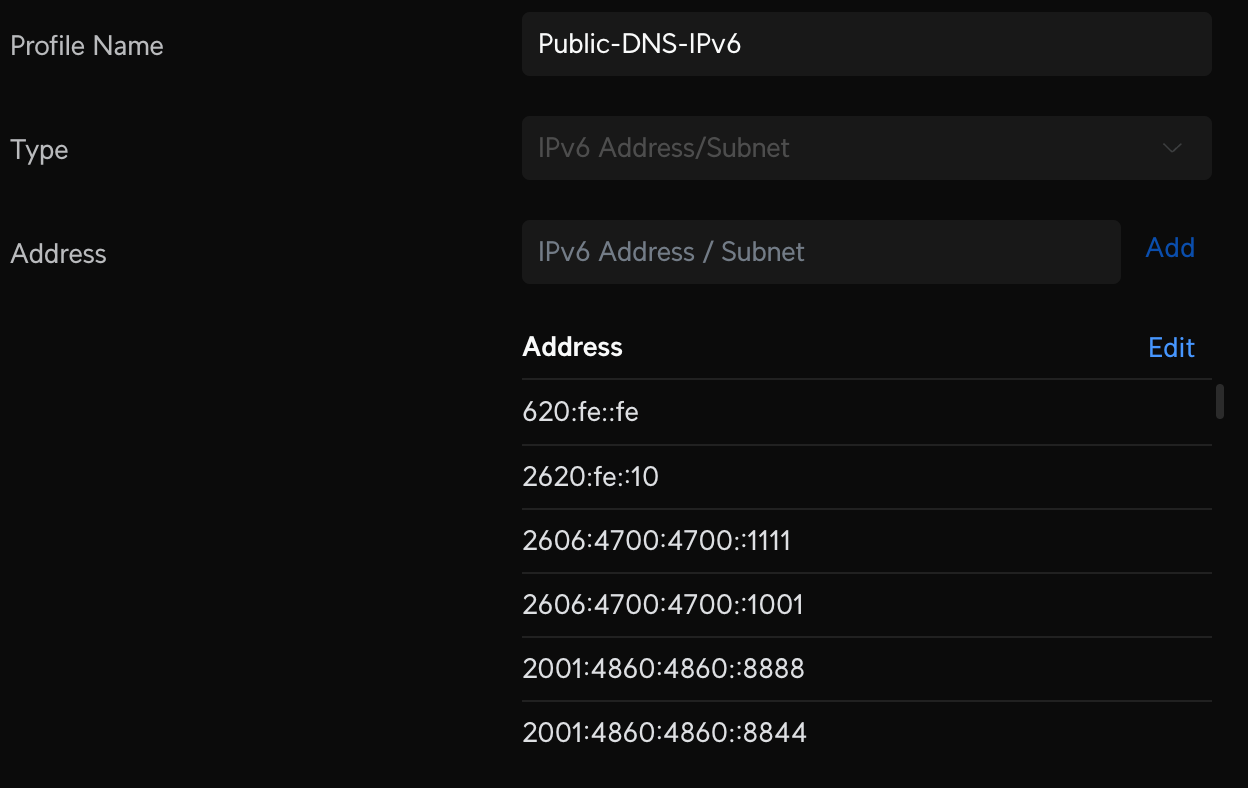
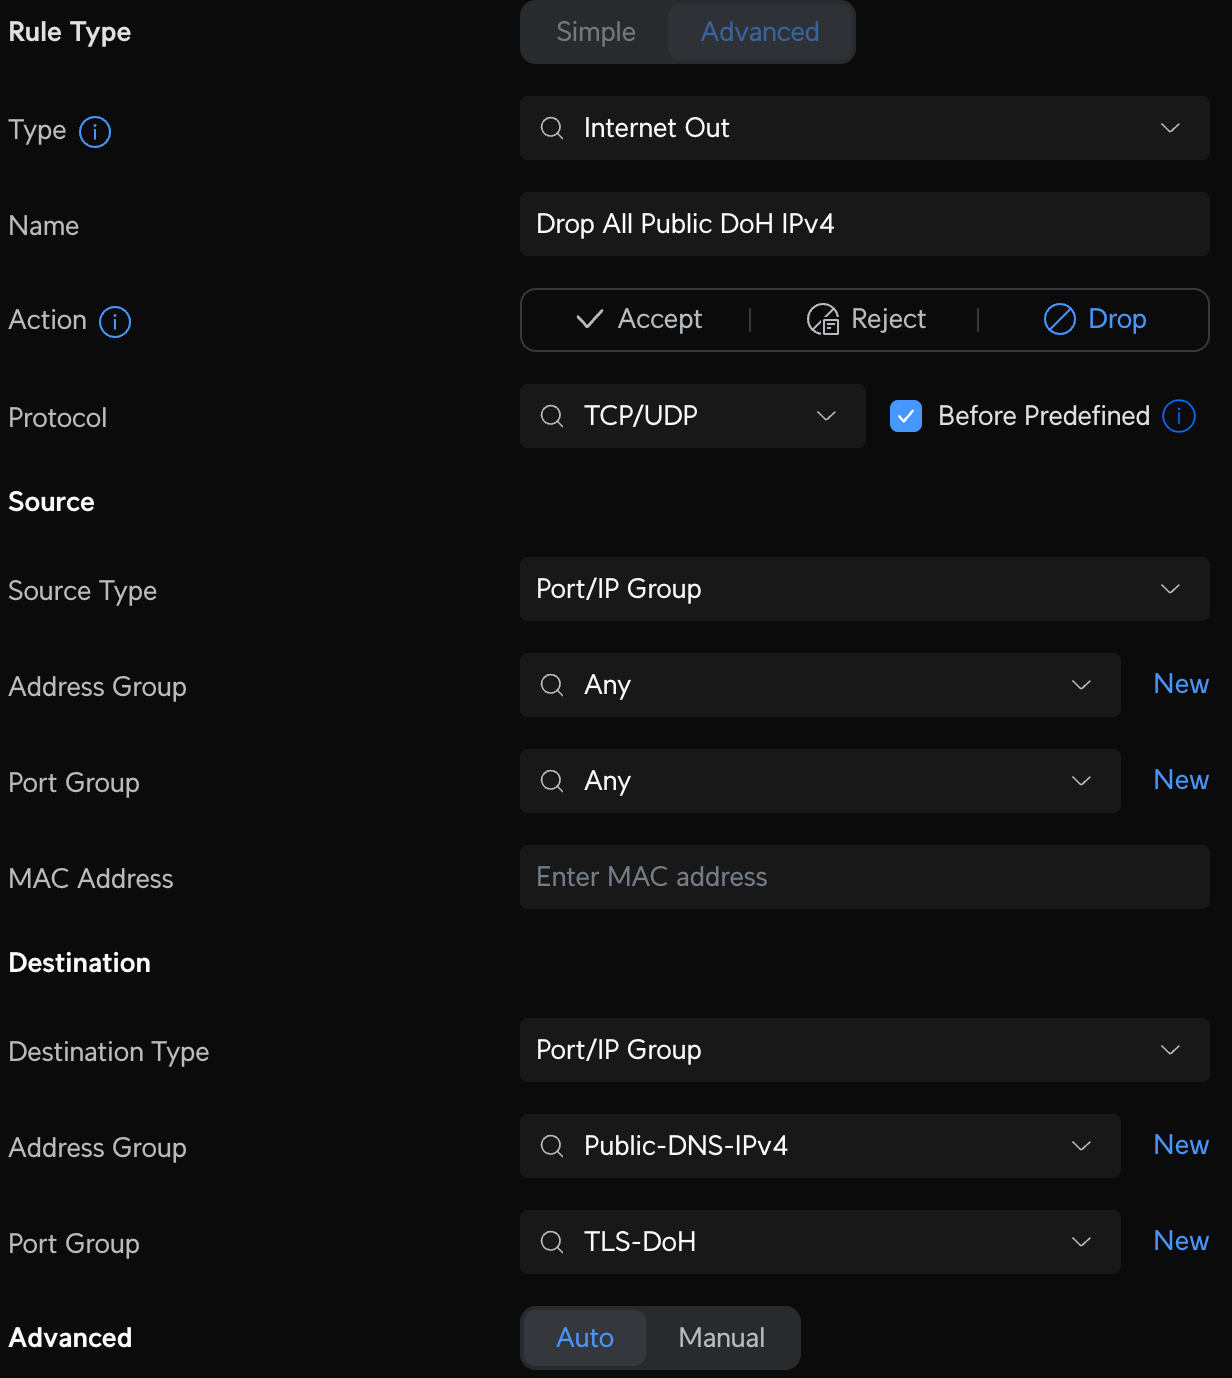
Now, it's time to block access to all DNS requests that attempt to circumvent Pi-Hole. As I stated above, these settings can be manually changed; some devices ignore your settings and use their own, and some devices and browsers use DNS over HTTPS or DoH, by default. DoH is great, and how I resolve any queries that come through Pi-Hole, through providers I trust with rules I maintain. Here's what we can do to block the ones we don't.
Create two new Profile IP Groups containing the list of public DNS DoH providers, Public-DNS-IPv4 and Public-DNS-IPv6. I've created a Gist below to help get you started. This will cover the main public providers, and I provide a few links in the comments of the Gist for lesser-known providers you may want to add for good measure. For reference, I have about 200 IP4 and 55 IP6 addresses in my lists and counting.
Now create some new Internet firewall rules that will allow us to access public DoH servers from our Pi-Holes and not anywhere else. Create two new Internet Out rules to Accept all DNS traffic from Pi-Hole servers and two new Internet Out rules that Drop all other DNS traffic from non-Pi-Hole servers. The Accept rules should be above the Drop rules; order matters.


Remote Access with Cloudflare ZeroTrust
I love Cloudflare ZeroTrust, so much so, that I've already written several posts on my journey. Check those out first, then come back for some new tips and changes since then.
Chris KirbyChris Kirby Chris Kirby
Through those articles, you've seen how to deploy cloudflared tunnels to your Kubernetes cluster, leverage your local Pi-Hole DNS servers via the Warp client split tunnels, and use your own domain with TLS termination to access all of your services remotely and securely—very cool stuff. By now, you've guessed that I'm a fan of making my services highly available. Here are some things you can do just to add a bit more resiliency to your homelab.
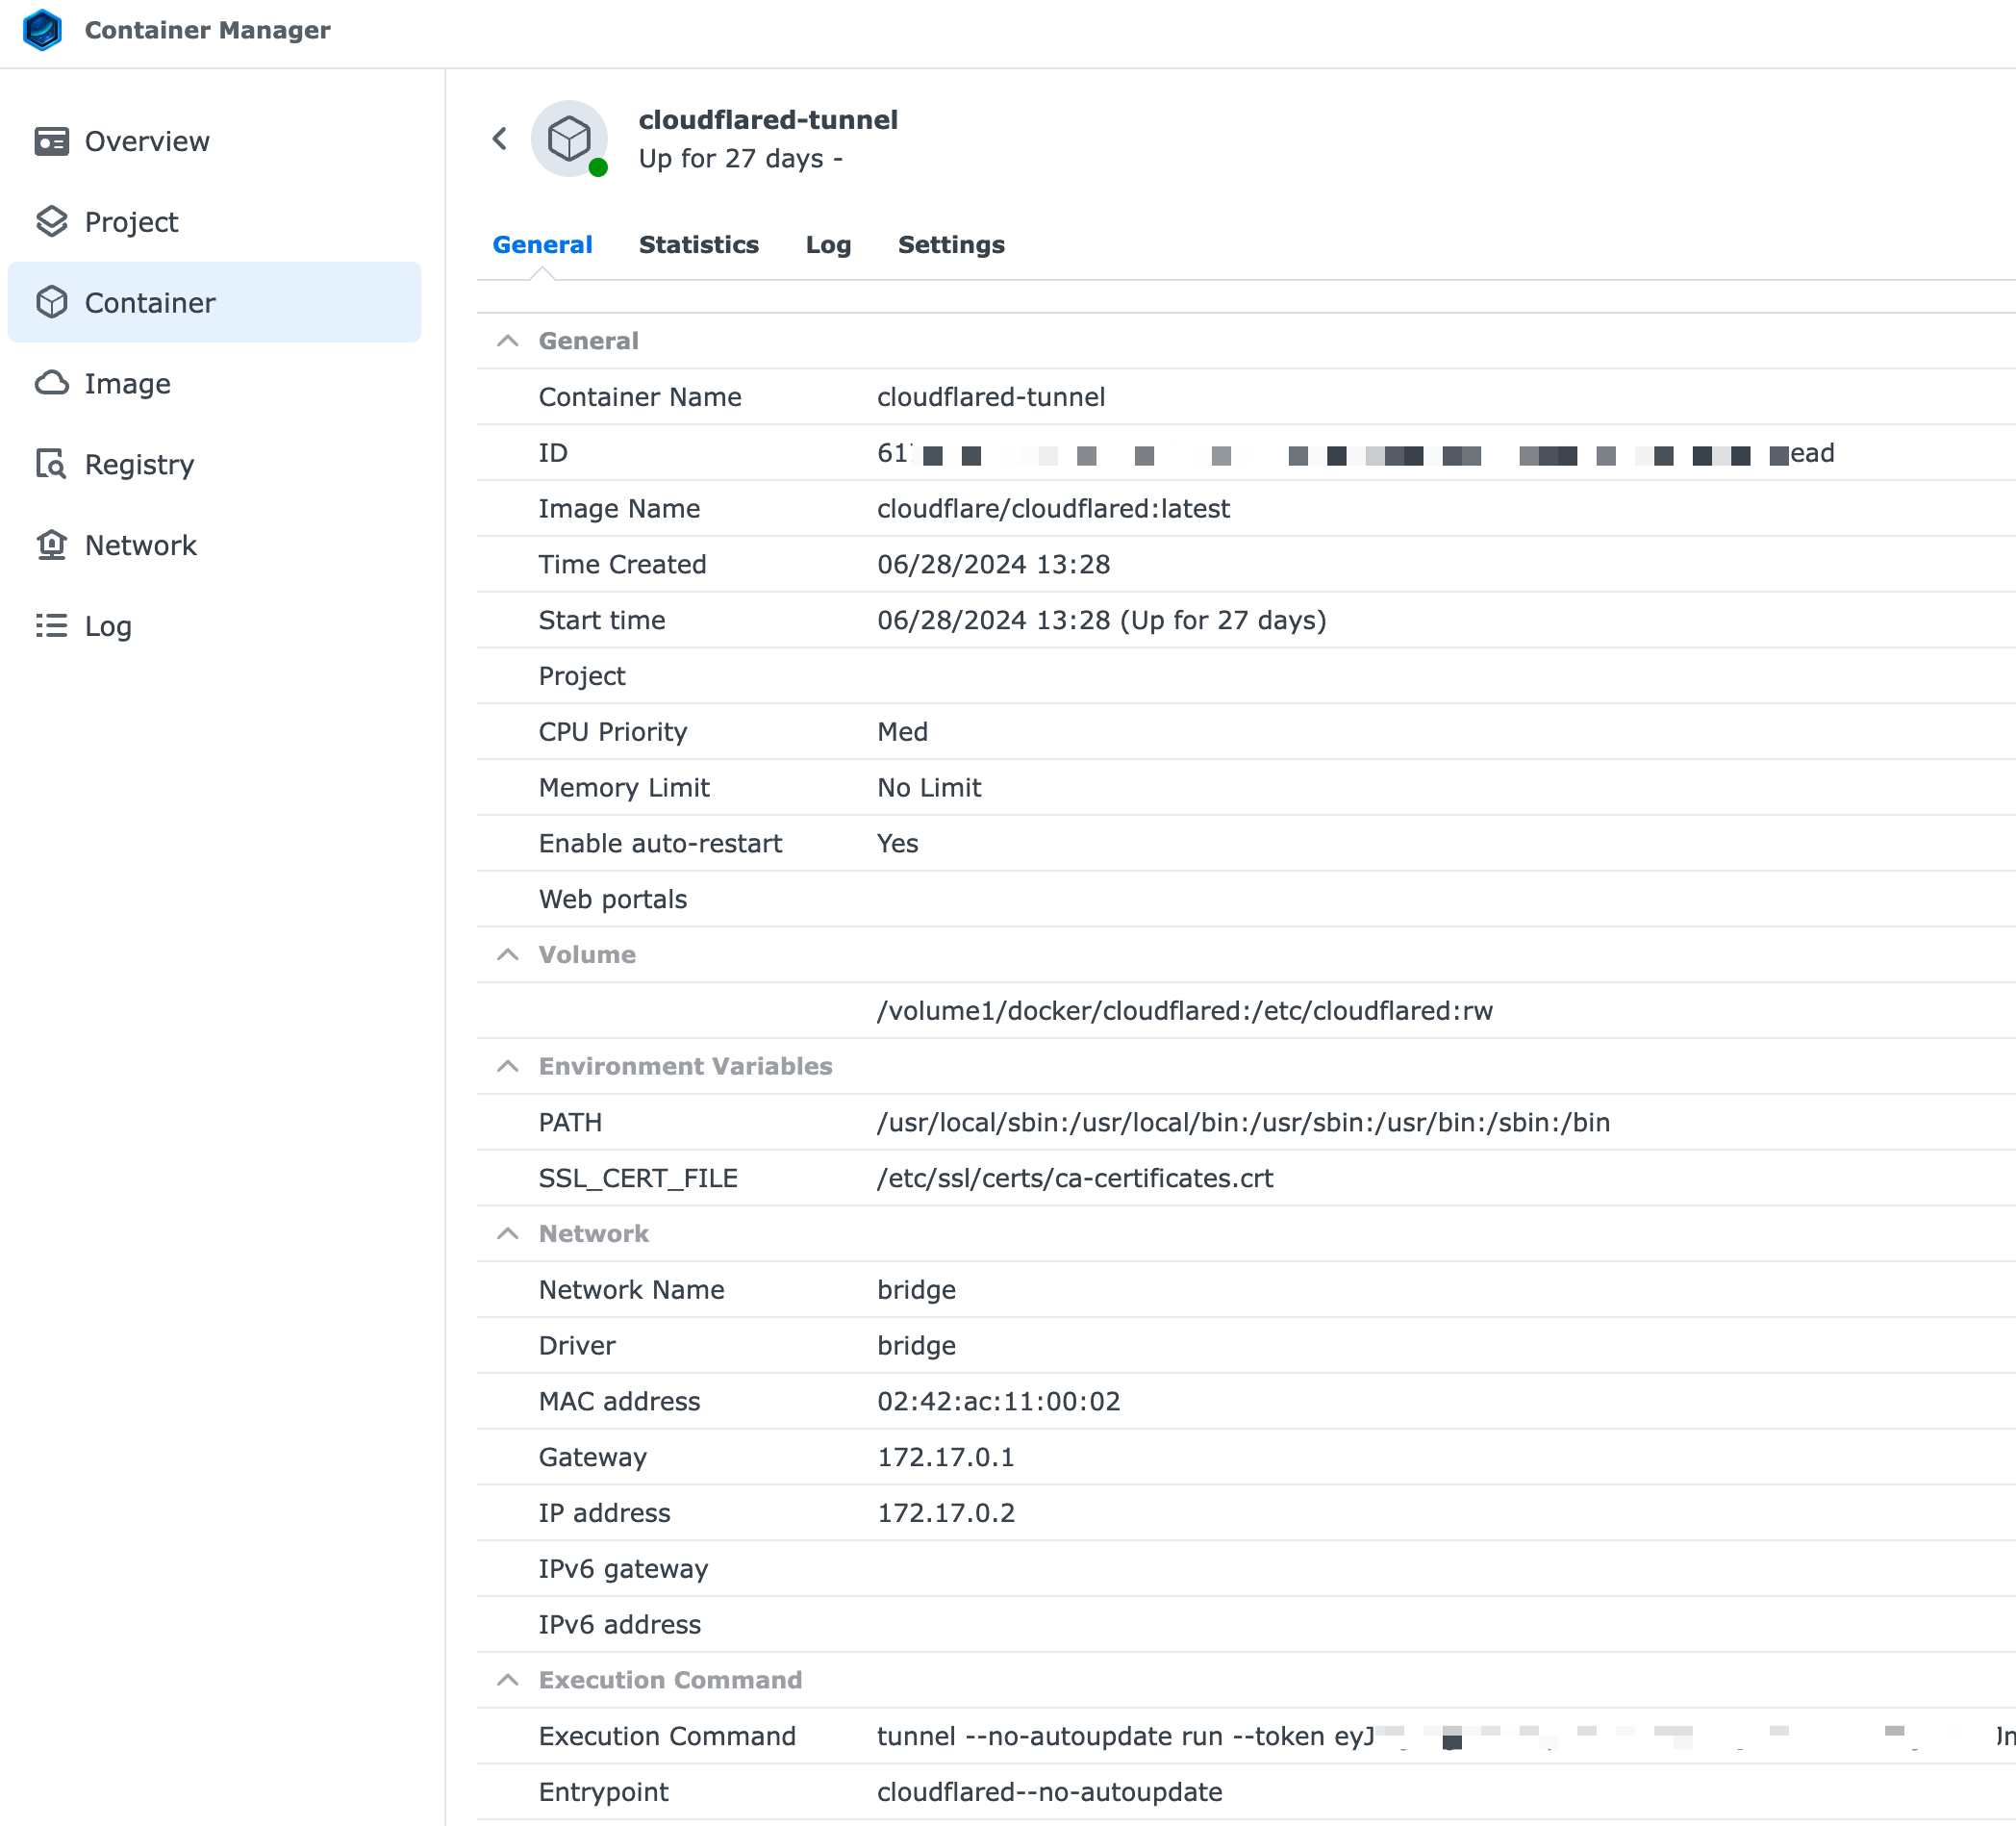
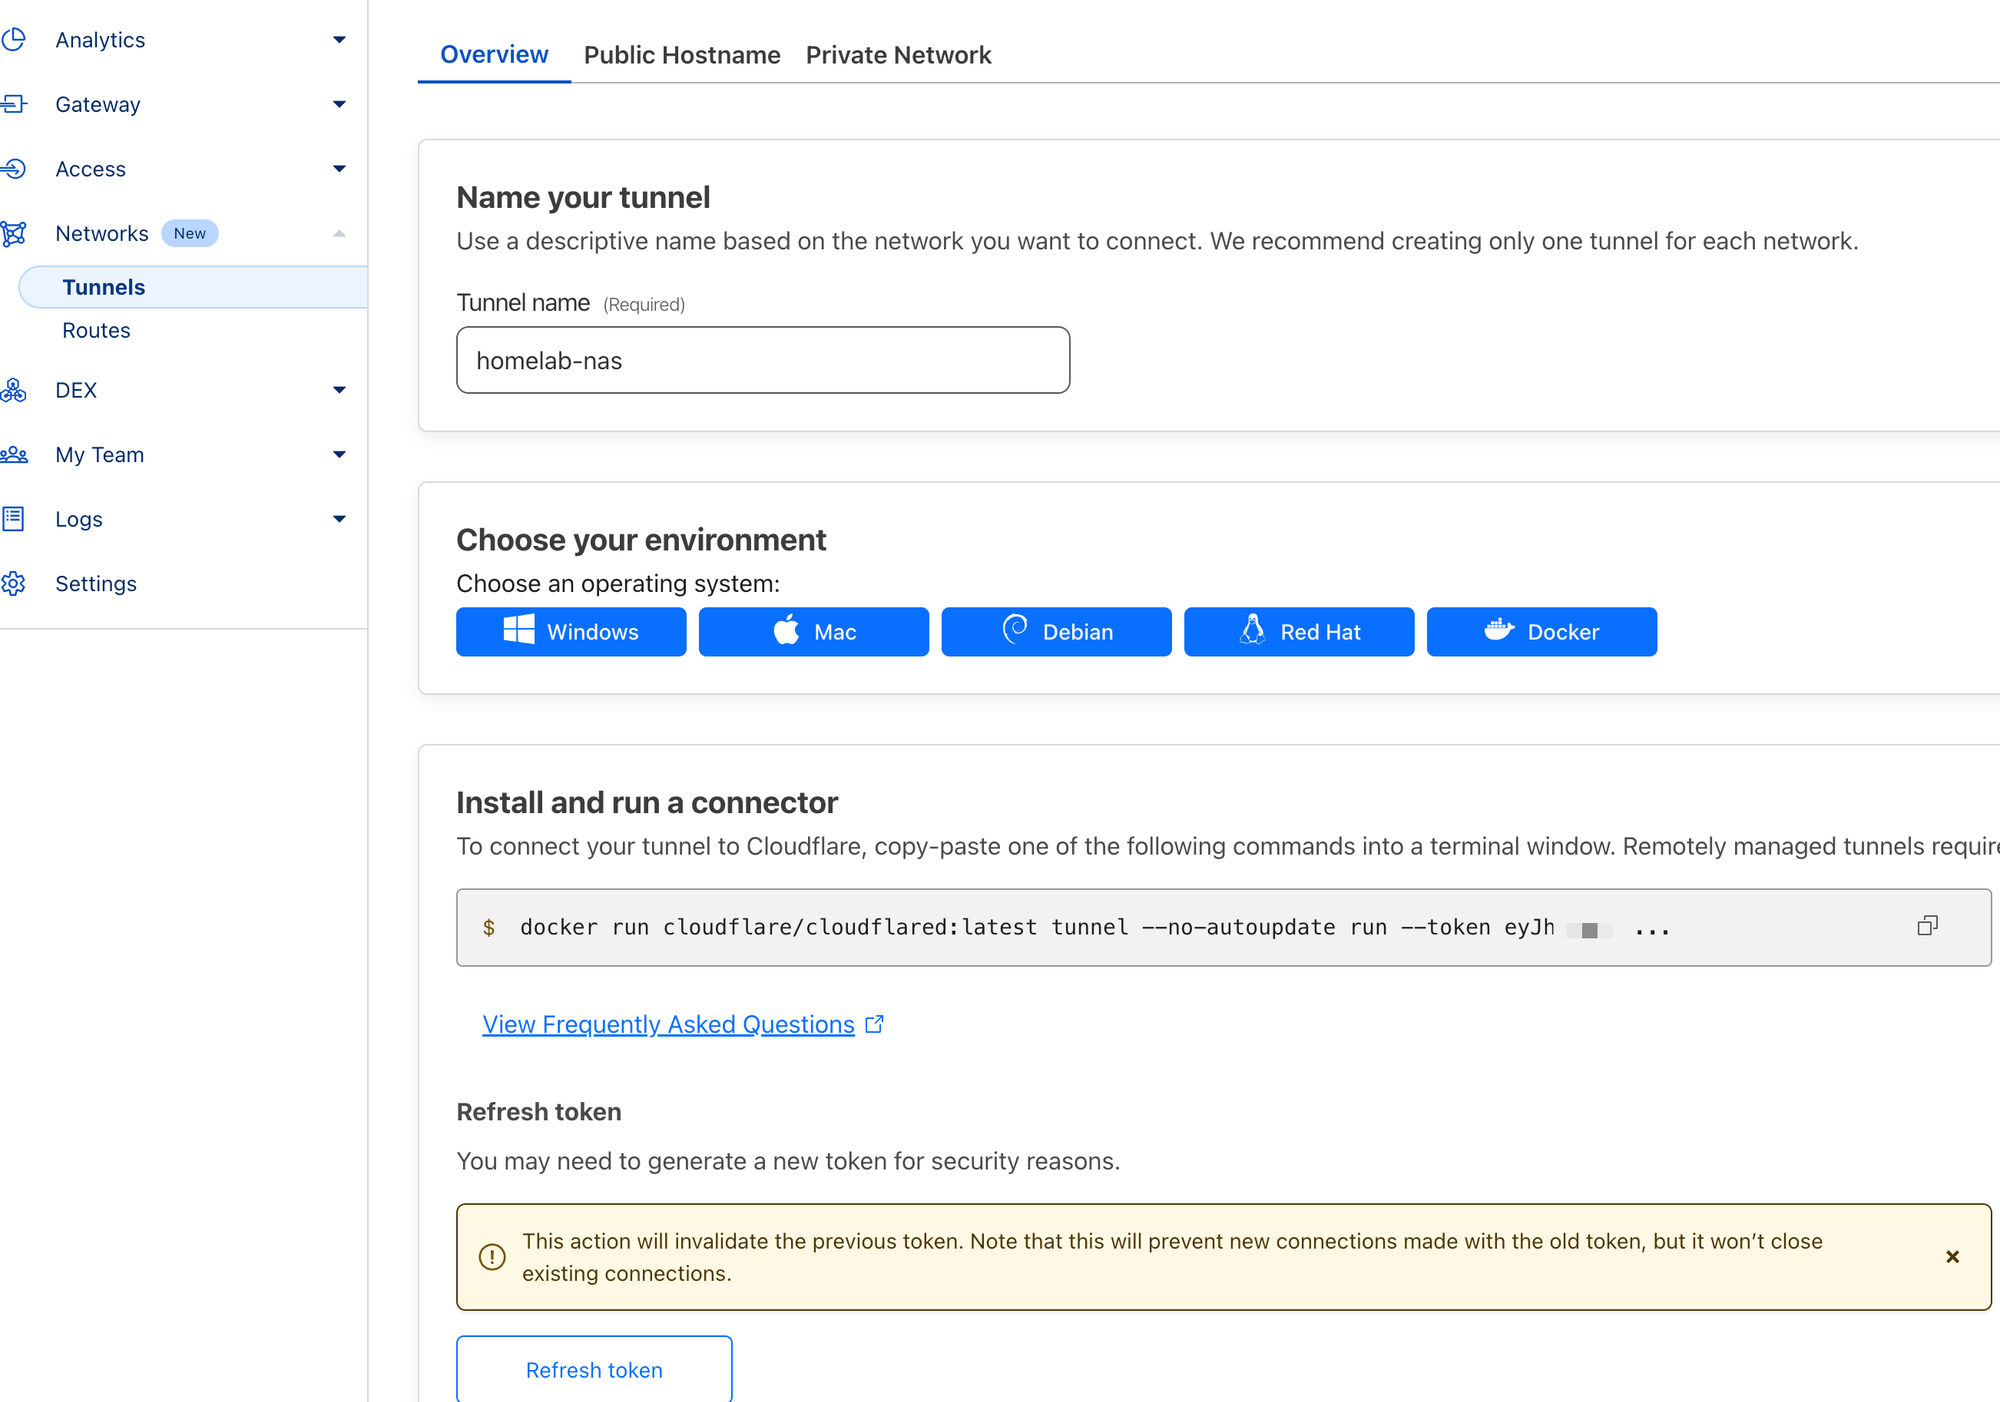
Run additional cloudflared tunnel containers on your NAS
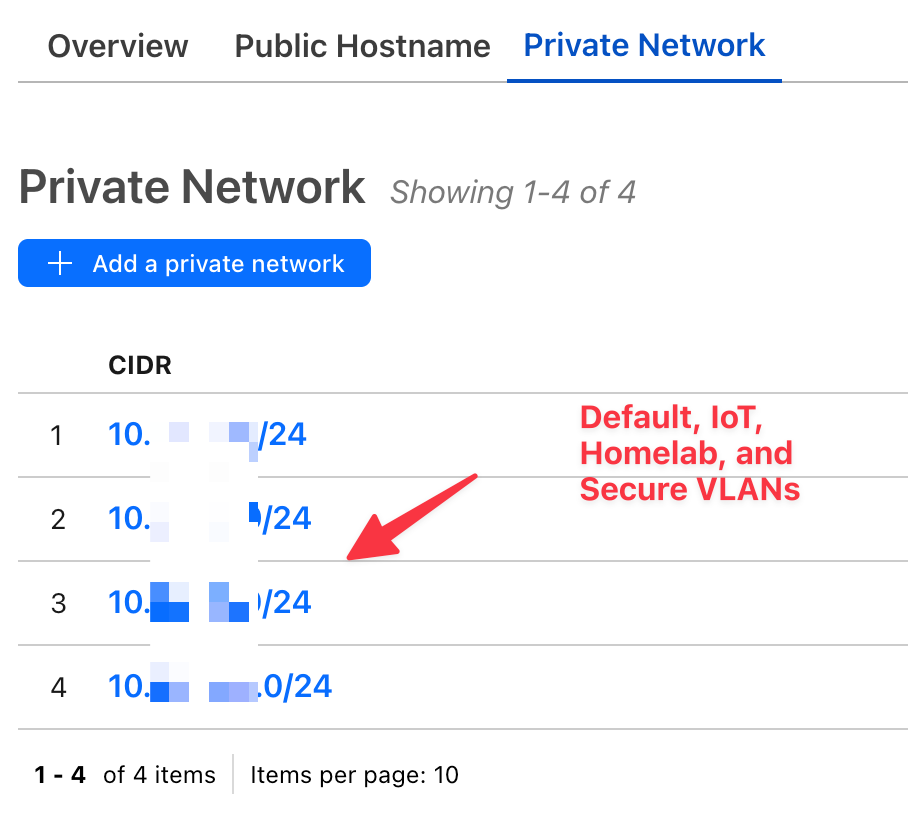
Maybe your k3s cluster is down, or maybe you're doing some maintenance, but why not have a few extra tunnels running just in case? Running lightweight containers on your always on NAS is a simple way to add some additional piece of mind. Create a new tunnel in your ZeroTrust dashboard Network -> Tunnels. Once created, you can create as many instances of the tunnel as you want to. For this tunnel, I'm setting up several of my local VLAN routes, to ensure I always have remote, VPN style, access to my network with the Warp client. If my k3s tunnels fail, and I lose public app access, I'll still have local network access through this set of tunnels running on separate metal.
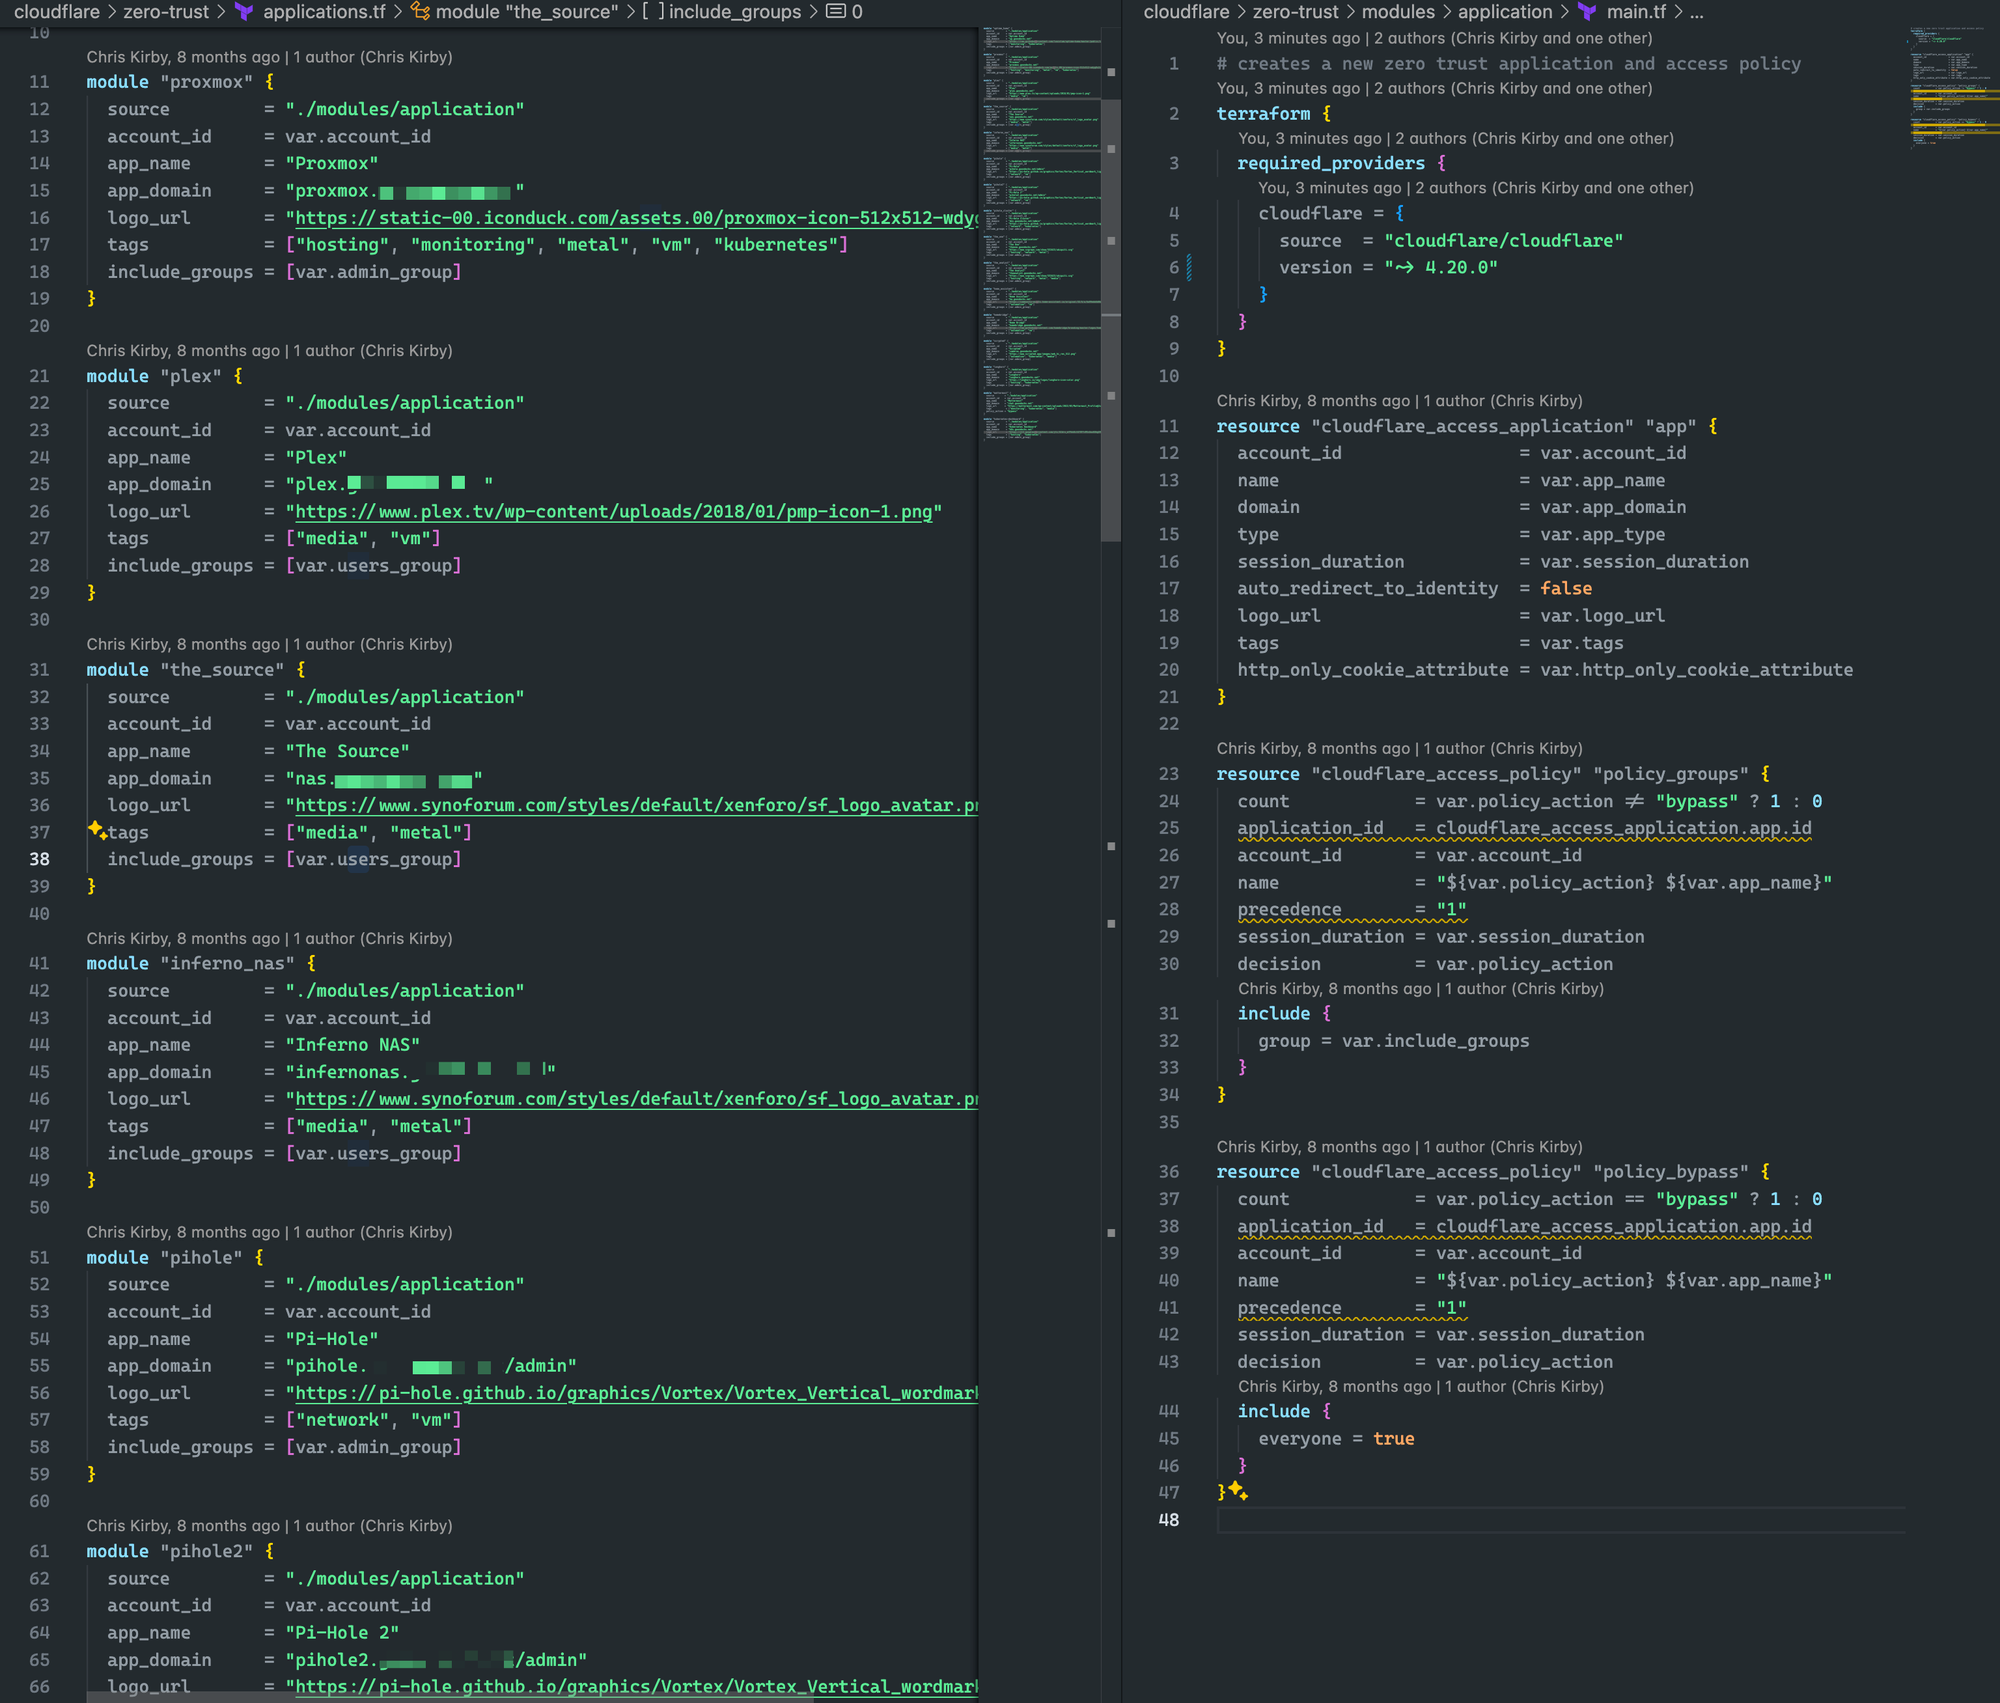
Terraform your ZeroTrust configuration
Click-ops is a fine practice for getting up and running, however, I prefer the IaC approach. Terraform is easy to use and, with the help of ChatGPT, easy to get started with your configuration. Here is a snapshot of the Terraform to see how straightforward it is using the Cloudflare Terraform provider. If anyone is interested in the code, perhaps I'll throw it up on Github, let me know.
Home Automation with Home Assistant
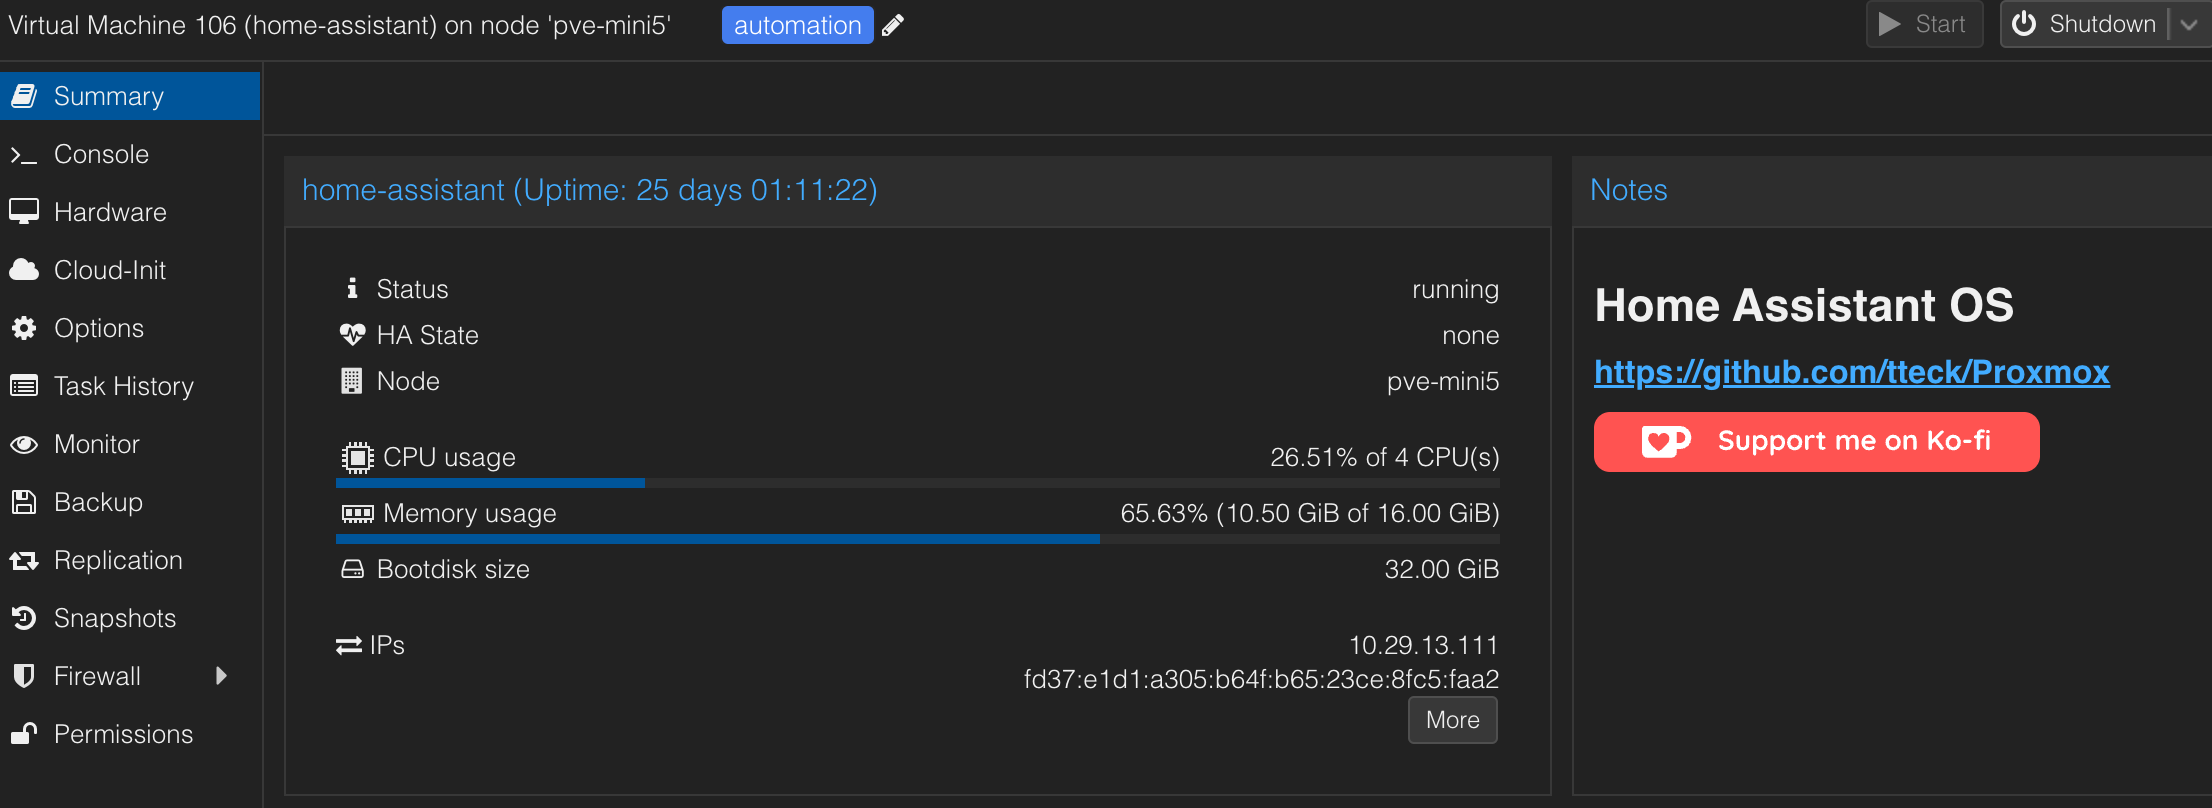
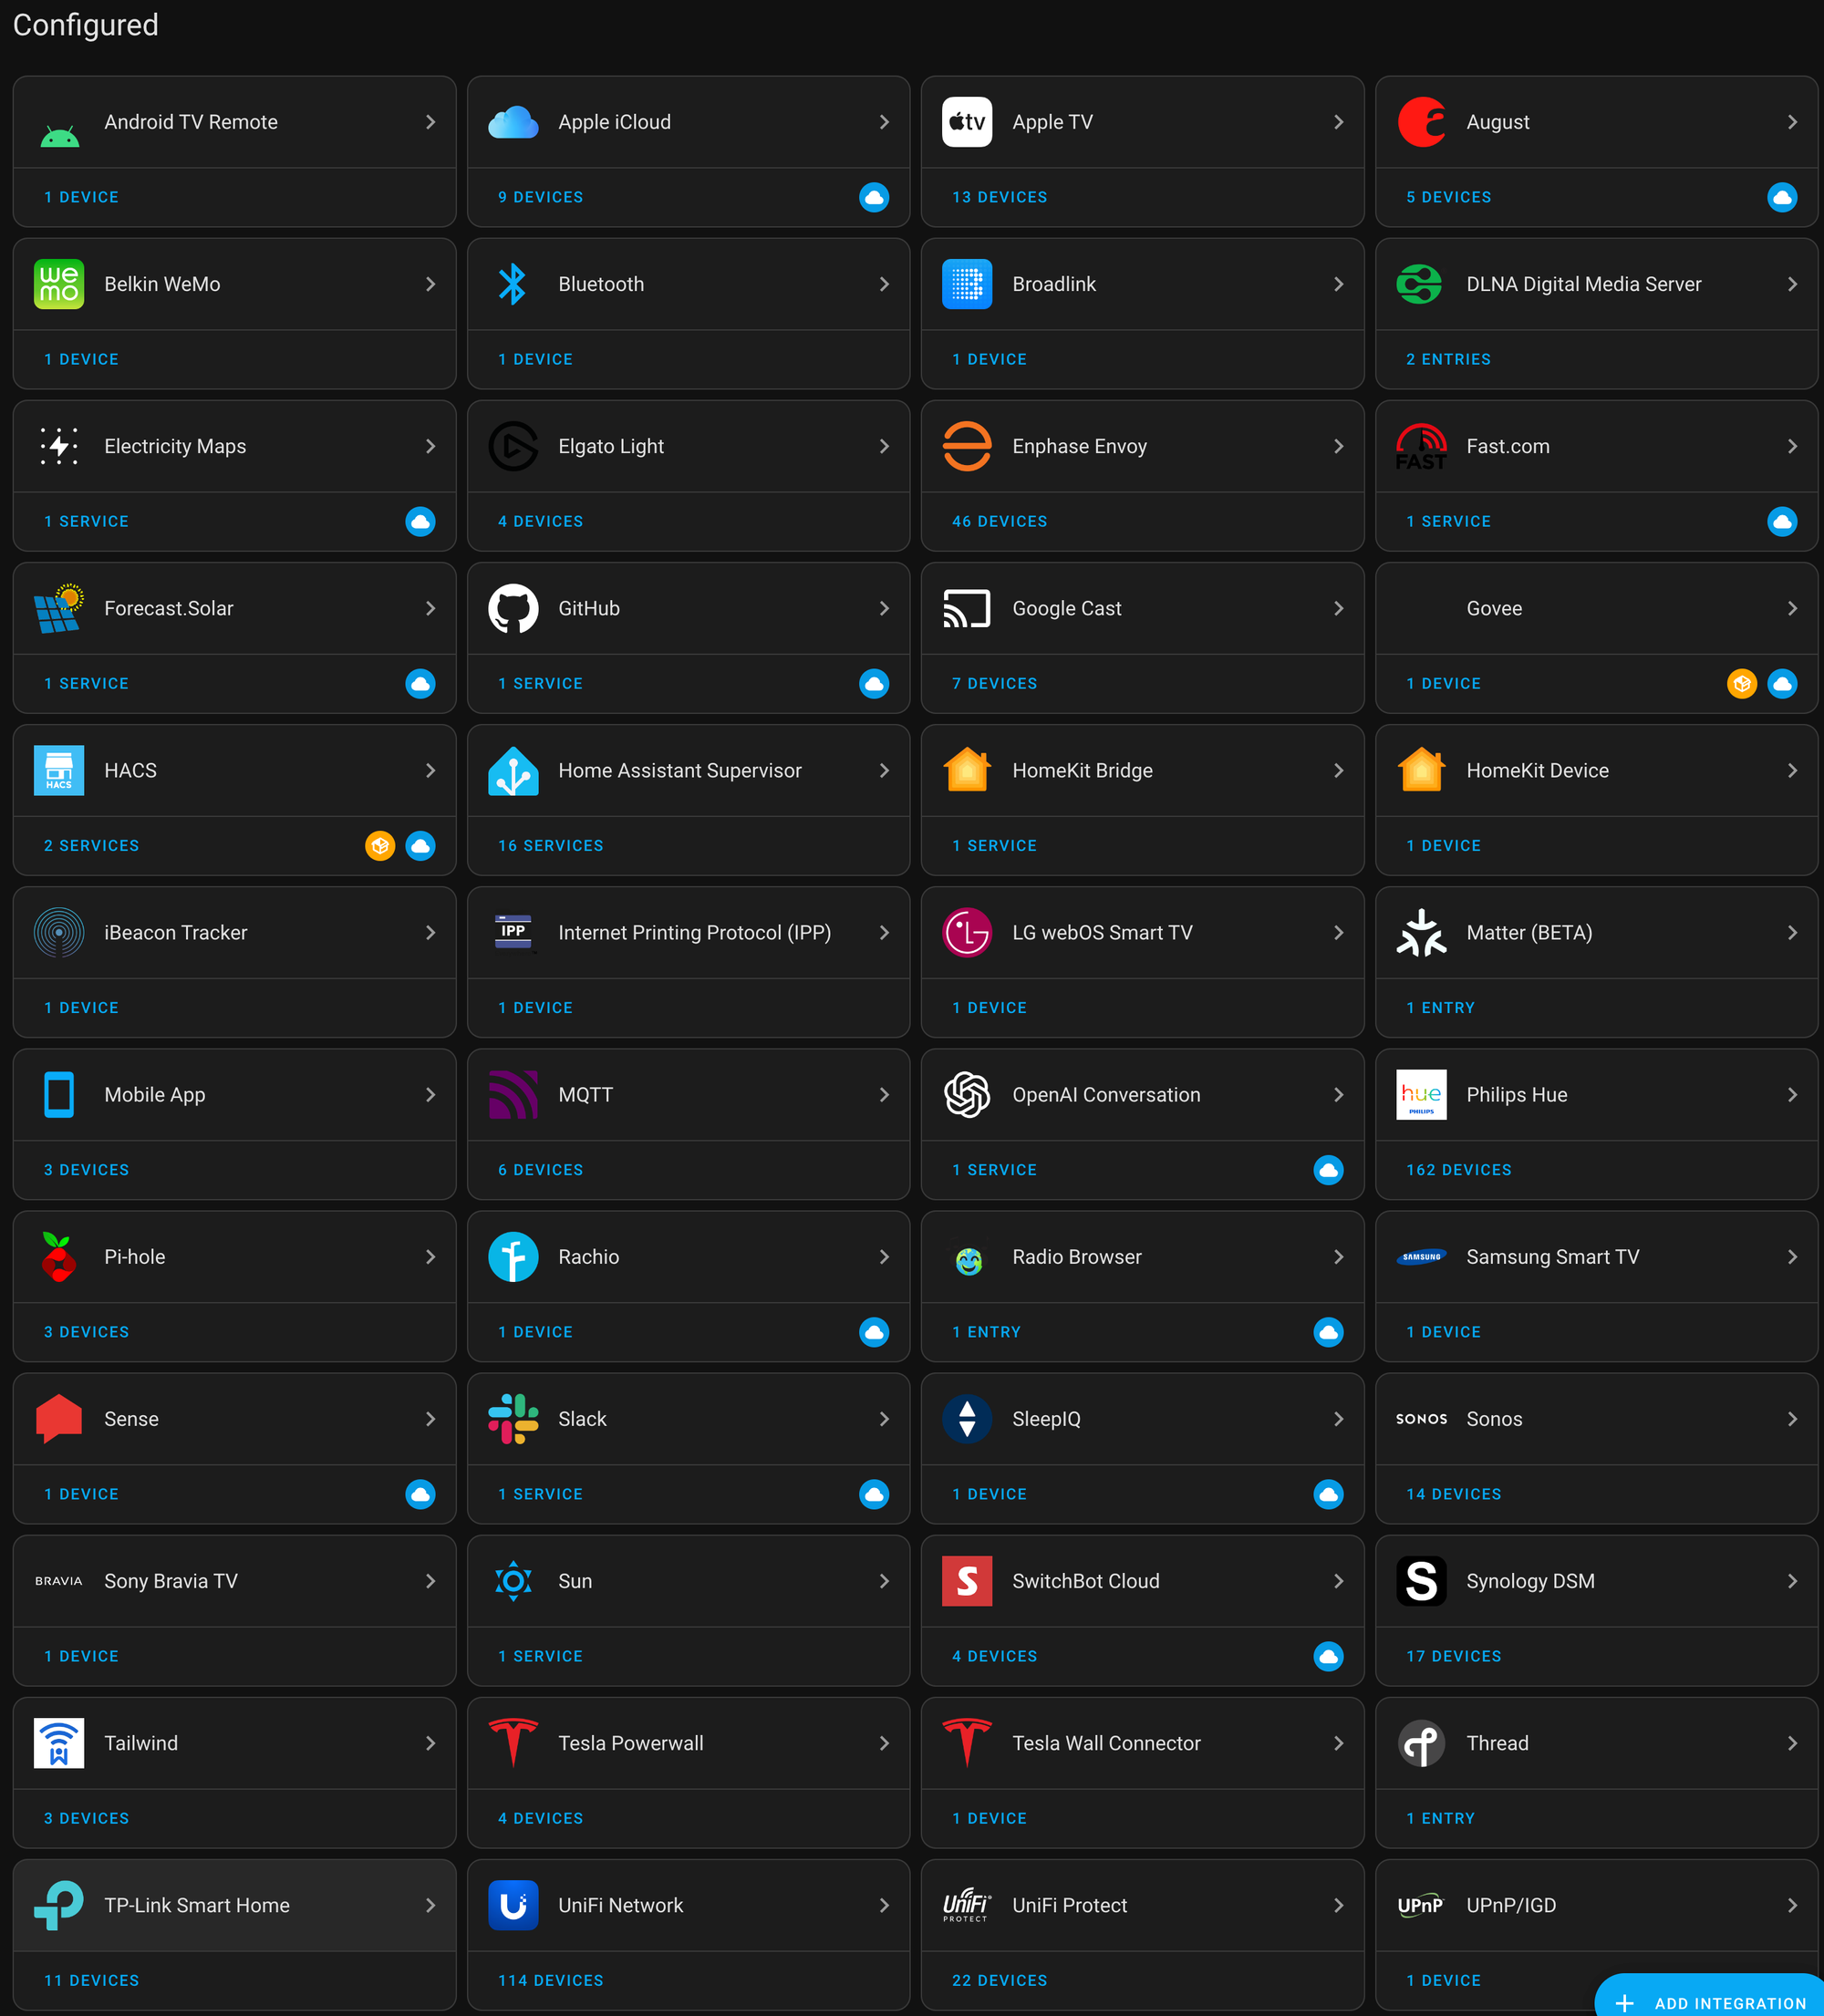
The ultimate automation services for everything in your smart home. I integrate my home solar and storage, all of my lighting, locks, Unifi network and camera, and even some custom integrations I created myself. The community for HA is awesome, which will make getting started very easy. I recommend installing via one of the Proxmox scripts here. I'm currently using the VM script, which I find the most flexible as I need to pass through several physical USB devices, like Zigbee, Z-Wave, and Bluetooth antennas. I would recommend a good amount of CPU cores and a healthy amount of RAM if you are a heavy user like me. You'll also notice that I have several network adapters, to help with device discovery on separate VLANs.
HACS
The Home Assistant Community Store (HACS) is a must-have once you're up and running. The officially supported add-ons are essential. However, there are a few blind spots. I use some community integrations for my Govee lights and many others.
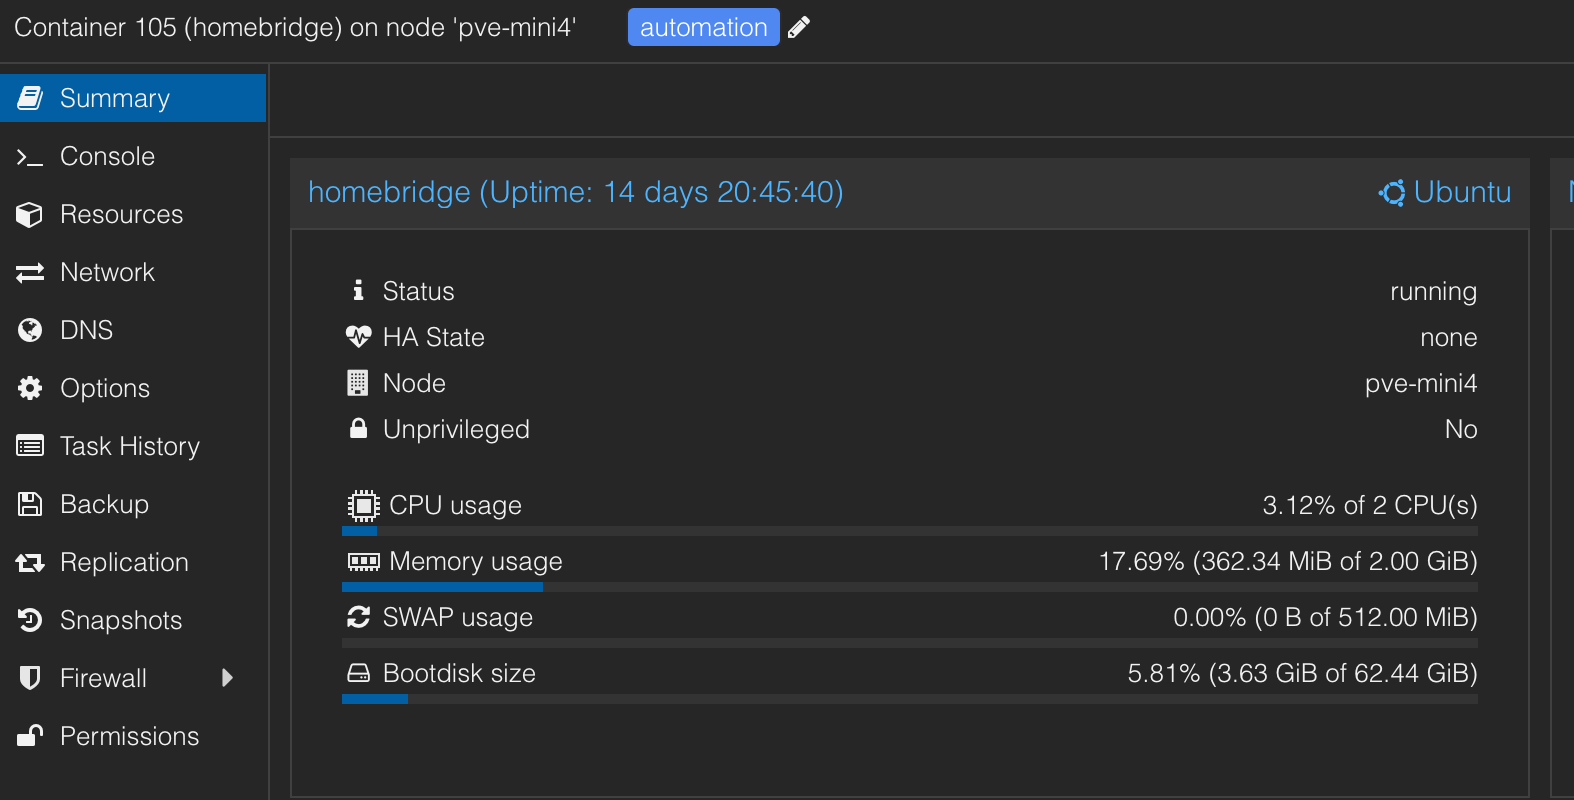
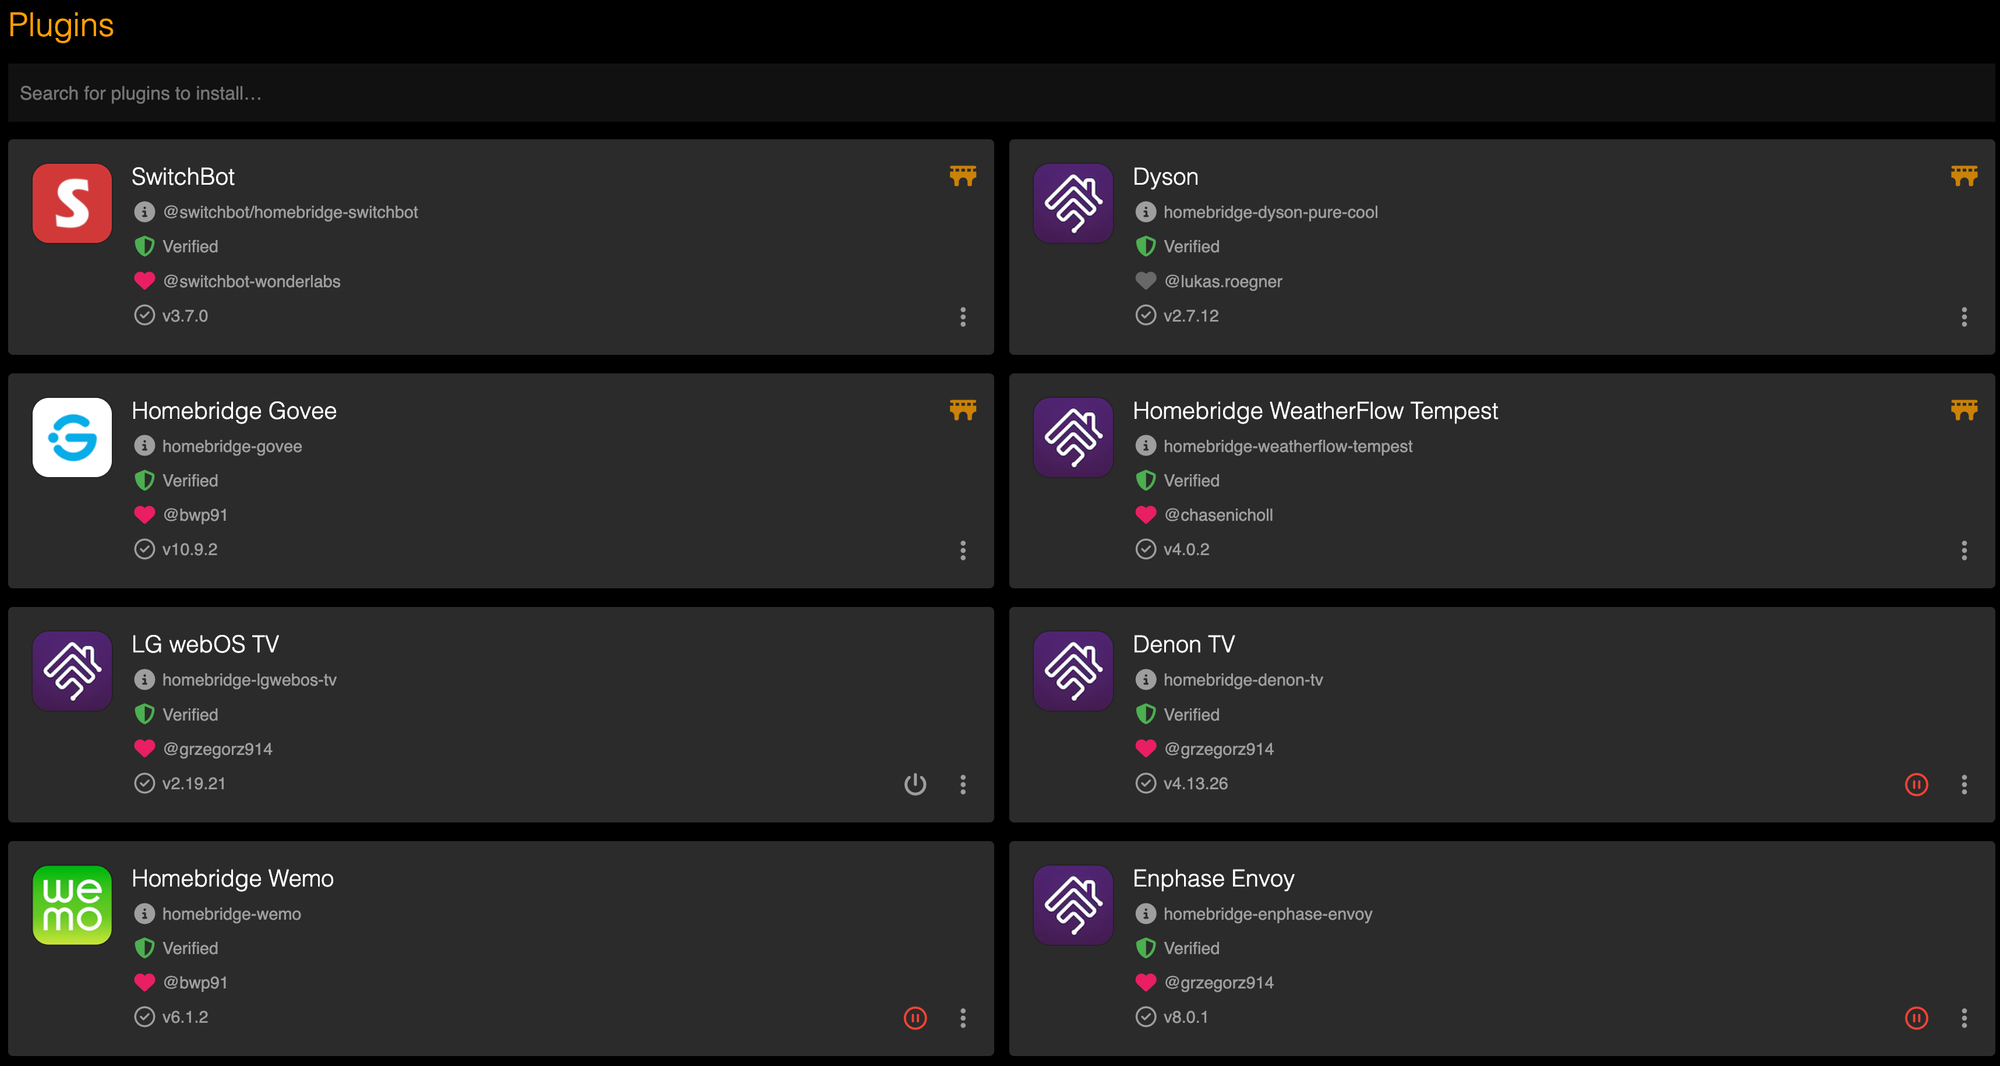
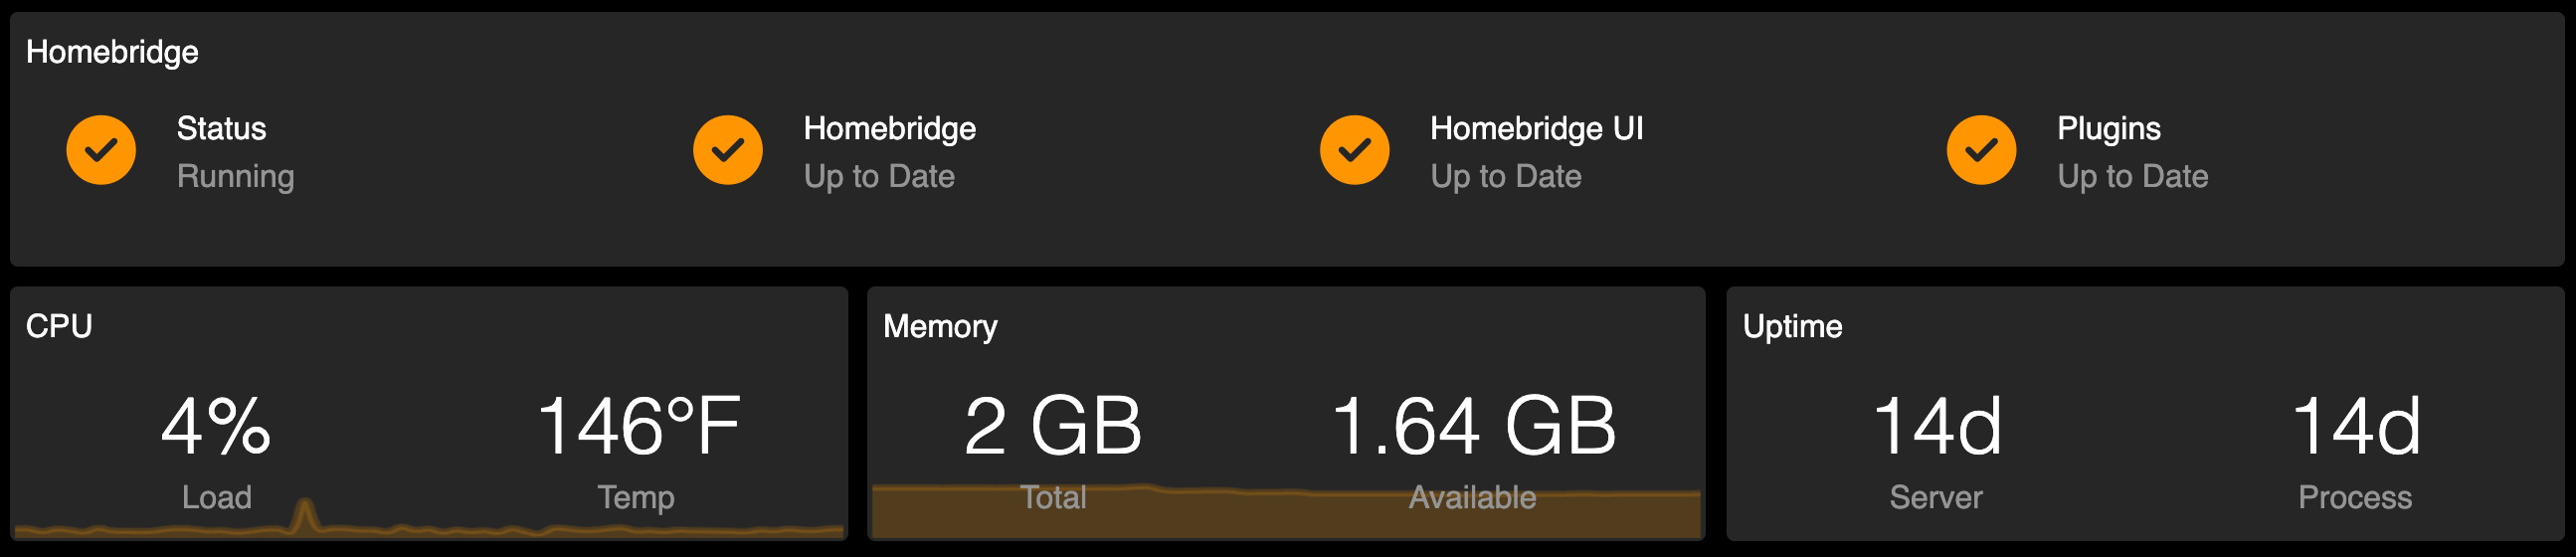
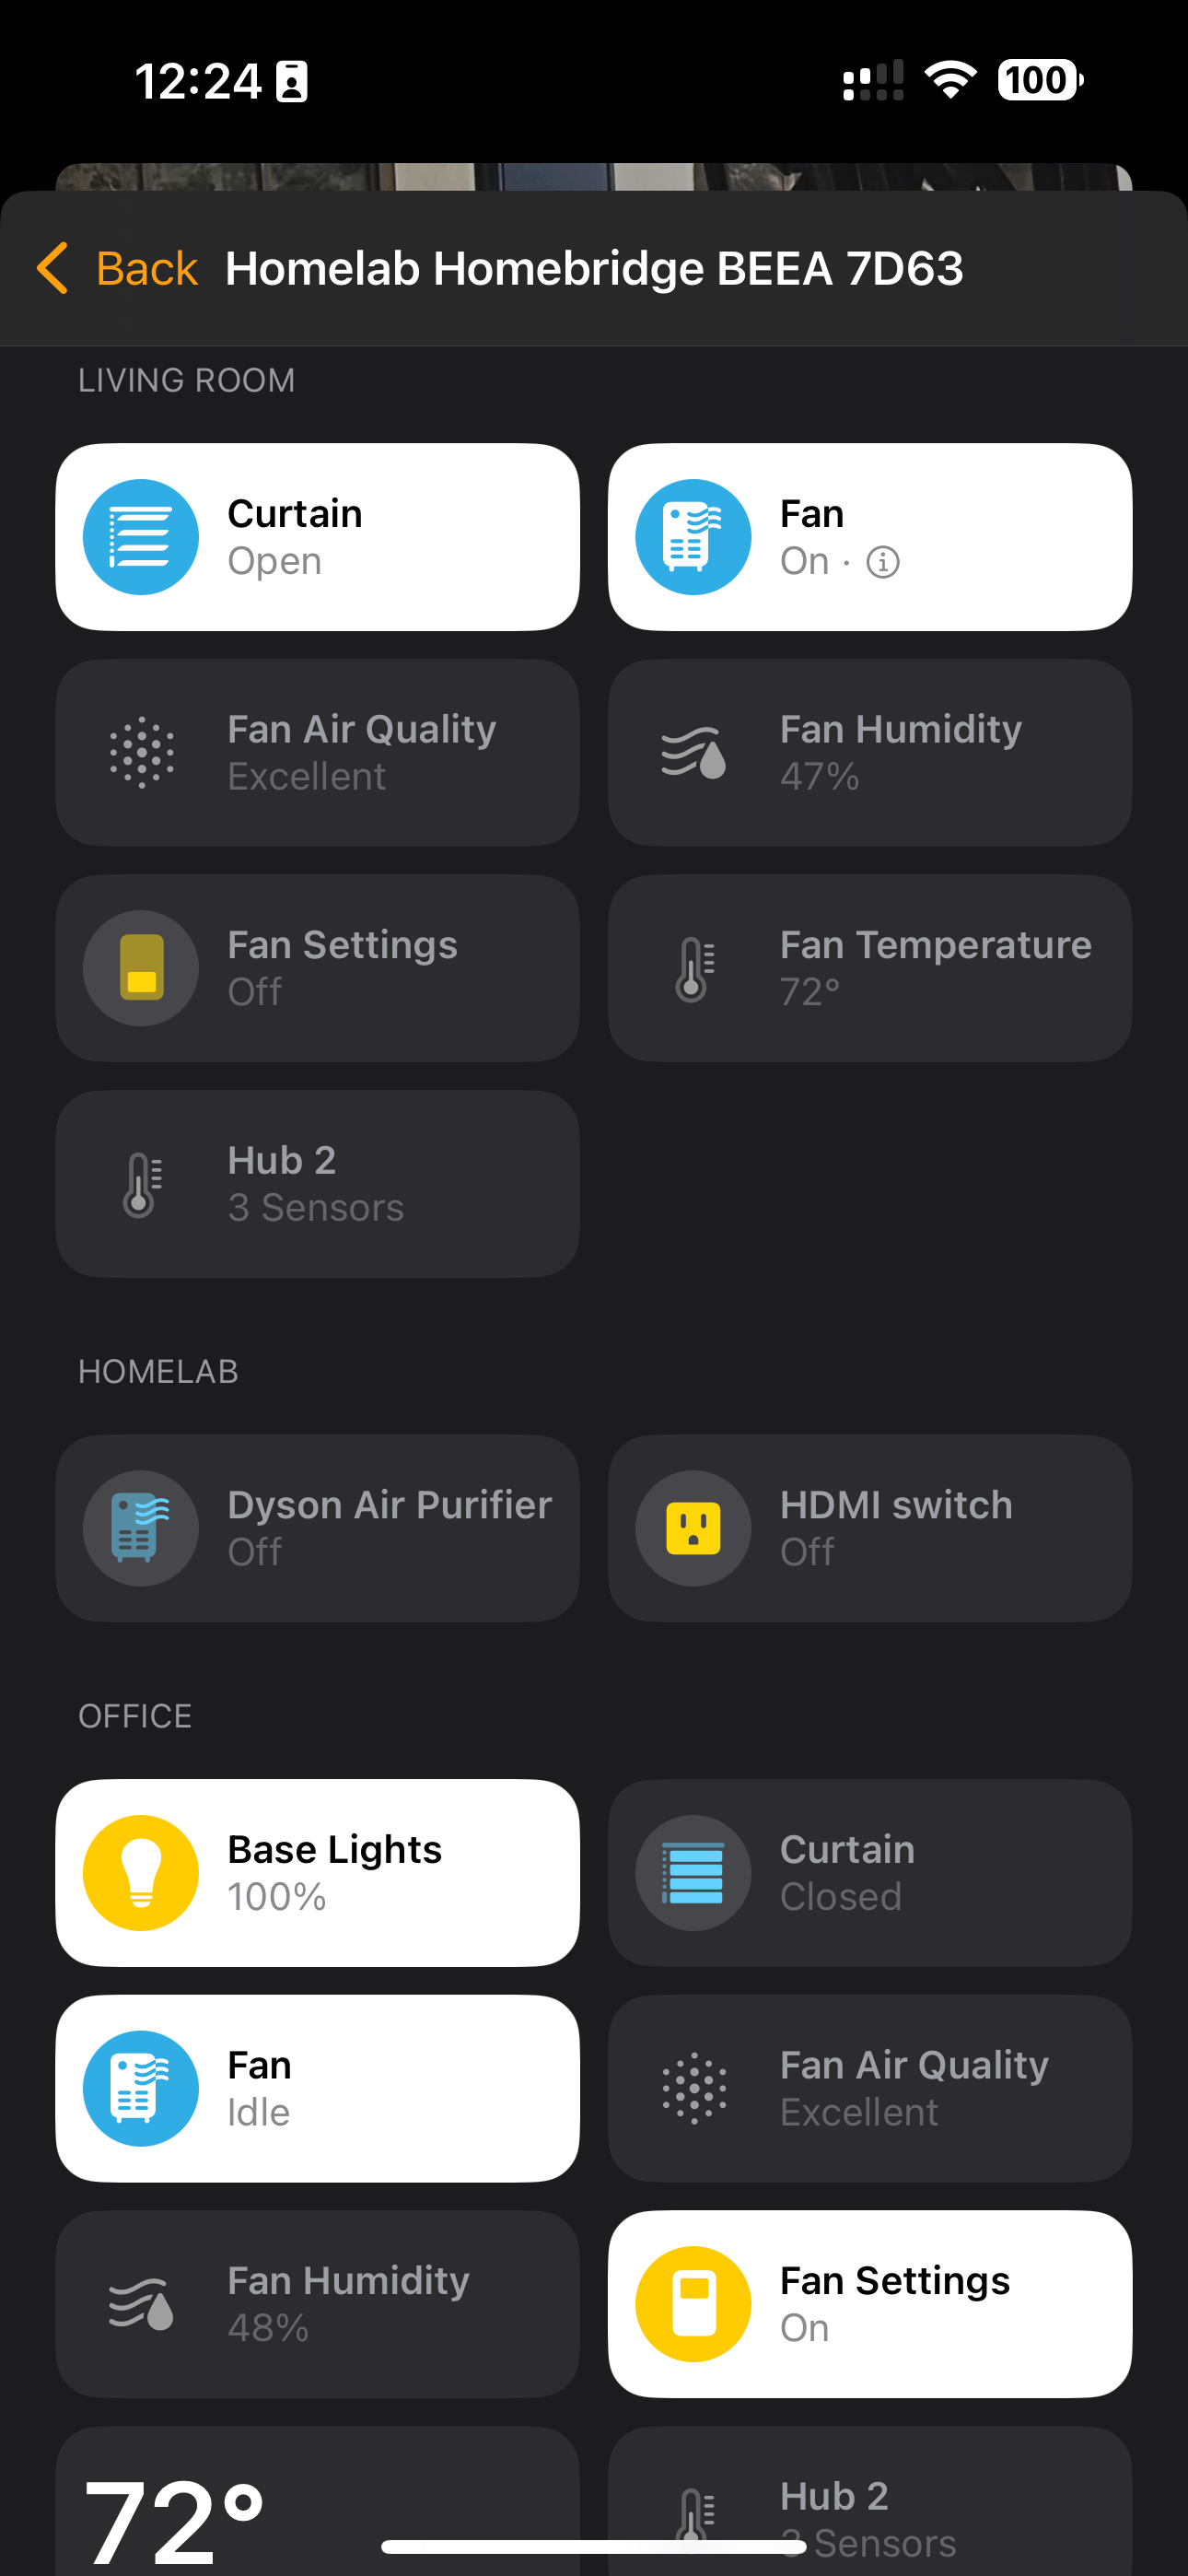
Homekit integration with Homebridge
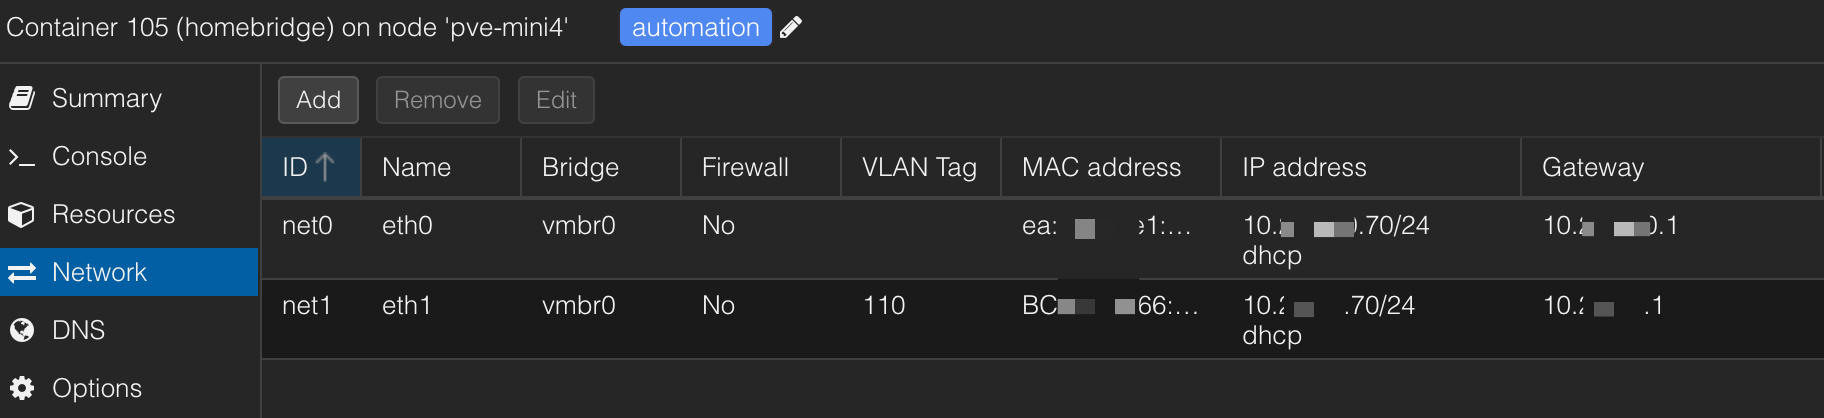
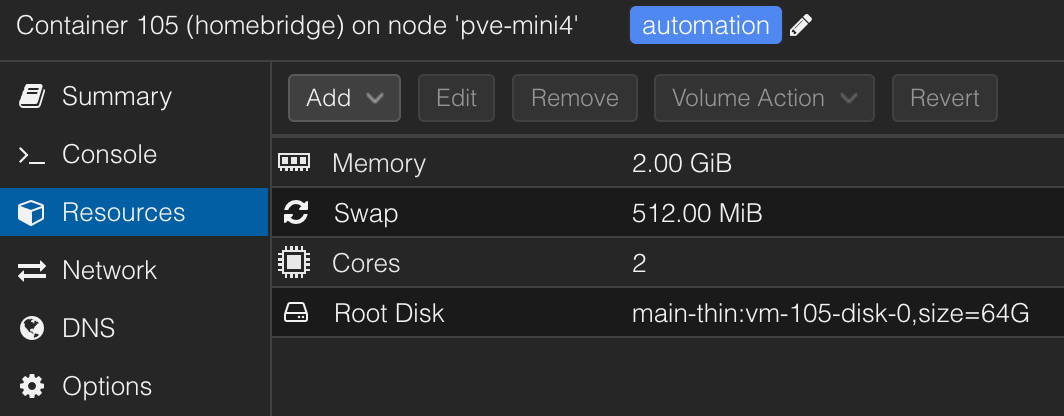
If you are a HomePod/Homekit family, then Homebridge is a must-have addition to your homelab. Homebridge acts as an unofficial bridge that can be added as a device to your Apple Home ecosystem and allows you to bring smart devices that are not officially supported to Homekit. This allows me to reliably control Switchbot, Elgato lights, LG TV, and a few others. It is very well suited to host on a lightweight Proxmox LXC container. Here are some snapshots of my Proxmox config, homebridge dashboard, and the Apple Home app on my phone showing the integration.
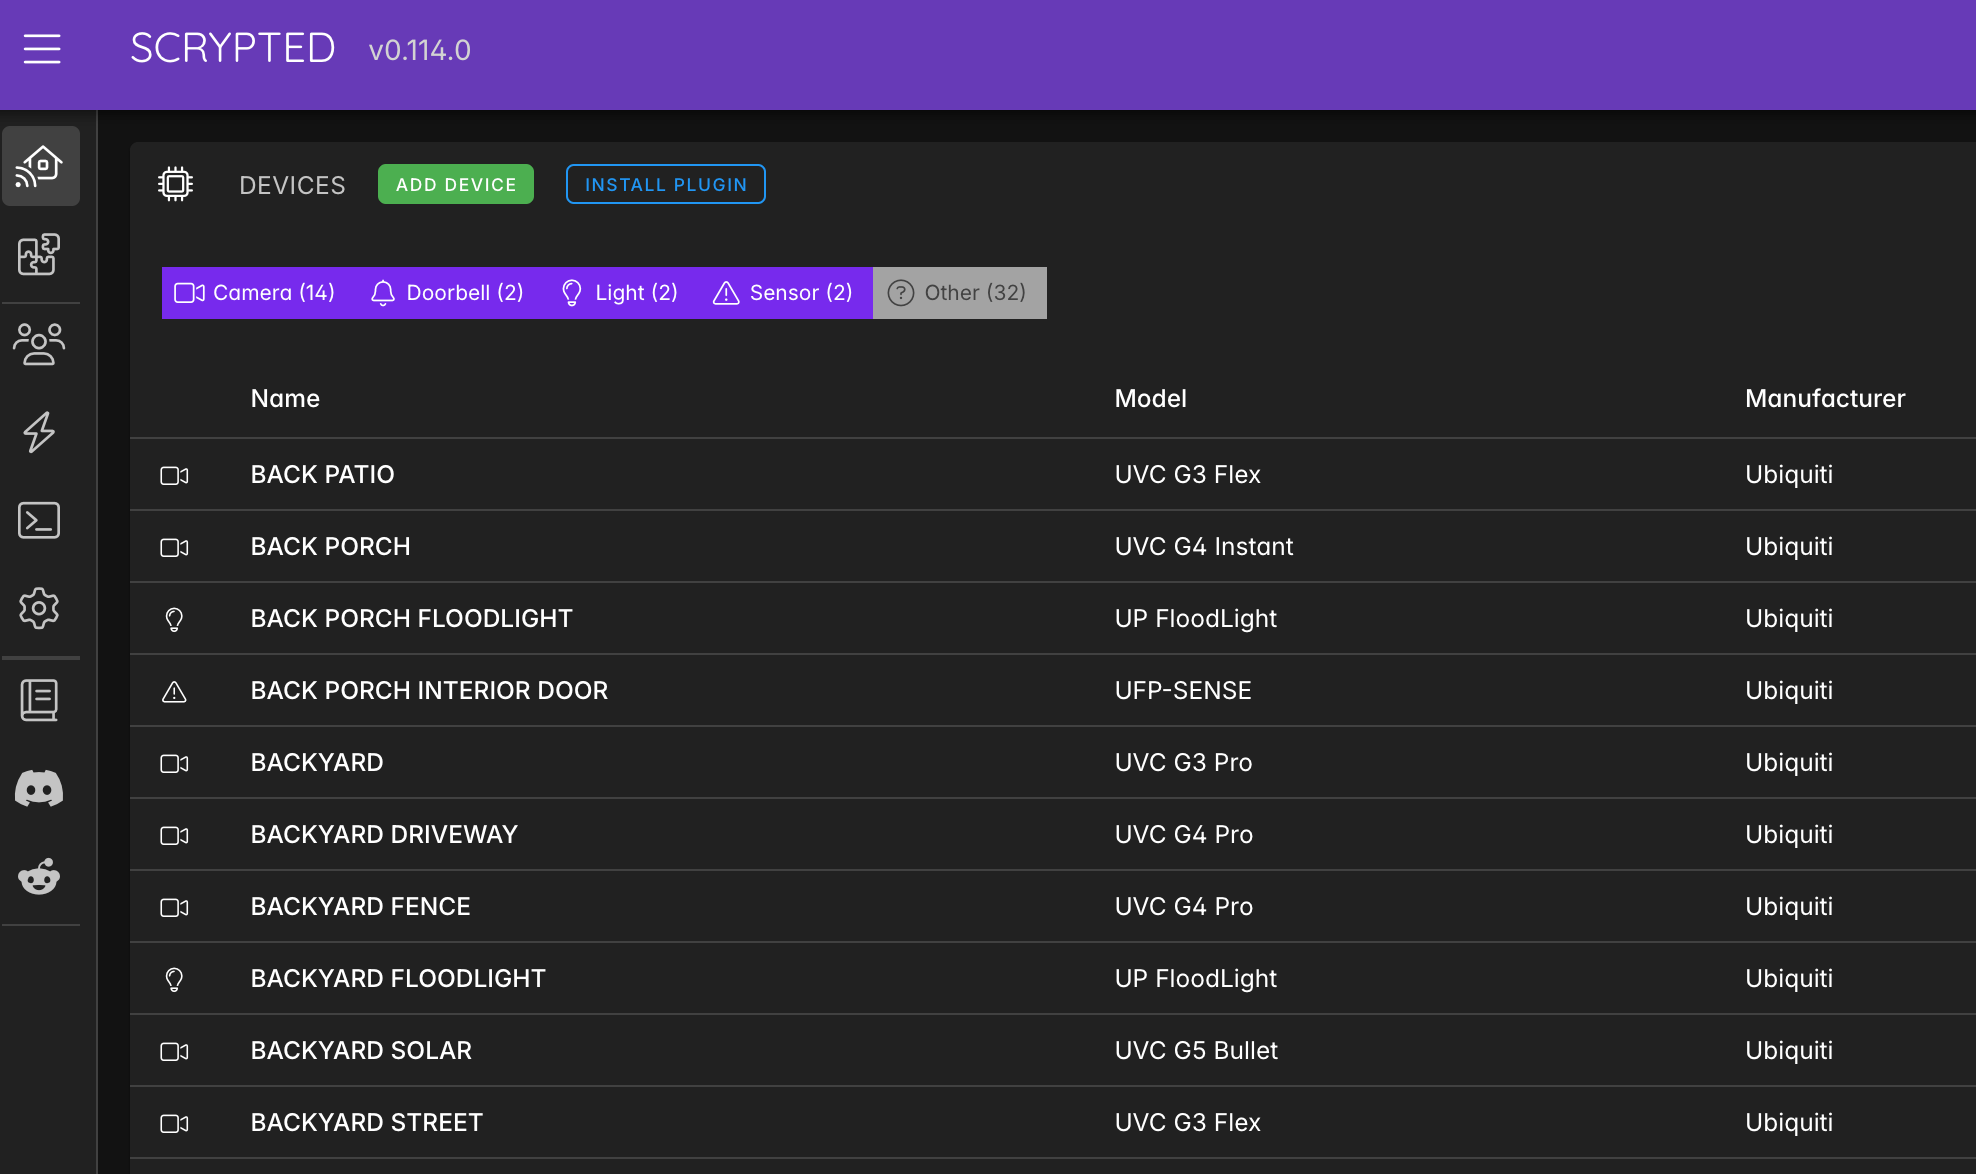
Cameras with Scrypted
Forget the integrations for Home Assistant and Homebridge for your Unifi, Nest, Ring, etc cameras; this is what you want. Scrypted pulls the RTSPS streams from my cameras, and then rebroadcasts the feeds to Homekit. Once my Protect cameras are integrated with Scrypted via their Unifi plugin (you'll set up a special local login on your console), I simply enable the Homekit plugin on each Camera, and then I can Scan and add the camera like any other Apple Home accessory. This enables things like Apple TV, phone, and watch popups and video notifications from my G4 Doorbell Pro, as if it was all meant to work together. You can even enable recording for people and package detection, as Unifi's AI detection does not natively work with Apple. This project is just awesome. They also have an excellent paid NVR service, which if you're not using a local NVR like me, will give you similar functionality.
Deep cut, Koushik Dutta (koush) is the developer and I used to use his Android ROM's and tools back in the day. Still killing it!
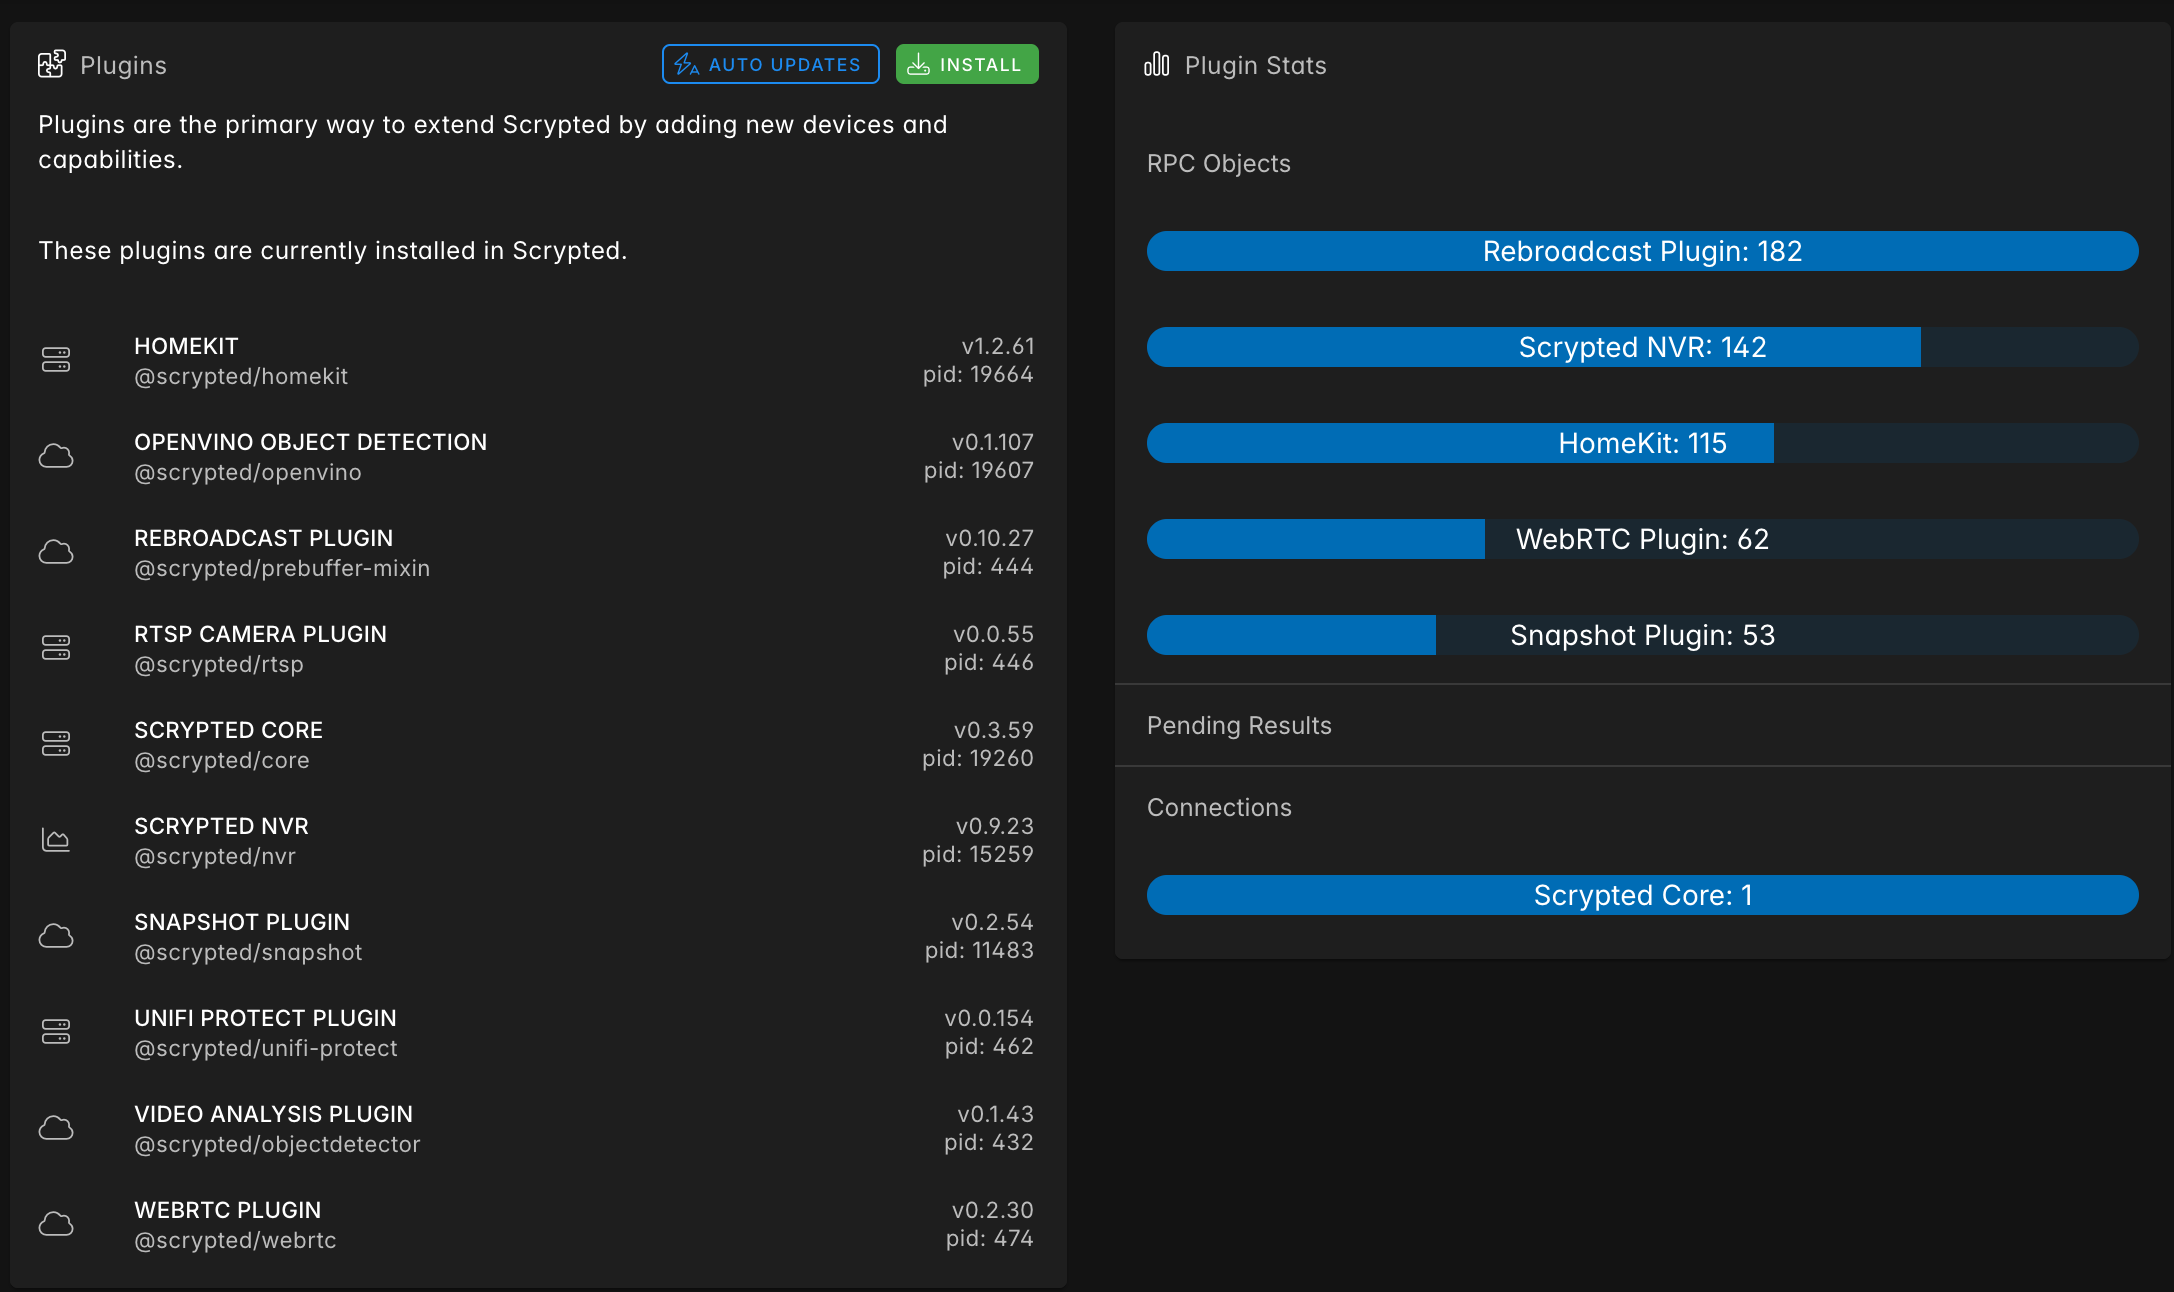
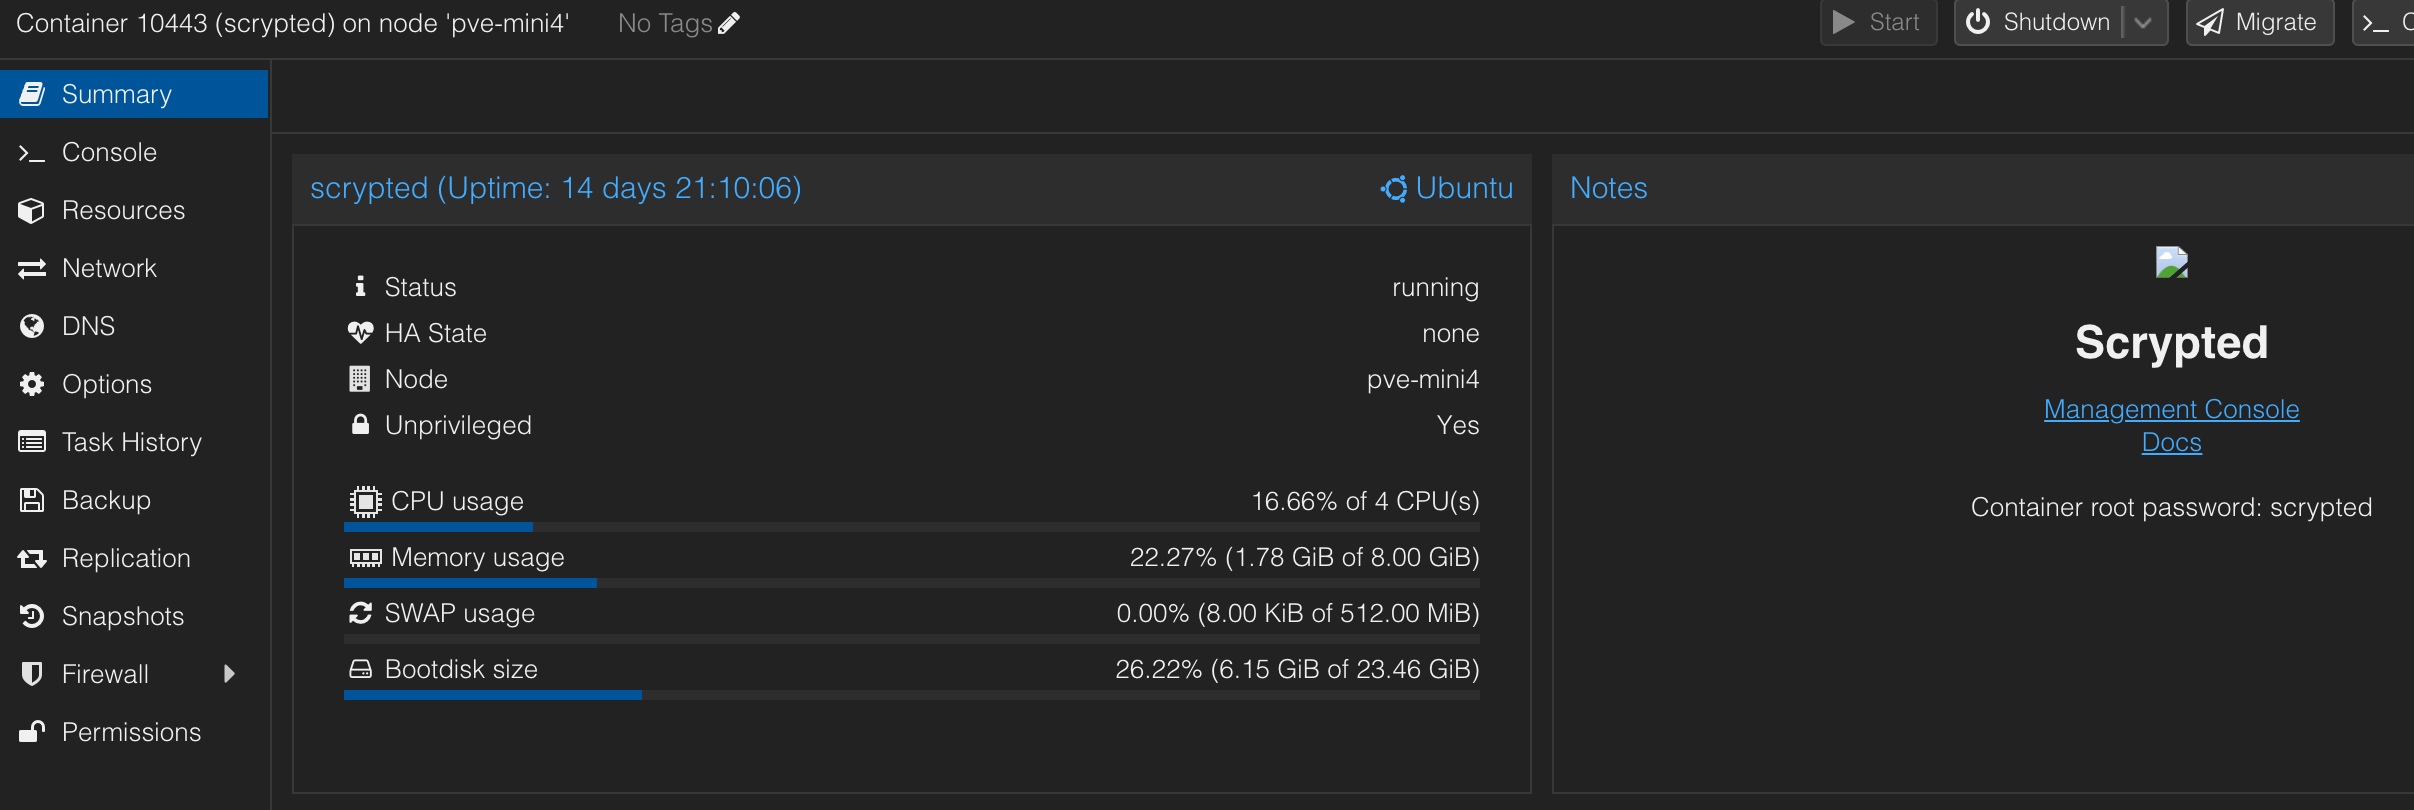
Hosting with a Proxmox container is the recommended way to run Scrypted, and they provide an install script that will also enable hardware encoding support for your camera streams. This one runs on my MINISFORUM mini PC, with dedicated graphics and it works very well. This will consume a decent amount of CPU, so make sure you run this on something that can handle it.
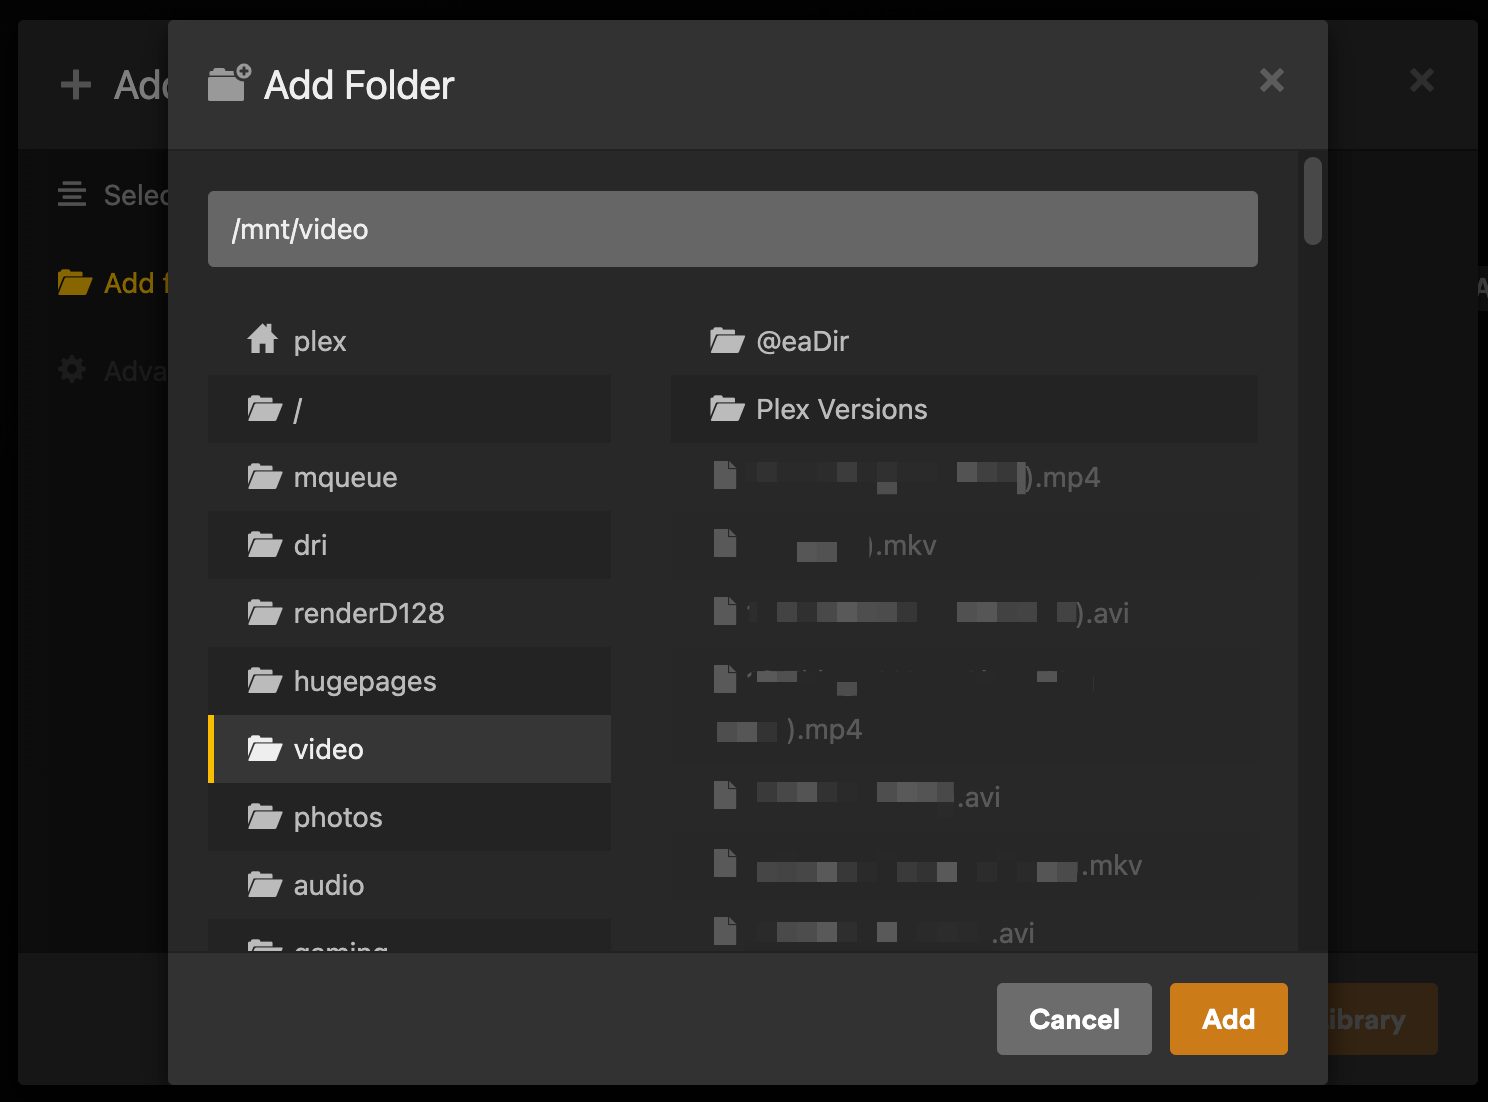
Media with Plex
Plex needs no introduction. I need a seamless way to stream all of it at home and when I'm away, and there is no better way than Plex. By itself, Plex is pretty great. It will run on an old Windows machine with a big hard drive just fine...which is exactly how I used to do it. As you've seen by now, we can do much better than that. First, I don't need UPNP or port forwarding for Plex, It's a configured app with Cloudflare ZeroTrust, which is how I access it remotely. Second, I keep all of my media on my two NAS devices, which are locally resilient and backed up to the cloud every night. Finally, I have Proxmox to host my server in an LXC container with full hardware acceleration support.
Install and configure
Start with this handy script to install Plex on one of your Proxmox nodes. Don't overthink the resource allocation, as you can always just allocate it later. If you need frequent transcoding, then you'll need to allocate a larger amount of resources. However, if you direct play most of your content, it will use very little CPU. Plex does like RAM, so be more generous there.
Mount your NFS shares to Plex
SSH into your new Plex server or open the Console in the Proxmox web interface. From there install NFS support sudo apt install nfs-common and then edit your /etc/fstab file sudo nano /etc/fstab and add entries to mount your NFS shares.
Conclusion
All posts must end
There's more, but this post is long enough 😀. It was fun to write, and I hope it helps you with your own homelab or inspires you to start one. Good luck, and feel free to reach out and let me know how it goes!