Load balanced and highly available local DNS with DNSDist and Keepalived
Caution: prepare to enter the over-engineering zone! I assert that your homelab can have one local IP address for DNS that will be fast & resilient across a high volume of requests, survive several physical and virtual machine failures, while never failing to resolve or respond.


Caution ⚠️: prepare to enter the over-engineering zone! I assert that your homelab can have one local IP address for DNS that will be fast & resilient across a high volume of requests, survive several physical and virtual machine failures, while never failing to resolve or respond. Well, NEVER may be a stretch. Let's say that it would be very, very hard for the answer to "Is something wrong with the internet?" to be pi-hole/DNS is down.
Prerequisites
This builds upon some of my previous posts, where I provide an in-depth walkthrough on how to set up a highly available pi-hole instance in Kubernetes. I highly recommend you check that out first, as you will need multiple instances of pi-hole (or alternatives) up and running...and, while you're at it, fully synchronized and secured with DoH. If you configure your setup similarly to mine, you'll end up with multiple layers of high availability (HA) and load balancing (LB). See, I told you this is over-engineered! It's five-nines or nothing!
Topology Requirements
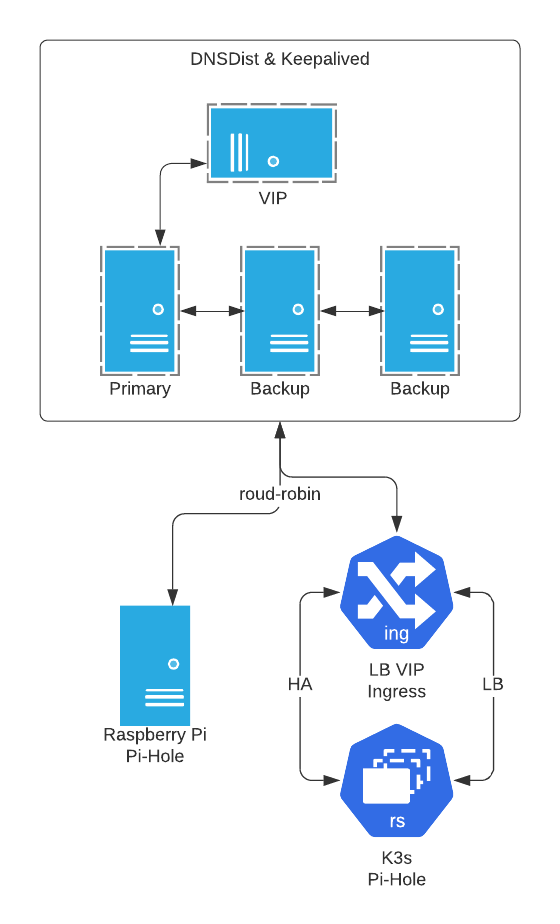
Here is a quick breakdown of the topology you'll need in minimum and recommended configurations. The load balancer is the endpoint and service that will spread your DNS queries equally across multiple pi-hole instances. The virtual IP address (VIP), managed by keepalived will ensure availability when your primary load balancer goes down.
Minimum
- Top layer: Two virtual machines (or IoT / Pi's), low spec, running DNSDist and Keepalived. One primary and one backup.
- Bottom Layer: Two virtual machines (or IoT / Pi's), low-med spec, running Pi-hole or equivalent service that resolves DNS queries.
This will tolerate one machine failure in the top layer and one in the bottom layer. Both servers in the bottom layer are required for load-balancing requests.
Recommended and beyond
- Top Layer: Three or more virtual machines (or IoT / Pi's), low spec, running DNSDist and Keepalived. One primary and two+ backups.
- K3s Layer: 3+Node cluster with Pi-hole stateful set using persistent volume storage and Cloudflared (DoH).
- Bottom Layer: One or more virtual machines (or IoT / Pi's), low-med spec, running Pi-hole + Cloudflared (DoH).
This will tolerate two machine failures in the top layer and two or more failures in the bottom layer, depending on your Kubernetes configuration. To further improve availability (depth), you add more agent nodes to k3s. To improve load-balancing and throughput (width), add additional virtual machines or Pi's to the bottom layer.
DNSDist

Install DNSDist on each top-layer machine.
sudo apt install dnsdist
Configuration is identical for each top-layer machine.
sudo nano /etc/dnsdist/dnsdist.conf
sudo systemctl restart dnsdist
Now use the DNSDist console to confirm your configuration is working correctly.
Keepalived
Repeat for each top-layer machine.
sudo apt install keepalived
Configuration will vary for each machine. The state, priority, unicast_src_ip, and the unicast_peer list will vary based on the machine you are configuring. The interface may also vary.
Primary
Backup 1
Backup 2
Backup 3
Restart the service or reboot.
sudo systemctl restart keepalived
Testing
Start turning things off and verify that DNS queries are still responding
nslookup
nslookup openai.com 10.10.10.100

Server:		10.10.10.100
Address:	10.10.10.100#53

Non-authoritative answer:
Name:	openai.com
Address: 13.107.246.51
Name:	openai.com
Address: 13.107.213.51
dig
dig @10.10.10.100 github.com

; <<>> DiG 9.10.6 <<>> @10.10.10.100 github.com
; (1 server found)
;; global options: +cmd
;; Got answer:
;; ->>HEADER<<- opcode: QUERY, status: NOERROR, id: 19540
;; flags: qr rd ra; QUERY: 1, ANSWER: 1, AUTHORITY: 0, ADDITIONAL: 1

;; OPT PSEUDOSECTION:
; EDNS: version: 0, flags:; udp: 1232
;; QUESTION SECTION:
;github.com.			IN	A

;; ANSWER SECTION:
github.com.		45	IN	A	140.82.113.4

;; Query time: 18 msec
;; SERVER: 10.10.10.100#53(10.10.10.100)
;; WHEN: Tue Feb 20 17:26:17 EST 2024
;; MSG SIZE  rcvd: 65
Wrap-up
The only thing left is to add your new top-layer VIP 10.10.10.100 to your DHCP and/or DNS client configuration, and you're good to go! Though defining a secondary DNS server is best practice, it's typically utilized only when the primary is unreachable. If you followed this walkthrough, that should account for 5.26 minutes per year 😉. For good measure, you could throw in an IP from your bottom layer, just in case. Alternatively, you could add an additional VIP to the top layer or offload that to a cloud provider like Cloudflare if local ad-blocking is less of a concern. My recommendation would be to block access to all public DNS resolvers, forcing some devices that like to ignore your DHCP settings to use your sink and block their ridiculous amount of telemetry and data collection. I'm talking to you Amazon, Apple, Sony, and LG, to name a few. Not in this homelab!
Alternatives and considerations
- Why not HAProxy? Nope, it does not load balance UDP traffic.
- How about NGINX? Yes, however, DNS load balancing is only available in NGINX Plus, their paid offering.
- Why not Cloudflare or another cloud-based DNS provider that offers blocking? It's good for some, but it lacks much of the functionality I get from pi-hole. And given that most connected clients are unable to utilize DoH, I would have to proxy and forward anyway. Cloudflare is a part of my solution, just not the whole solution.