Why Your Work Laptop Belongs in Its Own VLAN (and How to Do It)
Ever feel like Big Brother is lurking behind your screen? Spoiler: it probably is. I'll show you how to carve out a dedicated VLAN for your corporate machine—preserving the protections you need while keeping your personal network private

Ever feel like Big Brother is lurking behind your screen? Spoiler: it probably is. It's called Data Loss Prevention (DLP) software, and it lives on your work laptop—it’s a vital guardrail for company data. But once you step through your front door, most of that telemetry is just dead weight: scanning your network, rerouting DNS, and logging IoT devices without delivering meaningful value. Outside the office, your laptop only needs plain‑vanilla internet access. In this walkthrough, I'll show you how to carve out a dedicated VLAN for your corporate machine—preserving the protections you need while keeping your personal network private, performant, and uncluttered.
Things you'll need
- A WiFi router that you manage (not the thing your ISP gave you 🗑️), which supports multiple virtual networks and multiple wireless networks (SSIDs). I highly recommend a UniFi Dream Router or UniFi Express device, similar to what I'm using in the screenshots below. This setup will also work with any router with similar capabilities, such as TP-Link Omada EAP, Asus RT-AX86U, Linksys VELOP, and others, all in the $150-$300 price range.
- Your work computer, Mac or Windows PC, connected via WiFi or Ethernet.
Create your new virtual network
If your house is like most, you likely have 20, 30, or more devices connected to your home WiFi. Smart speakers, TVs, Phones, and even your kitchen appliances. Nearly all of these devices are connecting to the internet, and nearly all of them are collecting data on you. Now, I have several other posts on how to help you with that, which I'll link below; however, it all starts with the VLAN. The best way to ensure those devices follow your rules is to first put them in the same group. Once grouped, you can set up rules (also known as policies), which control how that group can behave on your network.
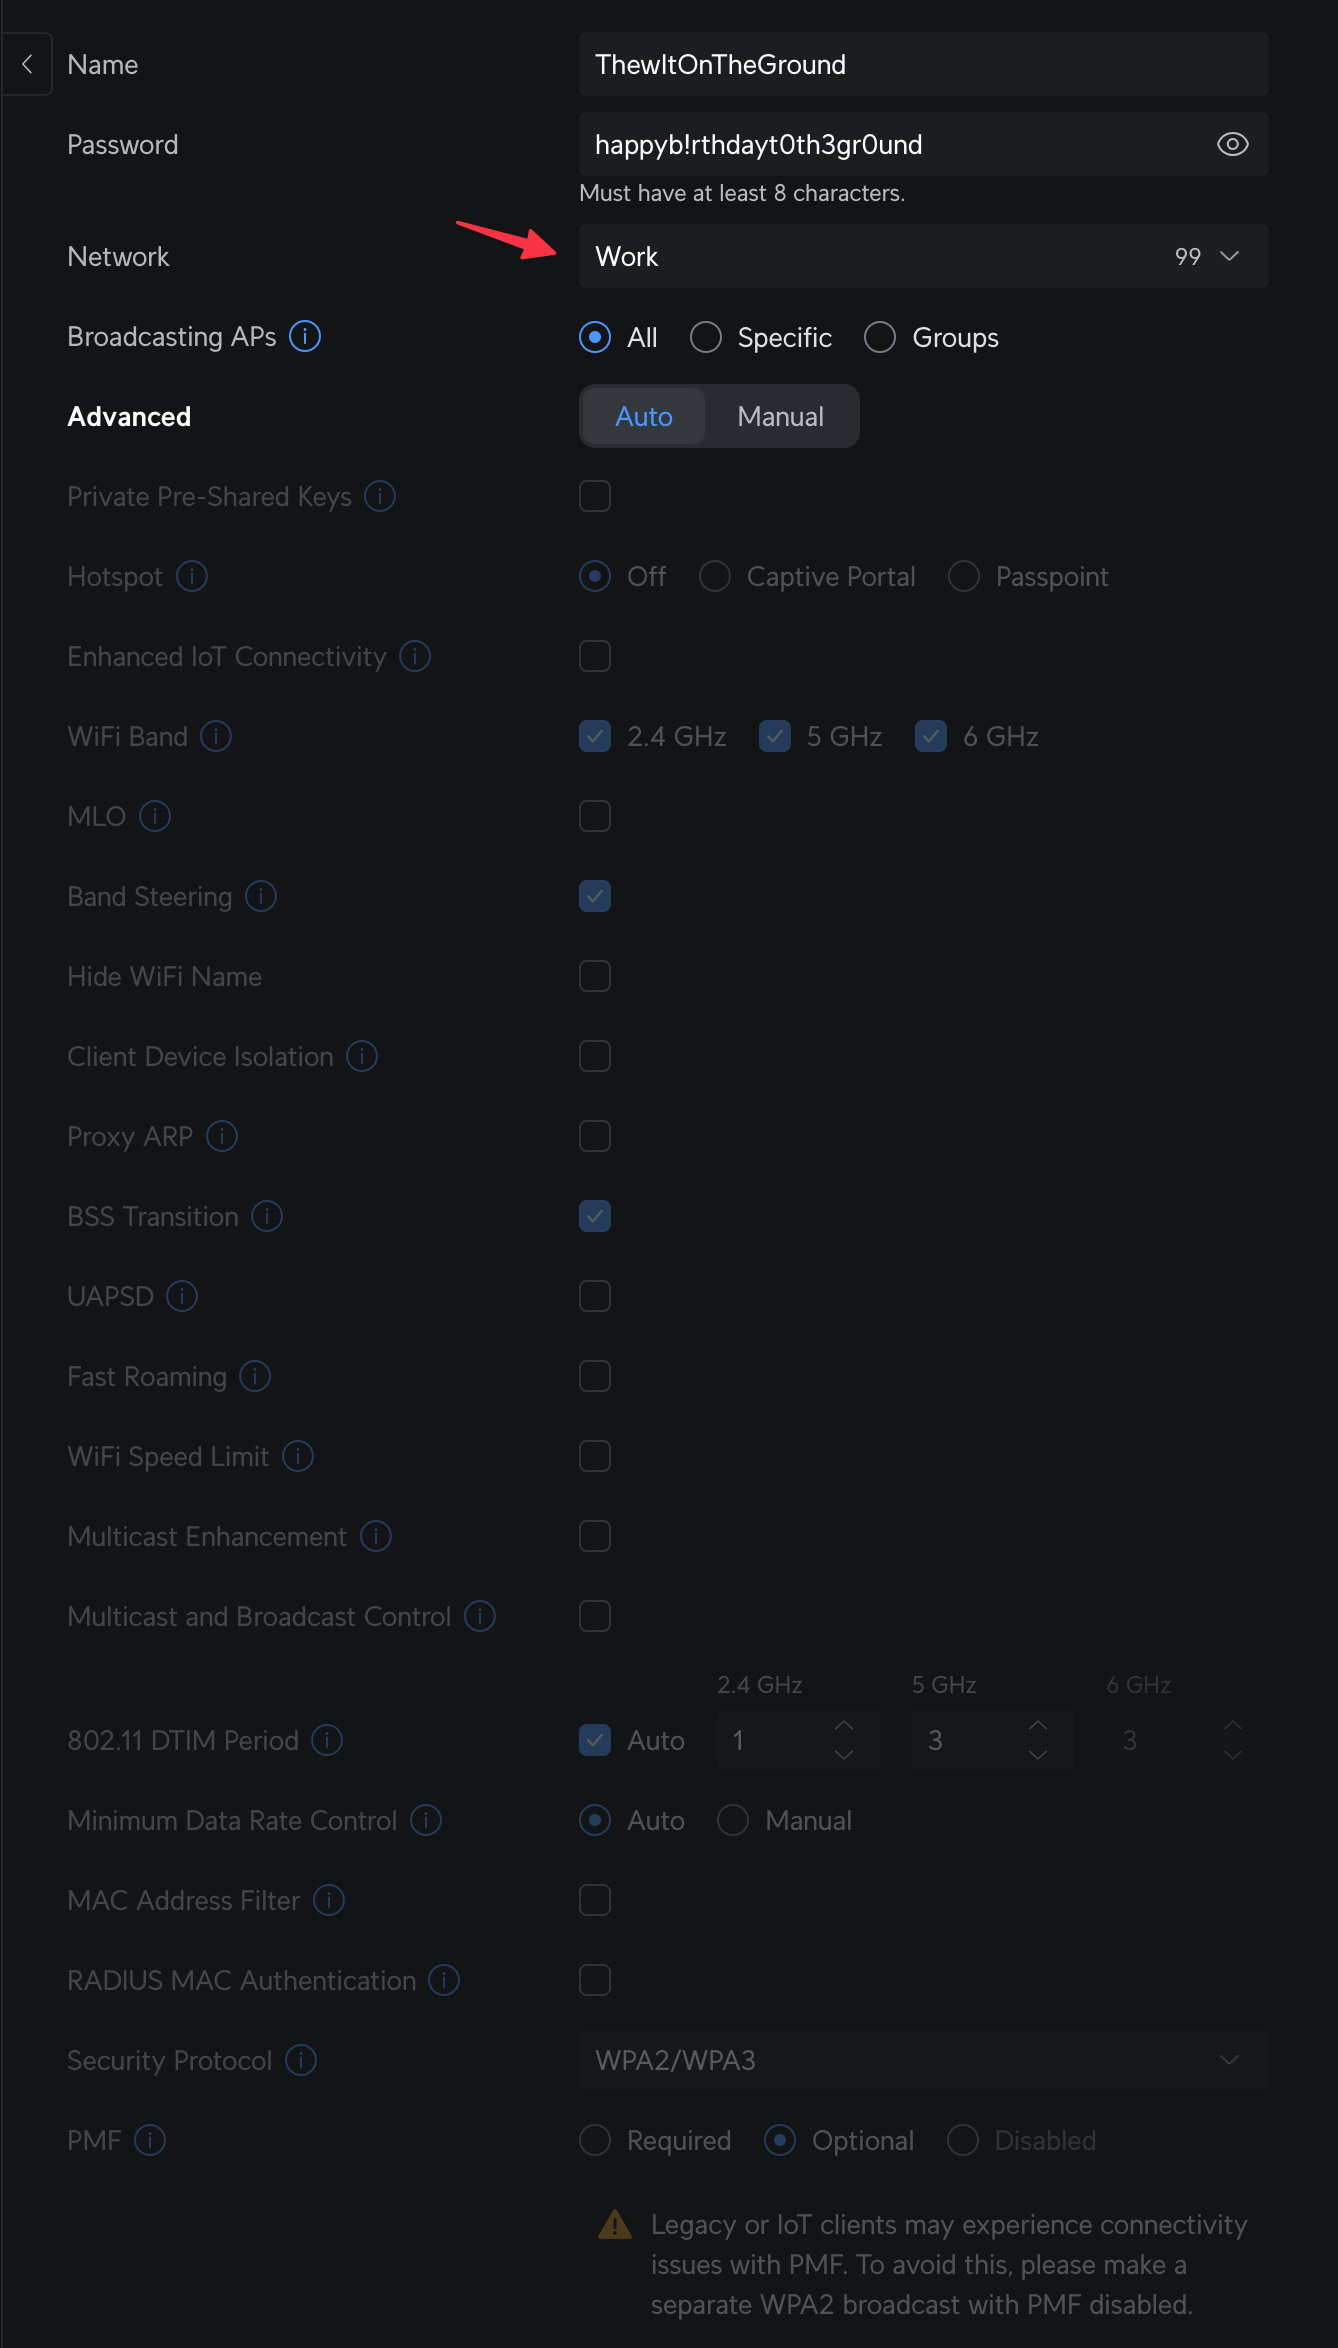
In this example, I'm configuring a new virtual network in UniFi that I'll call Work. Most settings can be left to the default, but ensure you allow internet access, and I recommend checking the isolate network option. You can always adjust your settings later if you want to customize things like your VLAN ID / Tag or Subnet, both will be important later. Settings -> Networks -> New virtual network
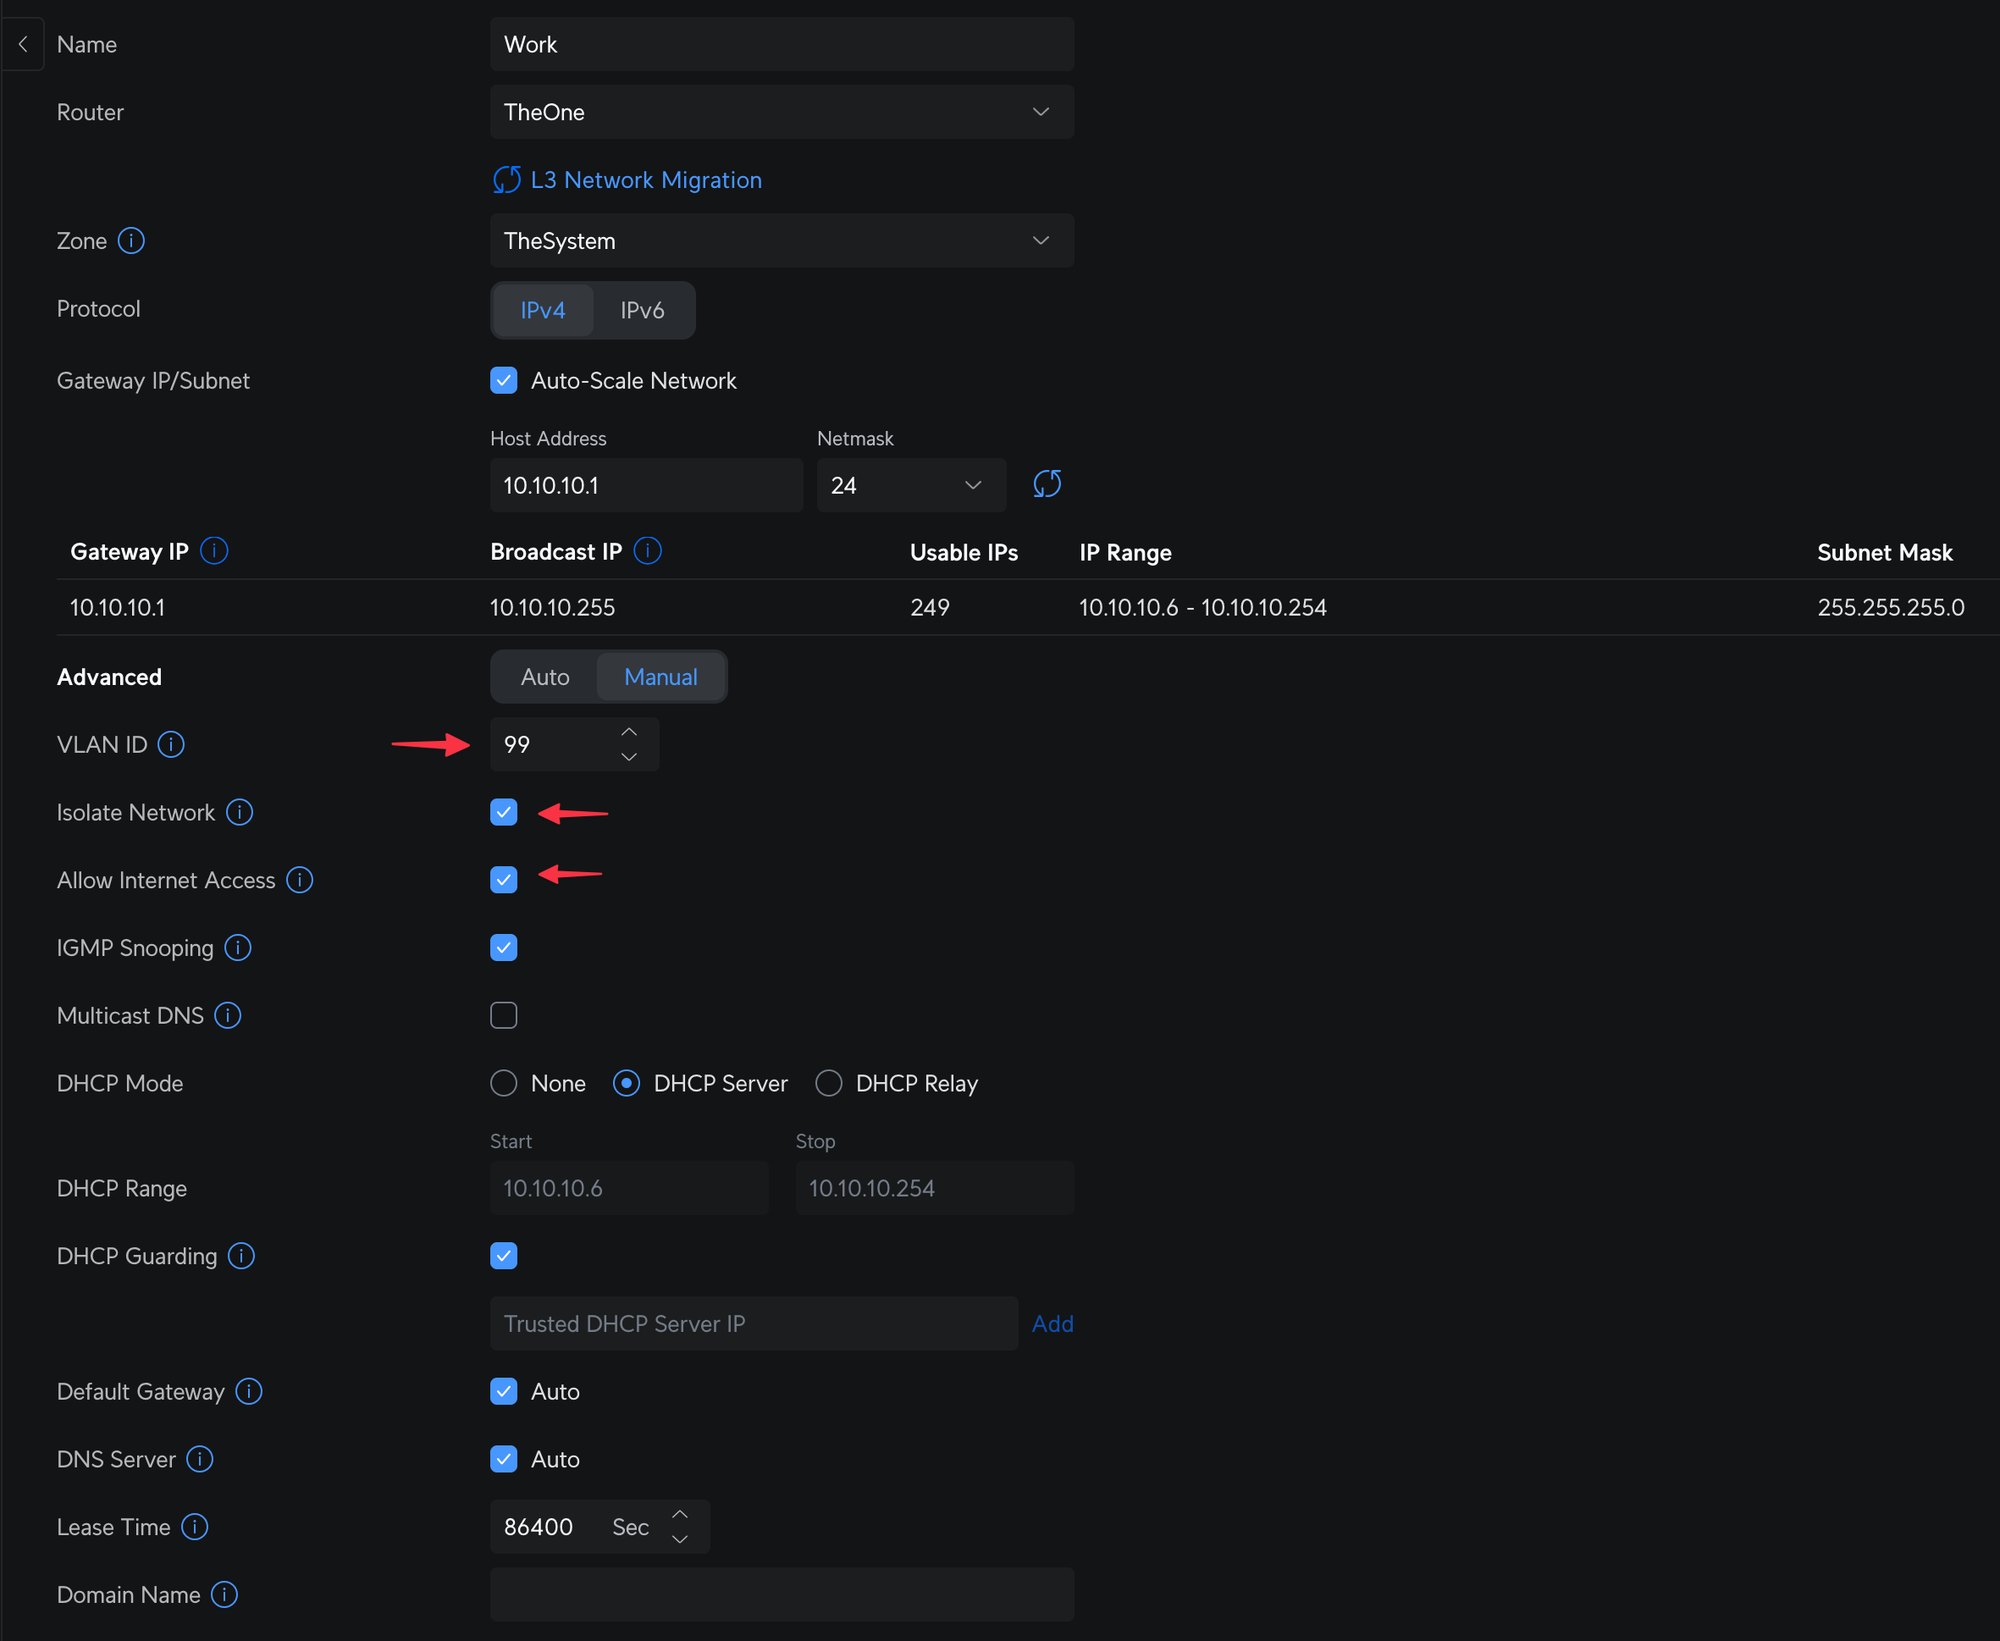
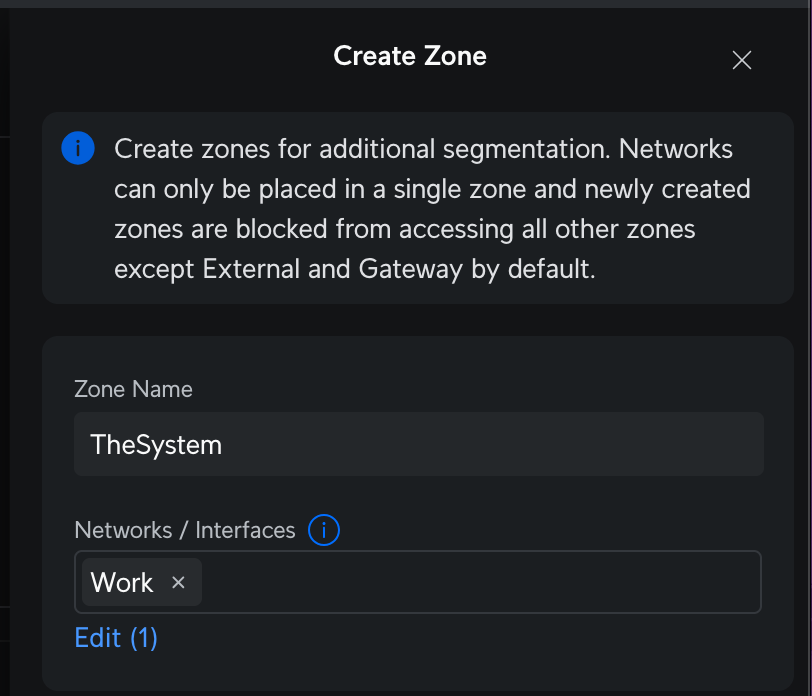
This is a nice option if on UniFi, which makes configuring polices a bit more straightforward and offers automatic isolation from your Internal zone by default.
Add a new Wifi Network (SSID)
I create a new network and ensure that my VLAN Work is set as the default network. This ensures that any device connected to this WiFi is on the Work network. Settings -> WiFi -> Create New
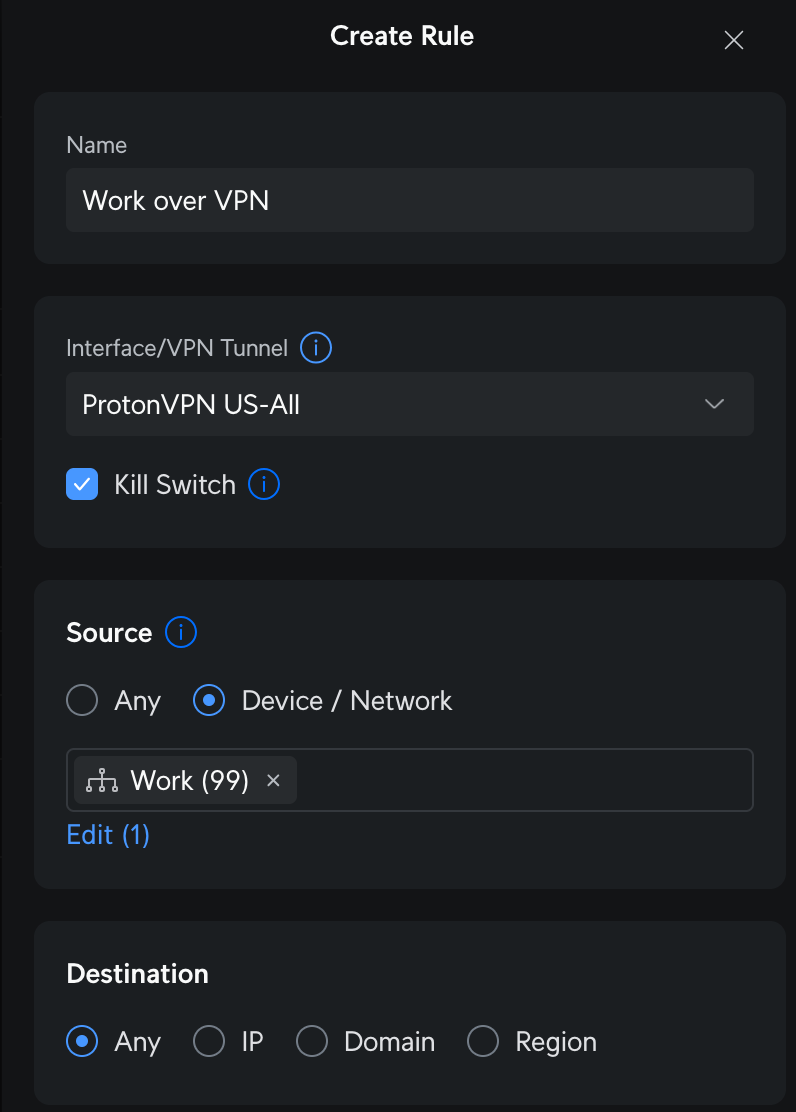
This will add an additional layer of privacy and security. This may cause issues if your work device is using another VPN; if so, skip or disable the policy. Settings -> Policy Engine -> Policy based routes
That's it for your basic network setup. Any device that is on this new network will automatically be isolated. From here, you can create more advanced policies as you get more comfortable. For example, you might restrict this WiFi and network to your work device only, or create policies that block your work device from connecting to your other home WiFi network. Policies are a powerful way to control what happens on your network, and I encourage you to learn how to leverage them.
Configure your work laptop to use your new network
There are a few things to consider here, and it may depend on the type of computer you have. I'll break down both WiFi and wired connections (for dock users) for Mac and Windows to cover the basics.
WiFi Configuration
This is the easy one; simply connect to your new SSID, which will automatically route all traffic to your new VLAN. However, there are a few more things you should consider. When logged into a Mac with your iCloud account or a Windows computer with your work and/or personal Outlook/Office 365 account, it will save your network settings. This means your laptop may unintentionally connect back to your home WiFi. Here are some steps to check off to ensure that doesn't happen.
Mac
Don't log in with your personal iCloud account on your work laptop. Now, I do this for Notes, Contacts, etc, and you may too. iCloud is very aggressive about switching network settings to "help". If you don't, you're good. I would still recommend following the steps below for good measure.
OR
Log in with your personal iCloud account, or use an iCloud account associated with your work email. This feature saves all network connection credentials across devices and automatically connects to the first available one. Great for personal devices, but we don't want this for our work laptop.
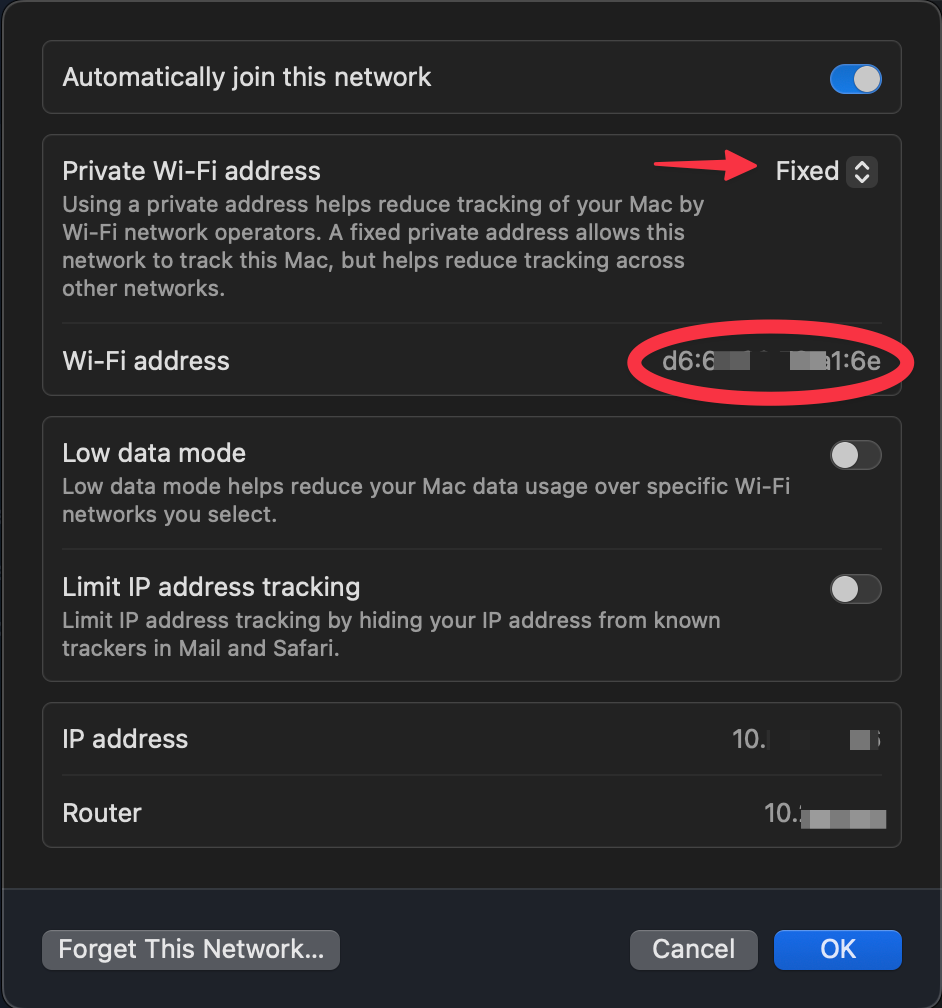
If you're able, turn off Private WiFi Address on your new SSID Settings -> Network -> WiFi -> ... Network Settings This allows us to consistently identify this device when connected to our network.
- Change Private Wi-Fi address to Fixed.
- Copy the Wi-Fi address (a.k.a. MAC Address)
Windows
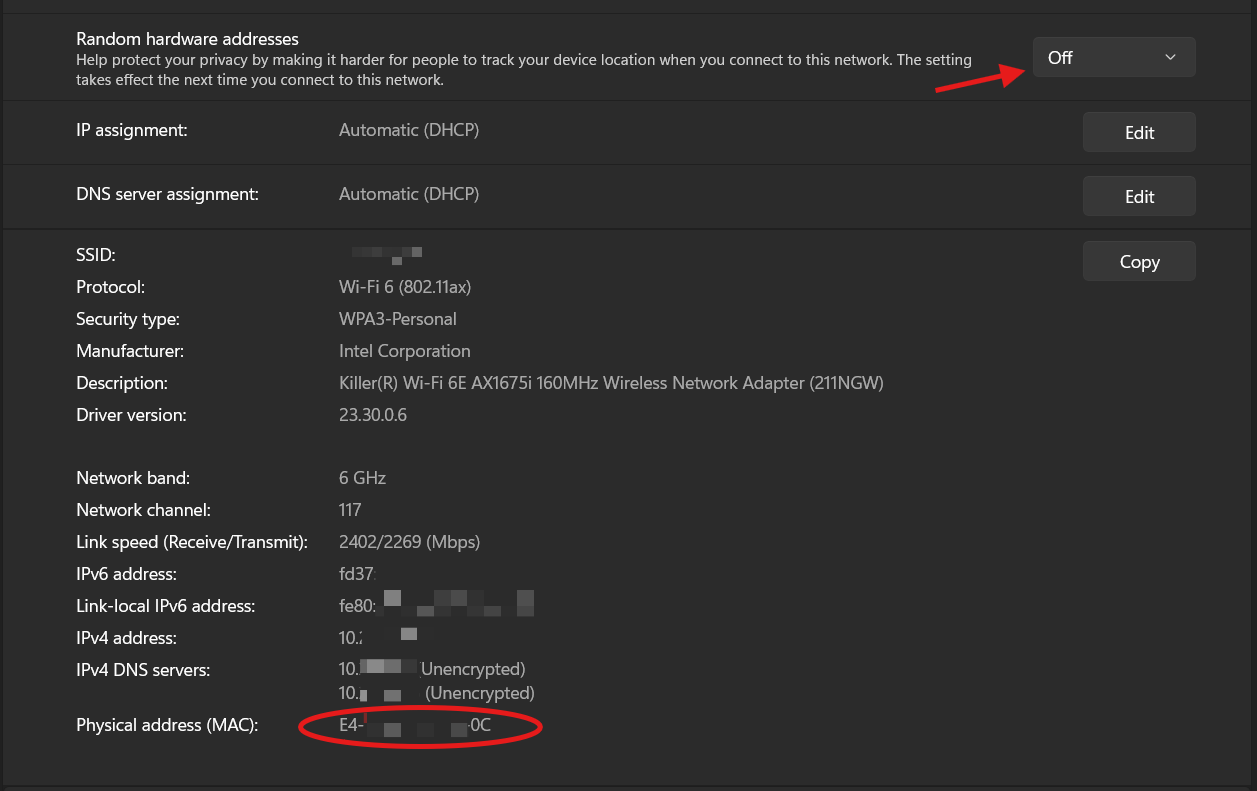
Similar to Mac's private Wi-Fi address, you should turn off Random hardware addresses in Network & Internet -Wi-Fi -> Work SSID
- Turn off Random hardware addresses
- Copy the Physical address (MAC)
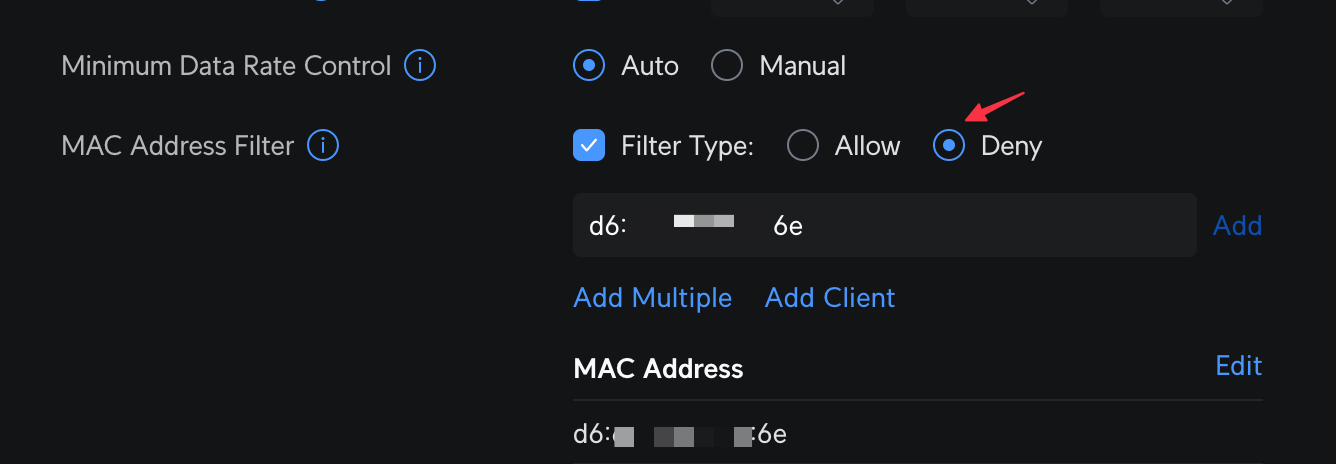
Optional: Exclude your MAC address from your home WiFi
If you made those changes and your MAC is now fixed, this is a sure-fire way to make sure you are never connected to your home WiFi.
- Go to your WiFi settings on your router for your home network and exclude your work MAC address. Even if your laptop tries to switch, your router will deny the connection; Work WiFi, or nothing.
Wired Configuration
I always prefer to hardwire if I have the option. It's faster and more reliable. To ensure proper isolation on a wired connection, you will need to either be directly connected to an available switch port on your router or to a managed switch that is connected to your router. Because we are using VLANS, you may need to adjust the settings on the port of your switch you are connecting to, or the port you are connected to must be configured to forward tagged network traffic. This is very easy to do on most managed switches; I'll be showing UniFi, but the same settings will apply to others.
Dedicated port
The easiest way to configure this is to dedicate a port on our router or switch to this new VLAN you created. When configured for that VLAN, any device you connect via Ethernet to that port will automatically be on that virtual network.
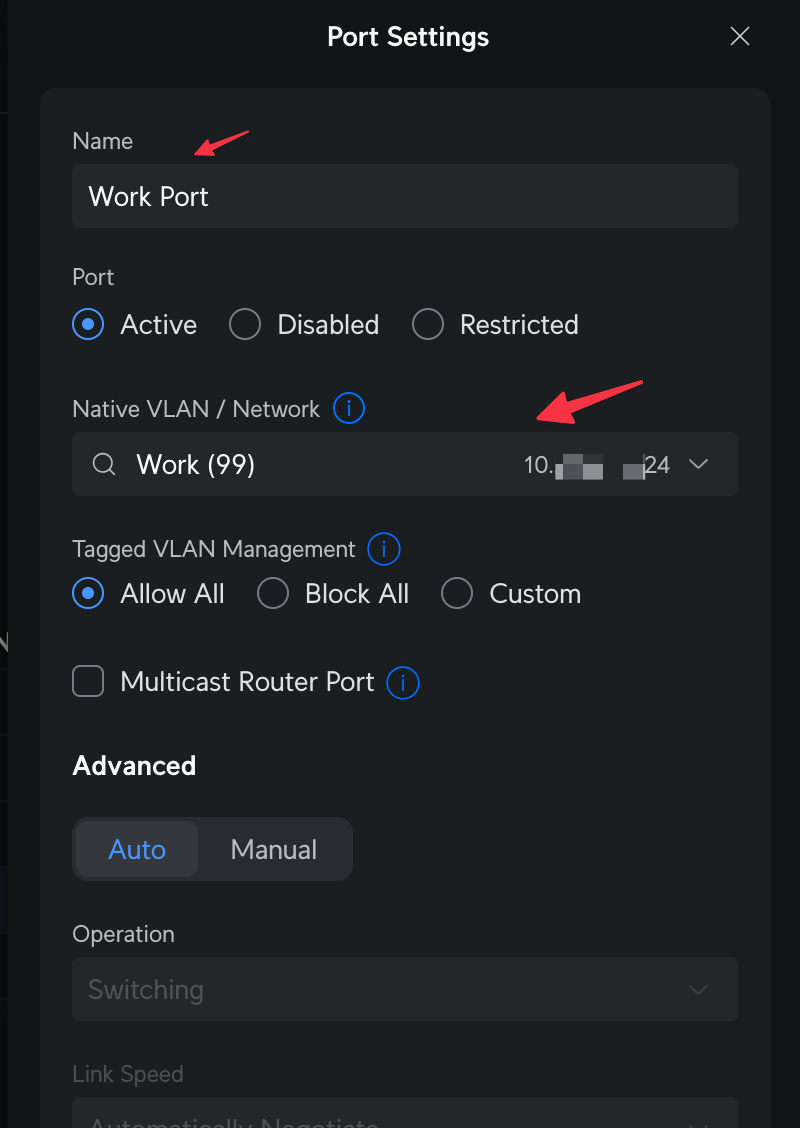
- Find the port your laptop or dock is connected to. In UniFi, this is
Port Manager -> Select Port - Change the name of the port (optional, but helpful)
- In the Native VLAN dropdown, select your new Work network
Same dock, different network
I'll offer some more advanced configurations for those that may have elevated permissions on their work laptop or perhaps share a dock and display, and want to swap between work and personal laptops on the same setup (this is what I do)
You may not be able to change your network settings on your work computer, and even if you can, it's not necessary. You just need to change the settings on your personal computer. If you see in the screenshot above, while we made the default VLAN 'Work', we still have Allow All for other tagged VLANS. That means if your laptop is 'tagged' for your home network, then when you dock your personal laptop, it will be on your home network without changing anything on your work laptop, router, or switch.
Mac Configuration
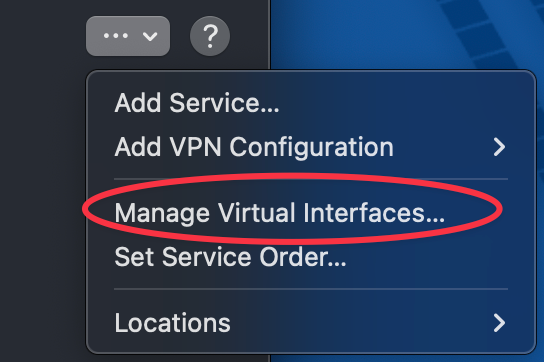
- Network Settings -> Manage Virtual Interfaces
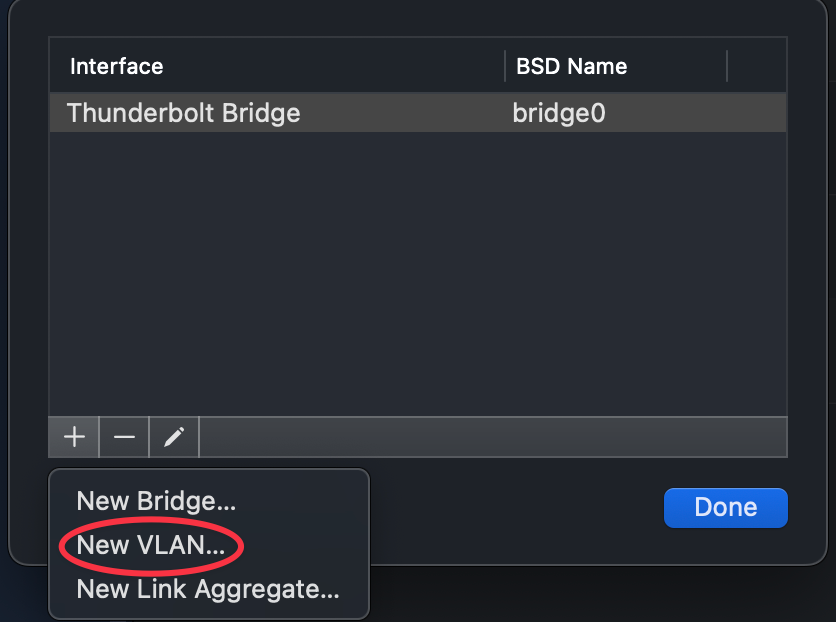
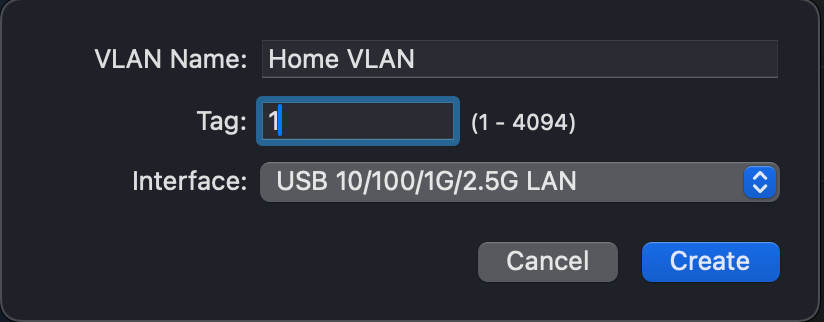
- ➕ New VLAN
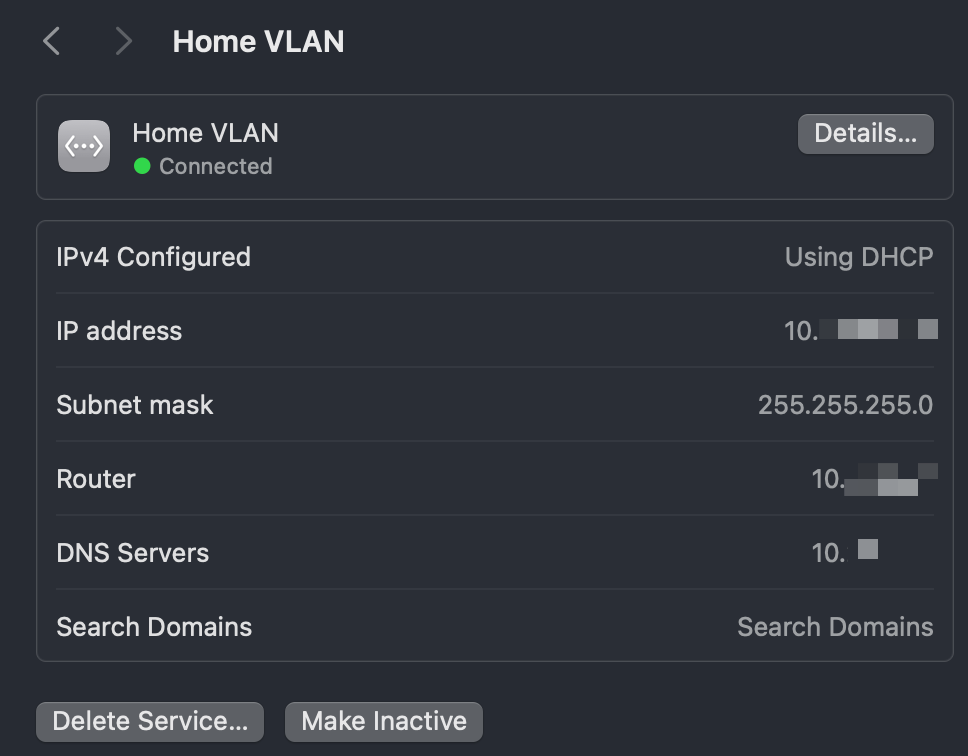
- Name it "Home VLAN", Tag should match the tag you set up in one of the very first setups for your VLAN on your router, mine is
1, which is a common default. - The interface should be your Ethernet interface; mine is my dock, showing as
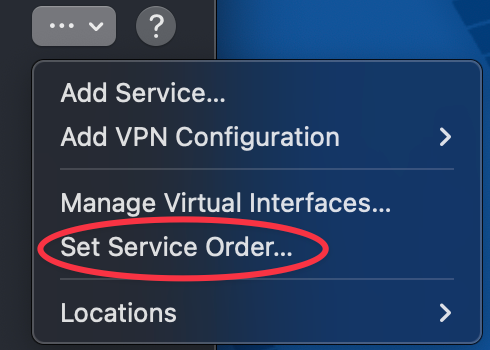
USB 10/100/1G/2.5G LAN - Now set your service order, and move Home VLAN to the top.
Windows
Here, we'll just use the existing adapter and tag the traffic to your home network.
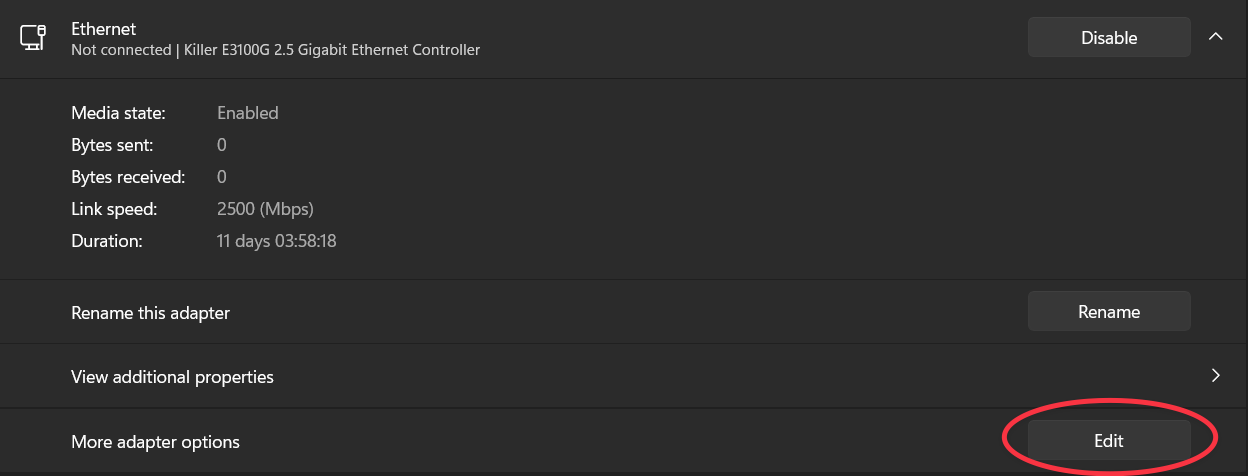
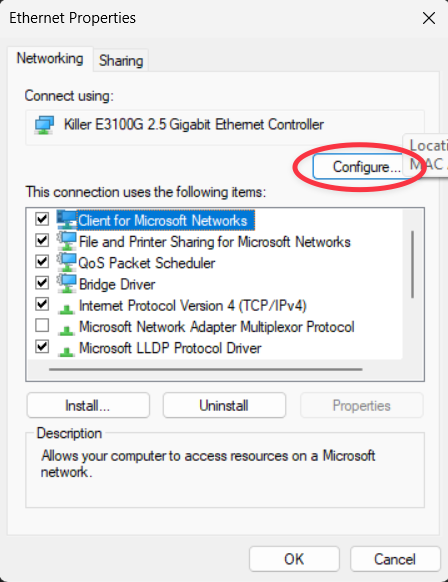
- Network & Internet -> Ethernet -> More adapter options
- This will bring up the old control panel, because Windows.
- Select Client for Microsoft Networks, then the Configure button
- Advanced tab, scroll to VLAN ID, change the value to 1 (or your home network tag)
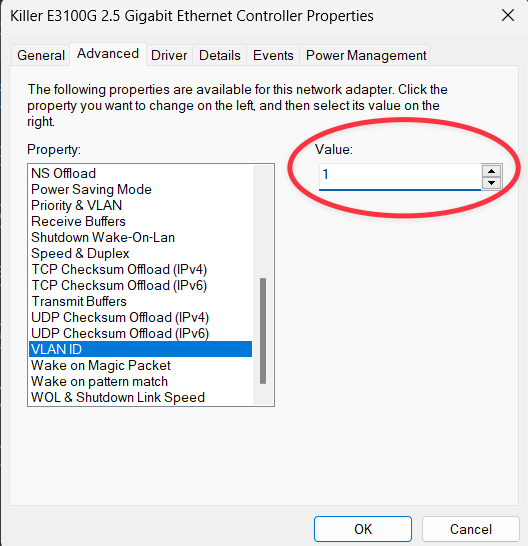
There may be other ways to do this in Windows, but this was the most direct way I could find. Once changed, your computer will request an IP from your home network instead of being on your new Work network.
Wrap up
Pretty painless, right? Now your work computer has its little corner of your home network, complete with unrestricted internet access. Great way to boost your privacy without compromising work security - everyone wins! Let me know how your setup goes.
You can use these same techniques to isolate other smart home devices. To get a more comprehensive breakdown of how you might approach that, check out my homelab guide below.