Use Kudu webhooks with Mobile Services for easy deployment notifications
Kudu is all around great tool if you're using Azure Websites. It will not only build and deploy your code from git, but it also provides a lesser-known web interface available on every azure website

Kudu is all around great tool if you're using Azure Websites. It will not only build and deploy your code from git, but it also provides a lesser-known web interface available on every azure website. Go to https://{mysitename}.scm.azurewebsites.net, and you'll drop into the Kudu web interface for your site. You'll find all helpful information here, including the handy Debug console and, more to the point of this post, Webhooks. In their current iteration, you can subscribe to the PostDeployment event by providing a POST endpoint URL to receive and process the JSON payload from Kudu. This will fire every time an automatic or manually triggered deployment is completed for your site. For me, this hook was the final piece to making a Kudu deployment a first-class part of my team's workflow. Meaning that I can now gather the necessary feedback to make building and deploying via Kudu just as viable as using my infrastructure-hosted CI servers. Not that it isn't helpful on its own, but unless my team and I know when the build has succeeded or failed using the same messaging as the rest of our systems...then it's not as valuable to me for production code. So if my TeamCity and Bamboo CI servers post messages to my HipChat room, then I need my Kudu deployments to do the same.
What better way to do that than to leverage more "free" Azure platform services to get the job done. Mobile Services provides a straightforward and fast way to build a custom API to do exactly what I need. After all, I just need a single web endpoint that can accept a public POST request. Once received, I need to parse the payload and send a message to my HipChat room. Easy stuff, given that HipChat is quite popular and has many client libraries for both Node and .NET, both of which are supported in mobile services. In this case, though, I opted for a Node backend. This allowed me to quickly build out my function in the Azure web portal and leverage one of the many HipChat client libs available on NPM.
Step 1 - Build your mobile service custom API
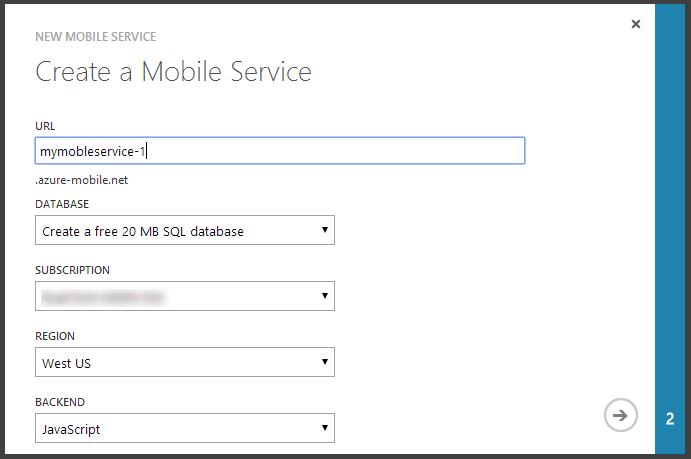
Create a new mobile service with a free database and a JavaScript backend in the Azure management portal.

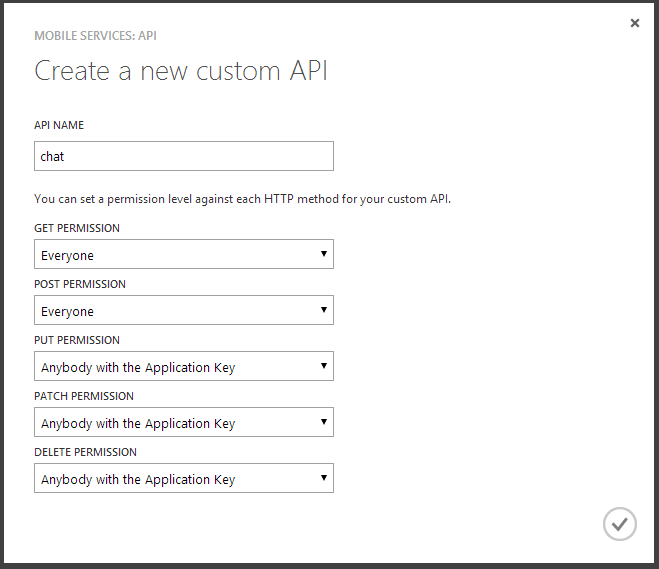
Navigate to the API tab and create a custom API called "chat" (or any name you want in your route). Also, ensure that the POST PERMISSION dropdown on the create window is set to "Everyone."

Now before adding the necessary functionality to the exports.post function of your new custom API, you'll want to clone your mobile repository service locally so that you can add any NPM module dependencies. You'll find the clone URL on the configuration tab, and you'll need your deployment credentials handy to complete the clone to your desktop. Once cloned, you'll see a package.json file in the root of your repository; this is where you can add your dependencies, install them, and commit them to your repository for use in your API. For my needs, I installed the node-hipchat package on npm via the command prompt npm install node-hipchat --save .The --save parameter will automatically add the dependency to your package.json file for you. Finally, commit and push your changes back.
Now that I've got the necessary dependencies pushed back to my mobile service, I'm ready to build out my function.
I'm simply using the data provided in the post body by the PostDeployment Kudu event and building out the message I want to display in my chat room when the deployment is complete. I don't need a lot of info in my case, but if you want to, the commit message, build times, etc., are also available (shown below).
Step 2 - Subscribe to the PostDeployment event for your website
Navigate to Kudu https://mysitename.scm.azurewebsites.net and go to Tools => Webhooks

Paste in your mobile service custom API endpoint, which should look like this: https://mymobileservice-1.azure-mobile.net/api/chat . Once you see your API in the grid, then you are all set.
Step 3 - Trigger a git deployment
You can manually trigger your deployment on your site's Deployments tab by selecting Redeploy on your latest commit or doing a fresh commit to your monitored branch.


All said and done; it was a pretty easy way to get the necessary feedback into my team's workflow. No VS projects or private repos to worry about; just leveraging what's already there on Azure to get the job done quickly. And though my needs were simple in this case, you could just as easily send a push notification or an email in that same method with just a few extra lines of code. If you haven't given mobile services a good look, I highly suggest you dive in and check it out yourself.


