Highly available Pi-hole setup with secure DNS queries to Cloudflare
Forget the Adblock browser extension. It's time to level up your home network to block unwanted ads and trackers across all of your devices. Pi-hole is an open-source project that has been around for a while and makes this dead simple.


Forget the Adblock browser extension. It's time to level up your home network to block unwanted ads and trackers across your devices. Pi-hole is an open-source project that has been around for a while and makes this dead simple. It's easy to install, fast, and has a handy web interface that gives you a detailed insight into device activity on your network. If you can run commands in a terminal, then you can be tracker-free in no time.
You can install Pi-hole on any computer you have available. In my setup, I'm running my primary Pi-hole server on a Raspberry Pi 4 and my secondary on a virtual machine. Both running Ubuntu 20.04 Focal, arm64, and amd64, respectively. The primary consideration is that each instance is on a separate physical machine.
There are many initial setup guides, so I won't go into that here. I would start with the Official guide on Installing Pi-hole, which should have you up and running in minutes.
curl -sSL https://install.pi-hole.net | sudo bash
Enhance your privacy
Since Pi-hole will be your DNS destination, you have a few options on how it performs your DNS lookups. In the standard Pi-hole setup, you enable a pre-configure forwarder, including the most popular public DNS servers like Google's 8.8.8.8 and Cloudflare's 1.1.1.1...or if you want some parental controls, you can also enable filtered DNS through OpenDNS. Easy, fast, and you are now ad-free. You are not free of your ISP, Google, and others logging and, in many cases, selling your DNS query data. The good news is that you can enhance your privacy here, but there are some potential trade-offs.
INSTALL A DNS SERVER ALONGSIDE YOUR PI-HOLE
Instead of Pi-hole blocking and forwarding to public DNS providers, you can install your own recursive DNS server. Essentially doing the same work that a public DNS server would do, it all happens locally on your server. This method will enhance your privacy, but it will also be noticeably slower, especially at first. Over time, queries will respond faster as your DNS server caches similar requests. It's also important to note that most DNS queries your server makes will not be DNS over HTTPS, aka DoH, and will be sent in plain text. In terms of privacy, while not encrypted, I would still consider this an excellent way to obfuscate the sites you are visiting. The Pi-hole documentation is ideal if you are interested in trying this out.
ENCRYPT YOUR DNS QUERIES WITH CLOUDFLARED (ARGO)
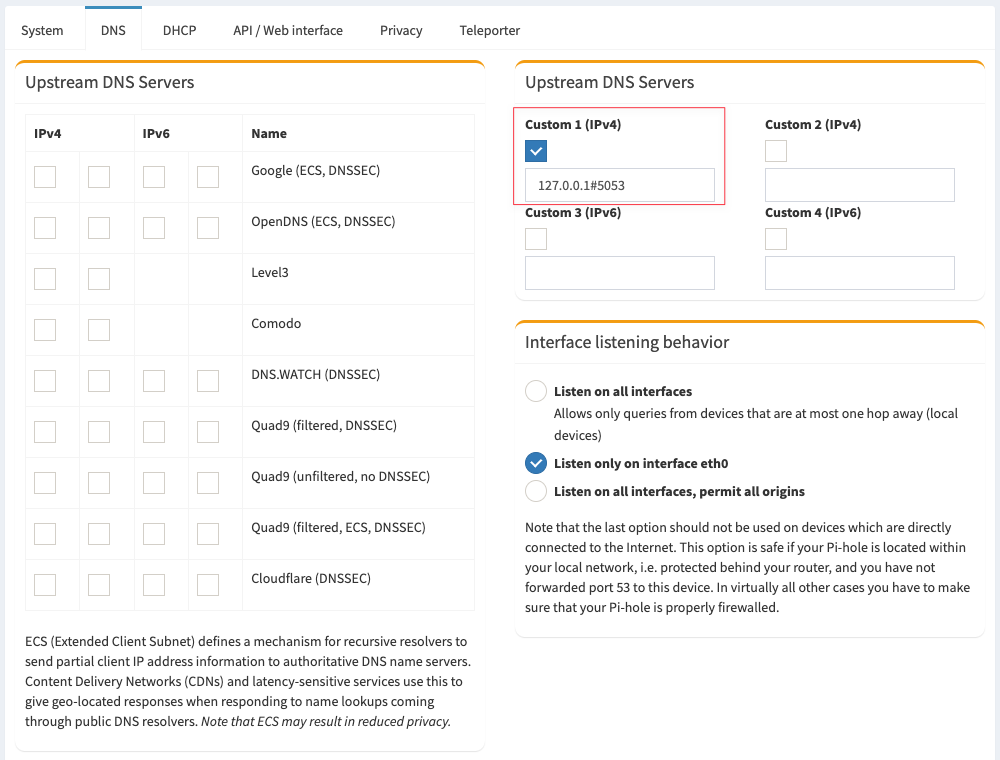
In terms of privacy, Cloudflare should be a top choice. Not only are they transparent in their privacy policy on what they collect and ultimately do with your data, they also provide a convenient and free way to proxy all of your DNS traffic to them over HTTPS! Now I realize this is still a 3rd party; however, this is my preference as I'm more concerned with the privacy policies of my ISP (or lack thereof) than I am with Cloudflare. With cloudflared, all DNS traffic is just HTTPS traffic to Cloudflare, making it difficult for your ISP to see what you are browsing. The Pi-hole documentation is excellent if you are interested in trying this out.
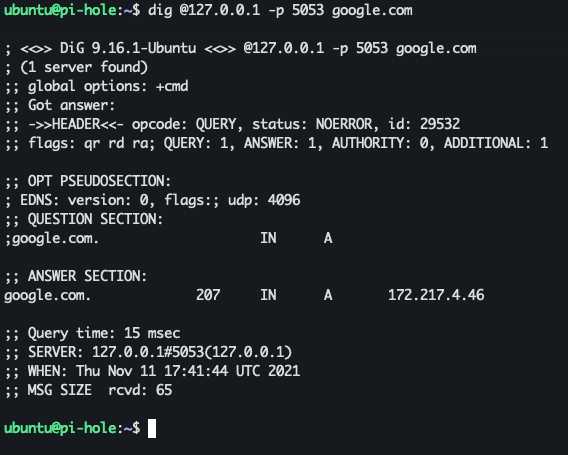
Once you've tested that your tunnel is up and running, your Upstream DNS server settings should be using Custom and pointing to 127.0.0.1#5053
Update 1/1/2023 - New Method
As of Cloudflared release 2022.12.1, the previous method for installing Cloudflared as a DoH proxy service no longer works...or at least it didn't for me. Moving forward, leverage the new method published by Cloudflare here.
tldr; adjust your service config:
Legacy method, for versions < 2022.12.1
The one addition I'll add here that may be more convenient than the cron method of updating outlined in the above doc, is having cloudflared update itself. After you install the service, edit /etc/systemd/system/cloudflared.service and add the --autoupdate-freq flag
sudo nano /etc/systemd/system/cloudflared.service
Your config should look something like this:
Sync settings between primary and secondary
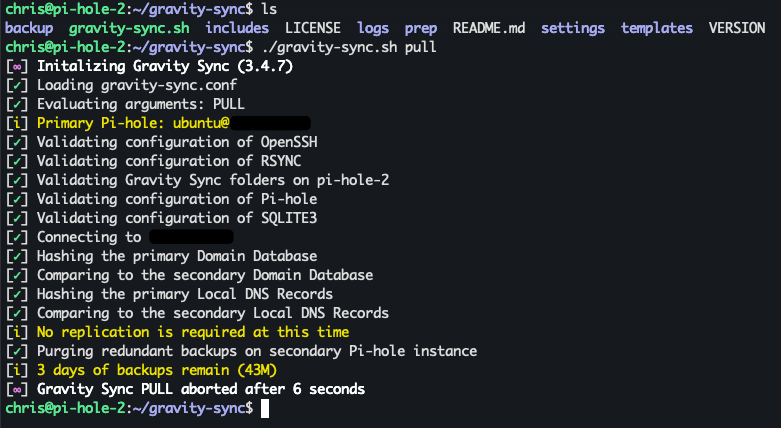
I chose to keep things simple and pull down the config from my primary server every 15 minutes on a cron; however, there are many more options to suit your setup better. An excellent open-source project called gravity-sync will allow you to synchronize your local DNS, Blocklist settings, allowlist, and denylist between your two (or more) instances. There are also some excellent write-ups and a few YouTube videos covering this in greater detail, which I'll link below.
Check the latest documentation for updates.
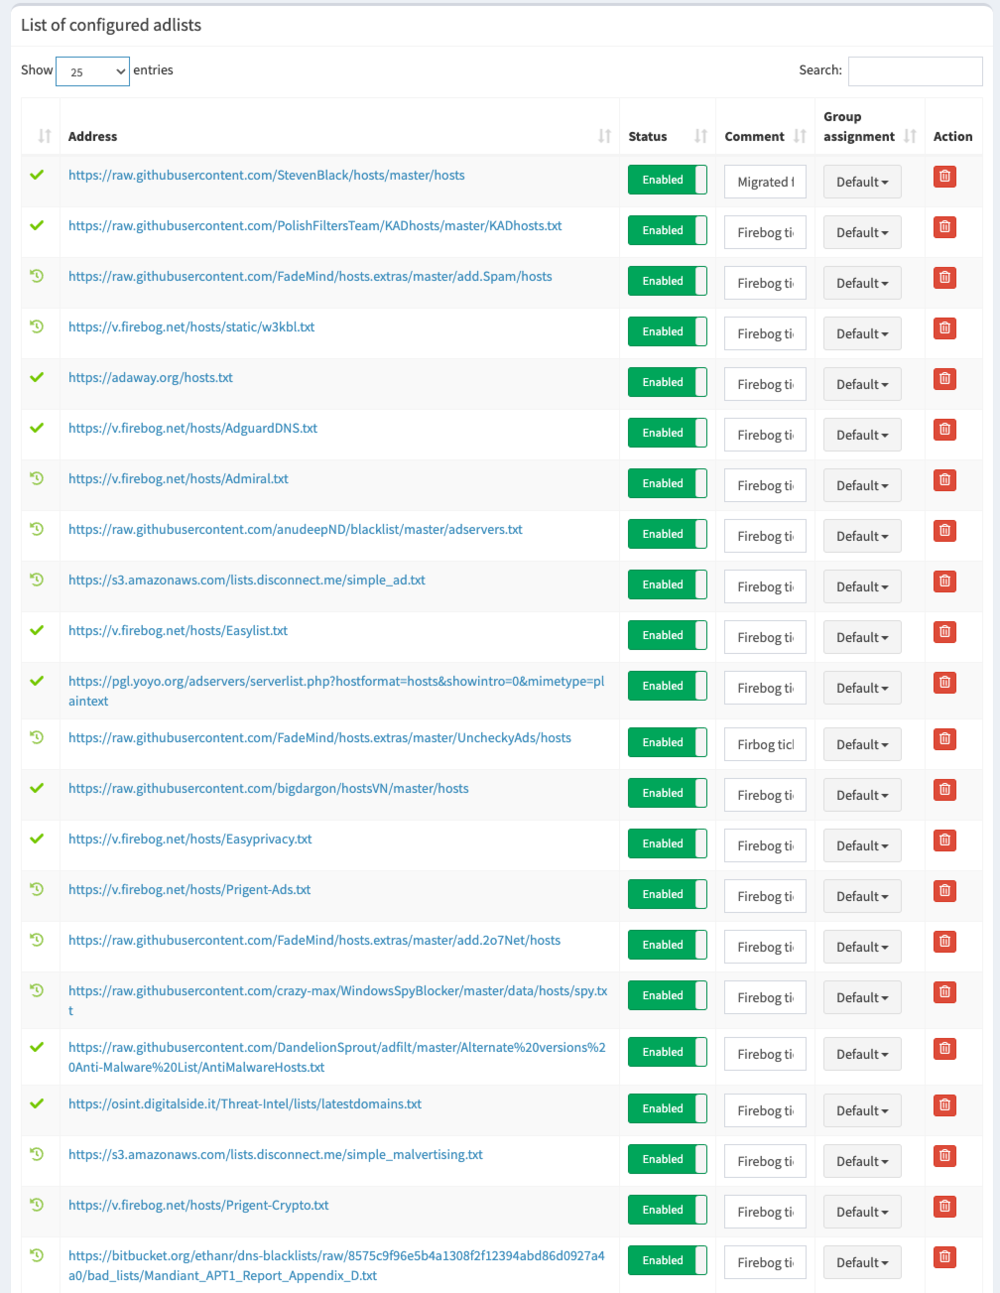
Add known blocklists to improve Pi-hole's effectiveness
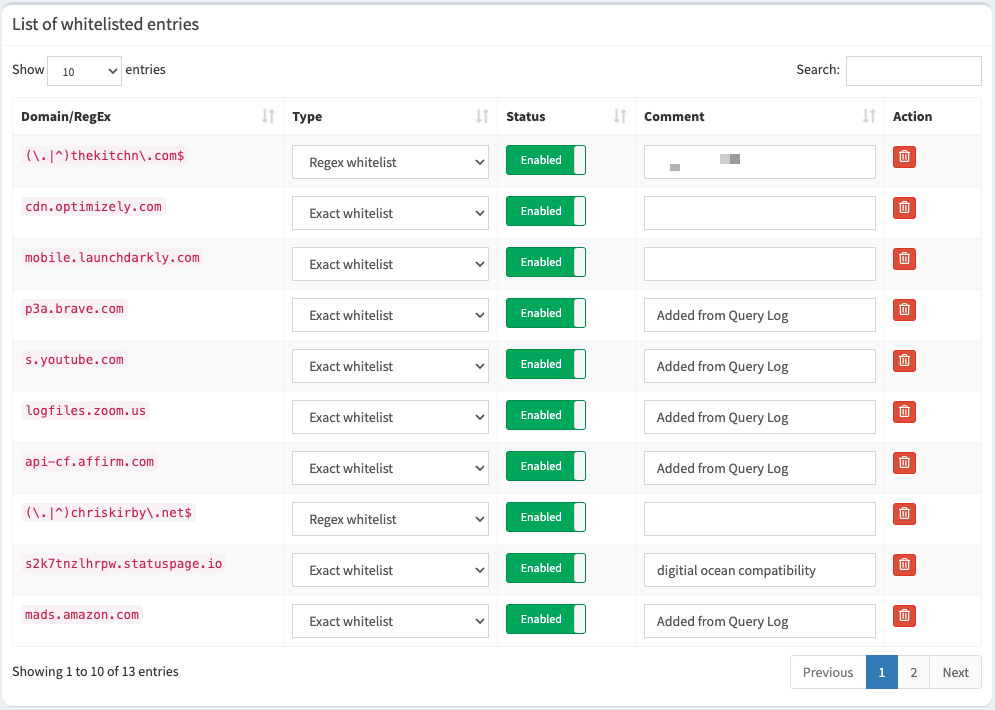
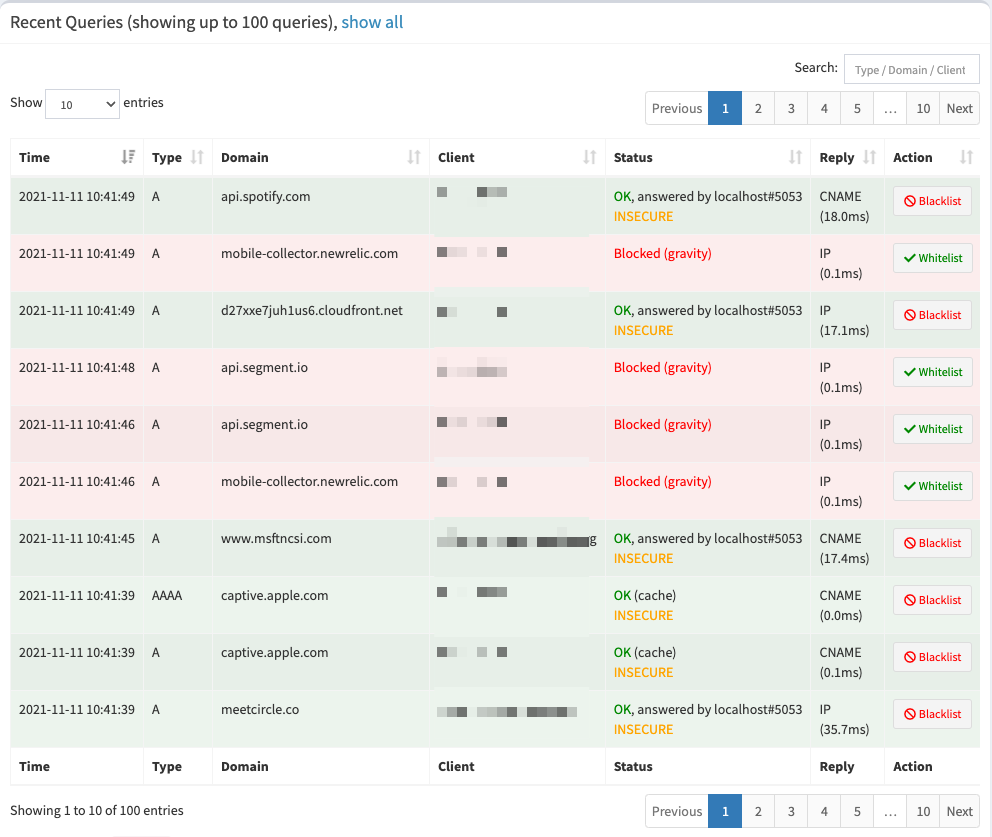
Fortunately, several curated and frequently updated lists will cover most of what you want to block without blocking the things you do. There will be exceptions to this based on how many lists you add; you'll have to decide if you need to click that email link or if you find ads in the Amazon app to be valid; if so, use the Pi-hole query log browser and add those exceptions to your allowlist. Those lists with the green checkmark should be the safest way to start.
Update your DHCP server to use Pi-hole
The last and most crucial part of your setup is configuring all of the devices on your network to use Pi-hole as their DNS server. If you've chosen to add multiple servers, which if you've gotten this far, you should have :), then you'll want to add both local IP Addresses to your DHCP custom nameserver settings. By default, most routers will either give clients their IP, for example: 192.168.1.1 to all DHCP clients, or they will pass your ISP's DNS servers. Moving forward, you'll manually add your new Pi-hole server IP Addresses instead. Let's say our primary is 192.168.1.5 and our secondary is 192.168.1.6. Once changed, devices will request a new lease over time, or you can reboot your router to speed things along. This is not proper failover; however, if one of these servers goes down, DNS will continue to work. Clients typically use the primary most often, but it will automatically try to use the secondary when it's not responding. Either way, you can unplug stuff without getting the "Is something up with the internet?". Finally, don't forget the devices you've set up with a static IP! If you want proper failover, see the article references below.
Useful tips and hacks
Here are some valuable things I've found that may help you with your setup.
INCREASE PHP SCRIPT MEMORY TO VIEW EXTENSIVE LOG REPORTS
If you have a lot of devices like me, that means you have even more DNS queries. I have Pi-hole configured to log all of my queries, which it keeps in a local SQL database on your device. Depending on the range and options you select in the long-term data query report, this can consume more memory in PHP than is required to render the information. To add more headroom here, you'll need to increase how much memory you allocate to PHP by modifying the php.ini file.
# edit the php.ini file (path is version dependent)
sudo nano /etc/php/7.4/cgi/php.ini
; Maximum amount of memory a script may consume (128MB)
; http://php.net/memory-limit
memory_limit = 1024M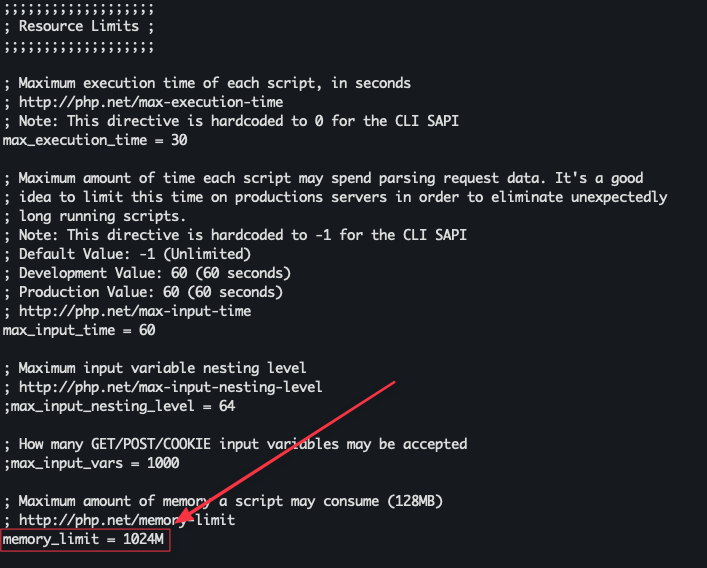
LOG TO MEMORY ON RASPBERRY PI
Save your SD card by keeping your live log in memory, flushing to disk at regular intervals. Log2Ram is an excellent open-source project that will do just that. I'm currently using this on my Raspberry Pi node. You may have to adjust some of the settings based on the size of your log files; otherwise, the default setup will work in most cases.
USE YOUR PI-HOLE DNS ON THE GO
Now that you have highly available ad-blocking local DNS servers, why not use them when you're away from your home network? Combining this setup with Cloudflare Zero Trust has worked well for me and might also be the ideal solution for you. Check out my post Replace your Homelab VPN with Cloudflare Zero Trust
Videos and articles that inspired my setup
High Availability Pi-Hole? Yes please!
You're running Pi-Hole wrong! Setting up your own Recursive DNS Server!
Set up Pi-hole in a failover configuration
Updated 1/12/2023